
8PhotoNonInverting
The circuit described is a visible and infrared light detector circuit board featuring eight detectors. The active components of this circuit are LM339 voltage comparators. These detectors can be integrated into other light detection circuits available on this site, including various Light Activated Detector Circuits. For phototransistors, a resistor value of 470K ohms is generally suitable for typical room lighting conditions. In low-light situations, a higher resistor value, such as 1 Megohm, may enhance sensitivity. The High Impedance Test Voltmeter circuit can also be employed for testing phototransistor installations. For CdS photocells, it is advisable to install the cell first and measure its resistance under normal lighting conditions. A resistor value three to five times the measured resistance of the cell should then be selected for R1. A 1K ohm resistor will permit approximately 10 milliamps to flow through a standard LED when the supply voltage is 12 volts. The resistor values at the comparator outputs can be modified based on the desired current through the LEDs. The circuit diagram illustrates a printed circuit board with eight independent photo-detectors featuring open collector outputs capable of sinking up to 15 milliamps each. All comparators on the PCB are configured such that exposure of the photosensors to light results in a LOW output from the comparators, thereby turning the LEDs ON. The detection voltage level for the circuit is set at half of the supply voltage. If a different detection level voltage is required, the values of resistors R9/R10 and R19/R20 can be adjusted accordingly. This circuit does not require a regulated power supply and can function with supply voltages up to 32 volts. For additional information on voltage comparators, refer to the Voltage Comparator Information page available on this site. The 1K output resistors can be replaced with jumper wires if not necessary, such as when interfacing with control signals that have their own current limiting resistors. Caution is advised, as reversing the polarity of the power supply or connecting the circuit to an AC or DCC source may cause damage. The maximum supply voltage for this circuit is 15 volts. The provided diagram can be printed in the center of a sheet of paper for recording wiring connections during installation of the circuit, sensors, and LEDs, offering a more user-friendly reference than the actual schematic. A typical installation circuit utilizing phototransistors and LEDs is also depicted. Multiconductor cables may be used to maintain organized wiring runs, particularly as sensors and indicators are likely to be grouped locally. The assembled circuit board measures 2 inches by 3 inches and is designed to fit DigiKey parts ED1601 (2 position) and ED1602 (3 position) terminal blocks. The INPUTs of the detectors are positioned on the left, while the OUTPUTs are located on the right side of the board. As shown in the complete circuit schematic, the INPUTs and OUTPUTs of the detectors are aligned directly across from one another on the board. A parts list for the 8-Photo-Detector circuit board is provided, with resistor values adjustable to meet user requirements. T42-1 Push-In Terminals can replace terminal blocks to reduce costs if desired, with the DigiKey part number for the T42-1 Terminals being V1069-ND. To minimize current requirements, LEDs can be wired in series so that four LEDs draw the same current as a single LED, resulting in approximately 8 milliamps in the example provided. Infrared light, which is invisible to the human eye, can be viewed using a digital camera without an IR blocking filter on the lens. When assembling the components on the circuit board, it is recommended to start with the lowest profile parts and progress to the taller components.
The light detector circuit board is designed for versatility and adaptability in various applications, including security systems, automation, and environmental monitoring. Each of the eight detectors operates independently, allowing for simultaneous detection across multiple points. The use of LM339 voltage comparators ensures reliable performance, as they provide a stable reference for detecting light levels.
The open collector outputs of the detectors allow for easy interfacing with other electronic components. This feature is particularly useful when integrating the circuit into larger systems where the output signals may need to trigger other devices or indicators. The ability to adjust the resistor values at the outputs enables customization of the current flow to the LEDs, accommodating different lighting conditions and user preferences.
The circuit's design is robust, with a maximum supply voltage of 32 volts, making it suitable for various power sources. However, caution must be exercised to prevent damage from incorrect polarity or excessive voltage. The layout of the circuit board facilitates straightforward installation, and the use of multiconductor cables promotes tidy wiring, which is essential for maintaining the integrity of the system.
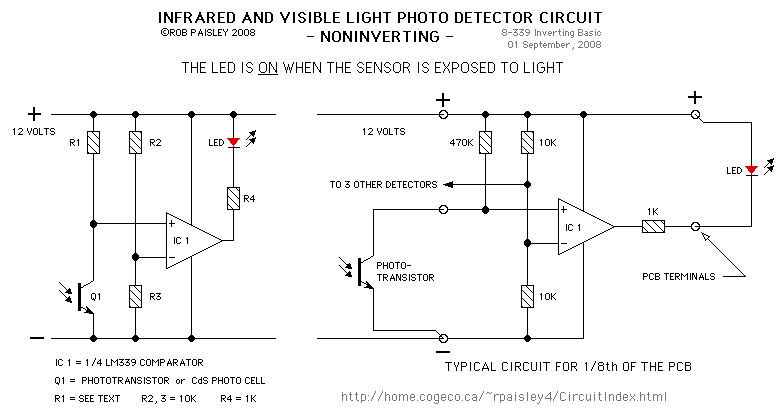
Overall, this light detector circuit board represents a practical solution for applications requiring light detection, offering flexibility in component selection and configuration to meet specific operational needs.The circuit on this page is for a visible and infrared light detector circuitboard that has 8 detectors. LM339 voltage comparators are the active element. These detectors can be used as part of other light detector circuits shown on other pages at this site such as these Light Activated Detector Circuits at this site.
For phototransistors a valu e of 470K ohms will work for most room light situations. If the light is dim, selecting a higher value resistor such as 1Megohm will give better sensitivity. This High Impedance Test Voltmeter circuit can also be used for testing phototransistors installations. For CdS photocells it is usually best to install the cell and then measure its resistance under the normal lighting conditions.
A resistor with a value that is 3 to 5 times the measured resistance of the cell is then selected for R1. A 1K ohm resistor will allow about 10 milliamps to flow through a typical LED if the supply voltage is 12 volts.
The value of the resistors at the outputs of the comparators can changed depending on the desired current through the LEDs. The following diagram shows the circuit that is on the printed circuit board. There are 8 independent photo-detectors with open collector outputs that can sink up to 15 milliamps each.
All of the comparators on the PCB are wired so that when the photosensors are exposed to light, the output of the comparators will be LOW and the LEDs will be ON. The detection voltage level for the circuit as shown is set at 1/2 of the supply voltage. If a lower or higher detection level voltage is needed, the values of resistors R9 / R10 and R19 / R20 can be adjusted.
This circuit does not need a regulated power supply and can operate on supply voltages of up to 32 volts. For more general information on Voltage Comparators please see the Voltage Comparator Information page at this site.
The 1K output resistors can be replaced by jumper wires if they are not needed such as for inputs to control or signals circuits that have their own current limiting resistors. WARNING - If the polarity of the power supply for this circuit is reversed or the circuit is connected to an AC or DCC source this circuit will be damaged.
The maximum supply voltage for this circuit is 15 Volts. The diagram above can be printed in the center of a sheet of paper then and used to record wiring connections when installing the circuit, sensors and LEDs. This diagram will be easier to use than the actual schematic for the circuitboard. The following schematic is for a typical installation circuit using phototransistors and LEDs. Multiconductor cable can be used to keep the wiring runs neat as sensors and indicators are likely to used in localized groups.
The following photo is of an assembled example of the circuit board which is 2 inches by 3 inches and is drilled to fit DigiKey part ED1601 - 2 position and ED1602 - 3 position terminal blocks. The INPUTs of the detectors are on the left and the OUTPUTs are on the right side of the picture. As in the full circuit schematic, the INPUTs and OUTPUTs of the detectors are directly across from each other on the circuitboard.
The following is a parts list for a typical parts list for use with the 8 - Photo-Detector circuit board. The values of the resistors can be changed to suit the needs of the user. T42-1 Push-In Terminals can be substituted for the terminal blocks to reduce costs if desired. The DigiKey part number for the T42-1 Terminals is V1069-ND. To reduce the current require, the LEDs can be wired in series so that four LEDs use the same amount of current as one LED.
In the example shown, approximately 8 milliamps. Infrared light is not visible to the naked eye, however, a digital camera can be used to view the IR light if it does not have an IR blocking filter on the lens. When installing the components on the circuit board start with parts with the lowest height and work up to the tallest parts.
Fo 🔗 External reference
The light detector circuit board is designed for versatility and adaptability in various applications, including security systems, automation, and environmental monitoring. Each of the eight detectors operates independently, allowing for simultaneous detection across multiple points. The use of LM339 voltage comparators ensures reliable performance, as they provide a stable reference for detecting light levels.
The open collector outputs of the detectors allow for easy interfacing with other electronic components. This feature is particularly useful when integrating the circuit into larger systems where the output signals may need to trigger other devices or indicators. The ability to adjust the resistor values at the outputs enables customization of the current flow to the LEDs, accommodating different lighting conditions and user preferences.
The circuit's design is robust, with a maximum supply voltage of 32 volts, making it suitable for various power sources. However, caution must be exercised to prevent damage from incorrect polarity or excessive voltage. The layout of the circuit board facilitates straightforward installation, and the use of multiconductor cables promotes tidy wiring, which is essential for maintaining the integrity of the system.
Overall, this light detector circuit board represents a practical solution for applications requiring light detection, offering flexibility in component selection and configuration to meet specific operational needs.The circuit on this page is for a visible and infrared light detector circuitboard that has 8 detectors. LM339 voltage comparators are the active element. These detectors can be used as part of other light detector circuits shown on other pages at this site such as these Light Activated Detector Circuits at this site.
For phototransistors a valu e of 470K ohms will work for most room light situations. If the light is dim, selecting a higher value resistor such as 1Megohm will give better sensitivity. This High Impedance Test Voltmeter circuit can also be used for testing phototransistors installations. For CdS photocells it is usually best to install the cell and then measure its resistance under the normal lighting conditions.
A resistor with a value that is 3 to 5 times the measured resistance of the cell is then selected for R1. A 1K ohm resistor will allow about 10 milliamps to flow through a typical LED if the supply voltage is 12 volts.
The value of the resistors at the outputs of the comparators can changed depending on the desired current through the LEDs. The following diagram shows the circuit that is on the printed circuit board. There are 8 independent photo-detectors with open collector outputs that can sink up to 15 milliamps each.
All of the comparators on the PCB are wired so that when the photosensors are exposed to light, the output of the comparators will be LOW and the LEDs will be ON. The detection voltage level for the circuit as shown is set at 1/2 of the supply voltage. If a lower or higher detection level voltage is needed, the values of resistors R9 / R10 and R19 / R20 can be adjusted.
This circuit does not need a regulated power supply and can operate on supply voltages of up to 32 volts. For more general information on Voltage Comparators please see the Voltage Comparator Information page at this site.
The 1K output resistors can be replaced by jumper wires if they are not needed such as for inputs to control or signals circuits that have their own current limiting resistors. WARNING - If the polarity of the power supply for this circuit is reversed or the circuit is connected to an AC or DCC source this circuit will be damaged.
The maximum supply voltage for this circuit is 15 Volts. The diagram above can be printed in the center of a sheet of paper then and used to record wiring connections when installing the circuit, sensors and LEDs. This diagram will be easier to use than the actual schematic for the circuitboard. The following schematic is for a typical installation circuit using phototransistors and LEDs. Multiconductor cable can be used to keep the wiring runs neat as sensors and indicators are likely to used in localized groups.
The following photo is of an assembled example of the circuit board which is 2 inches by 3 inches and is drilled to fit DigiKey part ED1601 - 2 position and ED1602 - 3 position terminal blocks. The INPUTs of the detectors are on the left and the OUTPUTs are on the right side of the picture. As in the full circuit schematic, the INPUTs and OUTPUTs of the detectors are directly across from each other on the circuitboard.
The following is a parts list for a typical parts list for use with the 8 - Photo-Detector circuit board. The values of the resistors can be changed to suit the needs of the user. T42-1 Push-In Terminals can be substituted for the terminal blocks to reduce costs if desired. The DigiKey part number for the T42-1 Terminals is V1069-ND. To reduce the current require, the LEDs can be wired in series so that four LEDs use the same amount of current as one LED.
In the example shown, approximately 8 milliamps. Infrared light is not visible to the naked eye, however, a digital camera can be used to view the IR light if it does not have an IR blocking filter on the lens. When installing the components on the circuit board start with parts with the lowest height and work up to the tallest parts.
Fo 🔗 External reference