
Another Arduino project for newbies
The next step involves connecting the components based on the schematic provided. The circuit can be assembled by directly connecting the parts or using a breadboard. Utilizing a breadboard is recommended for a more organized appearance. Although a die typically shows a maximum of six dots, seven diodes are required to represent the dot in the center for the values of one, three, and five. After constructing the circuit, the subsequent task is programming the Arduino board. This can be accomplished using the Arduino software included in the board's package. While the code can be copied and pasted, it is advisable to write it manually to better understand the functionality. In the code, seven diodes should be initialized within an array, allowing for a loop to initialize each pin. Additionally, a call to randomSeed is necessary; without it, the Arduino would generate the same sequence of outputs upon each reset. The dicePatterns array controls which LEDs are activated or deactivated for a specific outcome. To display the result of the dice throw, the code should loop through the array corresponding to the specific roll, adjusting each LED accordingly. This Arduino project is straightforward, and it is encouraged to undertake the assembly independently.
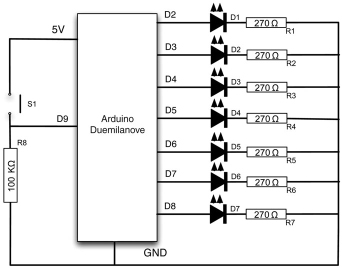
The project involves the use of an Arduino microcontroller, a set of seven LEDs (diodes), and a breadboard for circuit assembly. The LEDs represent the dots on a die, with specific configurations required for each number (1-6). The Arduino's digital pins are used to control the LEDs, while the random number generation function allows for the selection of a random number corresponding to the die's face value.
The schematic should illustrate the connections between the Arduino and the LEDs, showing which pins are designated for each LED. For example, if the LEDs are connected to pins 2 through 8, the schematic will indicate these connections clearly. Each LED will require a current-limiting resistor to prevent damage from excessive current flow, typically in the range of 220 to 330 ohms.
The programming aspect entails using the Arduino IDE to write and upload the code to the microcontroller. The code should include the setup function to initialize the digital pins connected to the LEDs and a loop function that generates a random number, updates the dicePatterns array, and activates the corresponding LEDs to display the result. The use of randomSeed with an analog input, such as noise from an unconnected pin, can enhance the randomness of the output.
Overall, this project serves as an excellent introduction to both hardware assembly and programming with Arduino, providing a practical application of random number generation in an engaging format.Electronic devices love accuracy. If you give them the same task twice, you will get the same resault. But sometimes you want some random result. This can be used in games. You can create your own lottery game. We will help you to do that kind of game with this Arduino project. It can also be used in other situations. Like a random walk, wher e a robot makes a random turn, then walks a random distance or until it hits some object. It is more natural movement if robot moves this way. You newer know what it will do next. It might be very funny. The Arduino library has a algorithm for generating random numbers. There are two versions of the algorithm random. It can either take only one argument (max) or two arguments (min and max). In first case the minimum is assumed to be zero. Be careful, because the max argument can be misleading, as the biggest number you can get back is the max minus 1. So, the this line will give x a value of 1 to 6: Next step is to connect this components by the schematics below.
You can build the circuit by connecting the parts directly or you can use the breadboard. Using breadboard is a better way because it looks better and orderly. Even though a dice can only have a max of six dots, we will need seven diodes to have the of a dot in the middle for one, three and five rolls. It is a dot in the middle of the area. After you created the circuit, next step is to program the Arduino board. You can program the board by using the Arduino software provided in the board package. Here is the software. You can copy/paste it, but it is not complex, the best way it to write it by yourself and when you have a problem, you can look below.
We have 7 diodes to initialize in the method, so it is good putting them in an array and have a loop over the array to initialize each pin. There is also call to randomSeed in the method. If we did not have this, each time we reset the Arduino, we would have the same sequence of lights. The dicePatterns array manage the diodes, which LEDs should be enabled and witch one disabled for a particular case.
When we need to display a result of the dice, we need to loop over the array for the particular throw, setting each LED accordingly. This Arduino project is very simple, we encourage you to try to build it by yourself. We are confident that you are succeed without our help. 🔗 External reference
Related Circuits
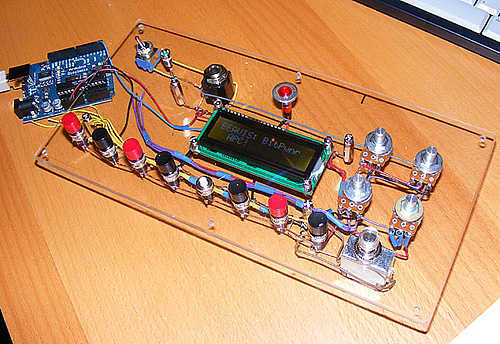
A programmable 8 step tone sequencer using an Arduino microcontroller. Features a 2 line x 16 character backlit LCD display The circuit design for the programmable 8 step tone sequencer based on an Arduino microcontroller incorporates several key components that...
This circuit exhibits an exceptionally fast high-frequency response, as demonstrated by applying a 100 kHz square wave to the input. All graphs were produced using Tina Pro. The circuit's design is optimized for high-frequency applications, showcasing rapid response times that...
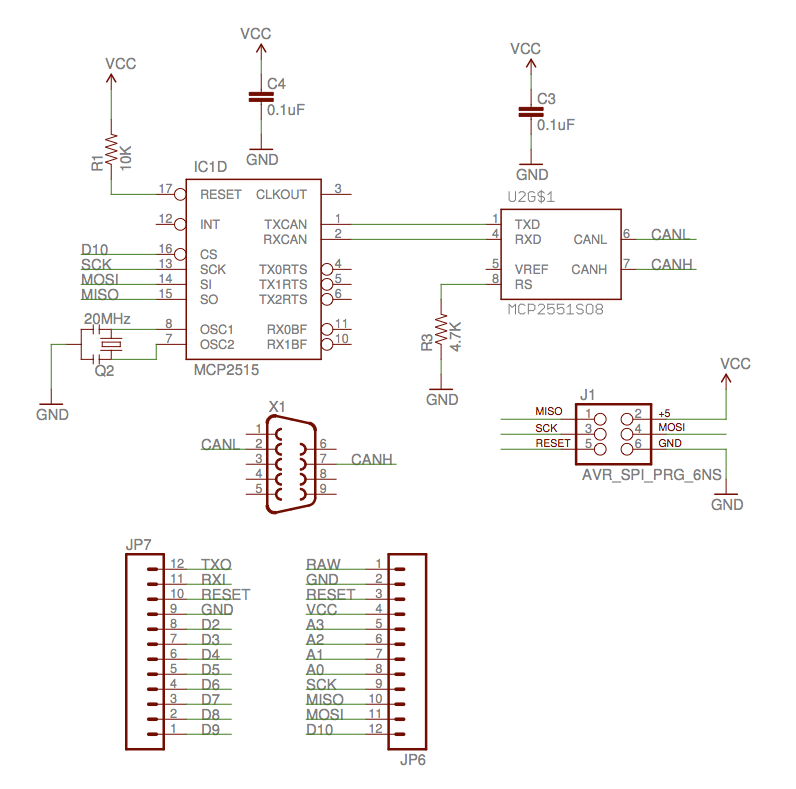
The implementation of the Controller Area Network (CAN) for aircraft applications is referred to as CAN-FIX, which is part of the MakerPlane Open Source Airplane project. This project aims to create an Arduino shield that facilitates communication over the...
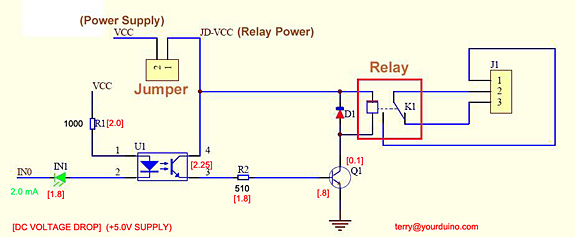
Control a relay from an Arduino-compatible board. When attempting to activate the relay from the Arduino, it takes at least a second to close, and sometimes it does not close at all. Digital pin 2 of the Arduino is...
This article aims to utilize an old PC as a simple controller. Many outdated PCs, such as the 8088, 8086, 80286, 80386, or even 80486, have become obsolete systems. This design employs an 8-bit LPT printer parallel data port...

A replacement remote control system for an electric garage door was constructed after the original remote failed multiple times. Although the old remote could have been repaired, it was 35 years old and not particularly enjoyable to use. The...
Warning: include(partials/cookie-banner.php): Failed to open stream: Permission denied in /var/www/html/nextgr/view-circuit.php on line 713
Warning: include(): Failed opening 'partials/cookie-banner.php' for inclusion (include_path='.:/usr/share/php') in /var/www/html/nextgr/view-circuit.php on line 713