
Arduino Flashy Christmas Lights Ornaments

The project involves designing a simple electronic circuit that utilizes an Arduino microcontroller to control multiple LEDs, creating a visually appealing ornament. The use of arrays allows for the efficient storage and manipulation of LED states, enabling the implementation of different flashing sequences.
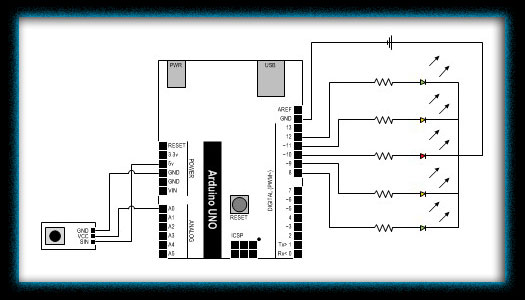
To construct the circuit, a standard Arduino board, such as the Arduino Uno, can be used. The LEDs should be arranged in a visually pleasing pattern on a piece of cardboard, with each LED connected to a digital output pin on the Arduino. Resistors are required in series with each LED to limit current and prevent damage. A 220-ohm resistor is typically suitable for standard 5mm LEDs when powered by 5V.
The power source for the circuit can be a 9V battery connected to the Arduino's VIN pin, ensuring that the board receives adequate voltage for operation. A battery clip can facilitate easy connection to the battery.
In the Arduino code, arrays will be utilized to define the LED pins and the sequences in which the LEDs will flash. A simple loop can iterate through the array, turning each LED on and off in a timed sequence, which can be adjusted to create various effects, such as chasing lights or simultaneous flashing.
This project not only serves as an introduction to programming with Arduino but also provides hands-on experience with basic electronics, making it an excellent educational tool for children. The combination of coding and soldering fosters creativity and technical skills, making the Christmas tree ornament a delightful and educational holiday activity.This is the next part in our learning Arduino series, and this time we ll be learning about and using Arrays to make a little Christmas tree ornament with various flashing sequences. This would be an ideal project to keep the kids occupied if you`d like to teach them basic soldering - just mount the LEDs on a piece of card, and you can get power from a standard 9v battery..
🔗 External reference
Related Circuits

Begin constructing the circuit as illustrated in the schematic. To view the schematic in a larger format, click the small "i" icon located in the upper right corner of the image. The schematic serves as a visual representation of the...
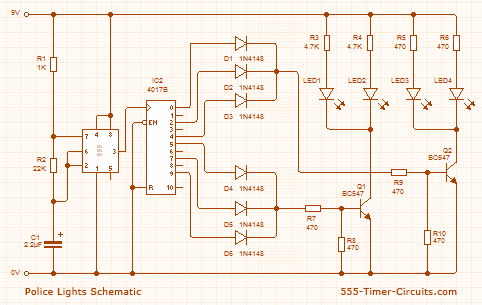
Children today often possess a wide array of toys available in stores. For those with a son or grandson who has a collection of toy cars, a handmade gift such as a set of traffic lights would be greatly...
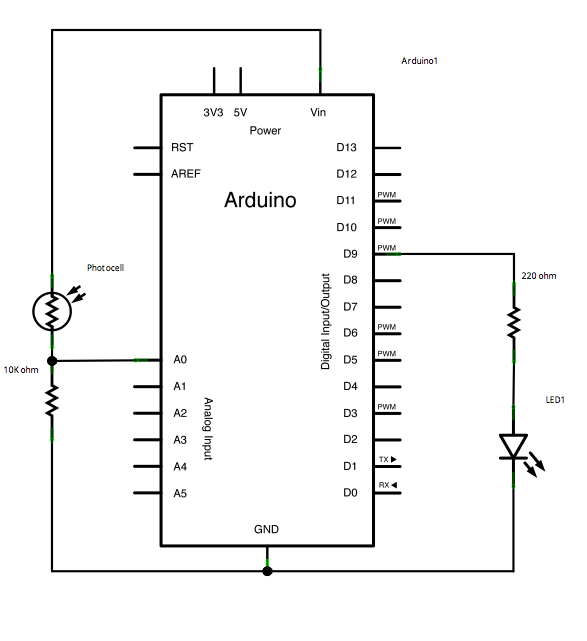
This example demonstrates a technique for calibrating sensor input. The Arduino takes sensor readings for five seconds during startup and tracks the highest and lowest values obtained. These sensor readings during the first five seconds of the sketch execution...
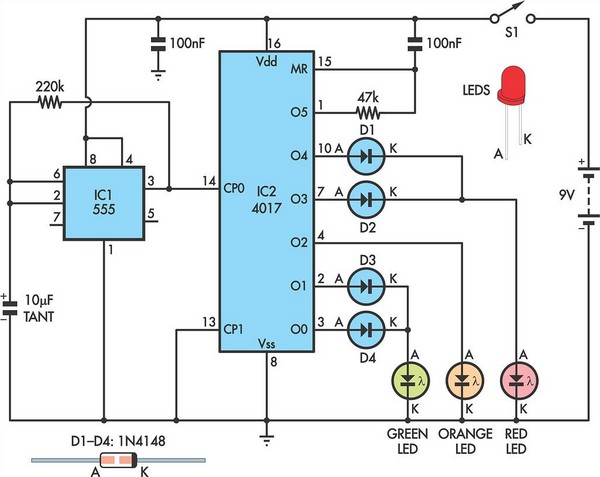
This circuit utilizes a 555 timer configured to operate in astable mode. This configuration produces a continuous output at Pin 3 in the form of a square wave. When the timer's output transitions to a high state, it triggers...
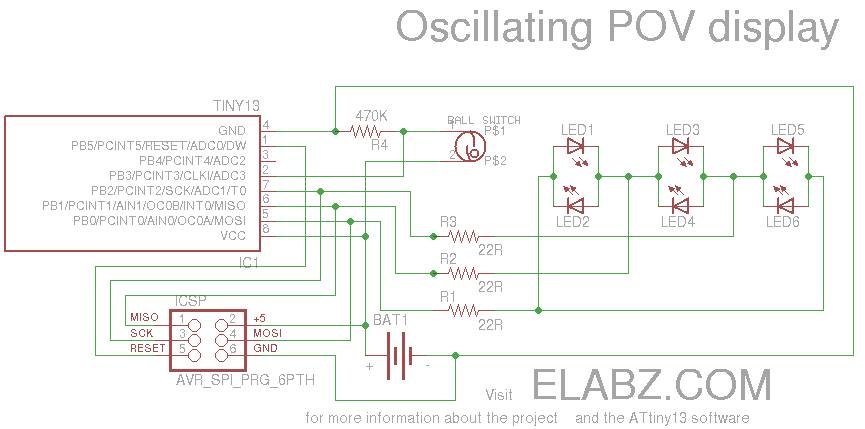
Smart Valentine's Day gift - a movement-sensing box of chocolates with an LED message. Circuit diagram and instructions for building the project using ATtiny13 and Arduino. The project involves creating a movement-sensing box of chocolates that incorporates an LED display...
Finally, an Arduino Uno Open Source Prototyping Platform has been purchased, and the first impressions are noteworthy. The Arduino Uno is a widely used microcontroller board based on the ATmega328P microcontroller. It features 14 digital input/output pins, six analog inputs,...
Warning: include(partials/cookie-banner.php): Failed to open stream: Permission denied in /var/www/html/nextgr/view-circuit.php on line 713
Warning: include(): Failed opening 'partials/cookie-banner.php' for inclusion (include_path='.:/usr/share/php') in /var/www/html/nextgr/view-circuit.php on line 713