


2004 F250 Truck Cap Rear Wiper
#wiper
#truck
#rear wiper
#motor
#automotive electronics
#washer
#vehicle accessory
#glass mounting
#truck cap
#tempered glass
Description: A rear wiper/washer system similar to those found in most SUVs. This kit features a motor that mounts through the glass, which end users cannot do due to the tempered nature of the glass. Truck cap manufacturers can drill the glass appropriately before tempering it. Another kit offered by the company has the motor mounted to the wider metal section at the bottom of the glass. While this is a viable solution, it is somewhat undesirable. Given the ample space above the glass in a particular truck cap, an attempt was made to retrofit a rear wiper/washer system from a 1991-1994 Ford Explorer. This setup was chosen primarily due to the availability of a 1994 Explorer for accurate measurements of the wiper arm and swipe area, ensuring a good fit and functionality. This system is designed to wipe glass without being mounted to it, featuring a "park" function that stows the blade off the glass when not in use. The Explorer setup is also straightforward to wire, requiring only two power connections and a ground, as the solid-state controller for parking is internal to the motor. Additionally, the early Explorers have the wiper/washer switch located on the dashboard, making integration into a different dashboard easier and providing a cleaner appearance. An update indicates that the installation has proven successful over four months, with daily use, including during snow and rain conditions. A desire for the wiper to operate on an interval led to the development of a circuit to allow for either continuous operation or selectable delay intervals. A complete rear wiper/washer system was obtained from a member of The Serious Explorations Forum, which included the wiper motor, wiper arm and blade, washer tank with pump, washer nozzle, tubing, dashboard switch, and resting bracket for the wiper arm. Initial setup involved creating a mock-up of the system by clamping the motor and using cardboard to template the wiper pattern and motor location. Two patterns were drawn; the first based on the original 14" blade and arm, which did not fit, and the second based on a modified 12" blade and shortened arm, which fit well. The wiper arm was then shortened by 2 inches, allowing for the creation of a new template that accurately represented the new dimensions.
To implement the retrofitting of the rear wiper/washer system from the 1991-1994 Ford Explorer into a truck cap, a detailed understanding of the components and their arrangement is essential. The system comprises several key elements: the wiper motor, wiper arm, wiper blade, washer tank with pump, washer nozzle, and the control switch. The wiper motor is the heart of the system, responsible for driving the wiper arm across the glass surface. The motor's internal solid-state controller simplifies wiring, as it only requires power and ground connections, eliminating the need for external control circuits.
The wiper arm needs to be precisely measured and potentially modified to ensure it fits the specific dimensions of the truck cap's rear window. The original arm may need to be shortened, as indicated by the adjustment made from 14 inches to 12 inches, allowing for a more suitable wipe pattern on the glass. The adjustment process involves drilling out rivets, cutting the arm, and re-bending it to maintain its functionality while ensuring it aligns correctly with the new blade length.
The washer tank and pump are mounted in a location that allows for easy access to the washer fluid reservoir, ensuring that the system can be refilled conveniently. The washer nozzle must be positioned to effectively spray the fluid onto the glass surface, optimizing visibility during adverse weather conditions. The integration of the dashboard switch from the Explorer provides a clean and functional interface for the user, allowing easy activation of both the wiper and washer functions.
For enhanced functionality, the addition of an interval control circuit can be implemented. This circuit can be designed to modify the signal sent to the wiper motor, allowing it to operate in a continuous mode or switch to a delay mode where the wiper operates at set intervals. Such a feature is particularly useful during light rain, where continuous wiping may not be necessary. The design of this circuit should ensure compatibility with the existing motor and control mechanisms, maintaining the reliability and performance of the wiper system.
Overall, the retrofitting of the rear wiper/washer system from a 1991-1994 Ford Explorer into a truck cap can significantly improve visibility and safety in various weather conditions, while also providing a clean and professional installation. Proper measurement, modification, and integration of components are crucial to achieving a successful outcome.A rear wiper/washer similar what every SUV on the road has. this kit has the motor mounting through the glass, which the end users cannot do since the glass is tempered. The truck cap manufacturers can have the glass drilled appropriately, before tempering. This company does offer another kit that has the motor mounted to the wide metal section, at the bottom of the glass.
This is a decent solution except having the motor mounted at the bottom of the glass is somewhat undesirable, at least to me. So, since my particular truck cap has a lot of space above the glass, I decided to try to retrofit a rear wiper/washer system from of a 1991-1994 Ford Explorer. I chose this setup, mainly, because I own a 1994 Explorer which allowed me to get good measurements of the wiper arm, swipe area, etc so I was fairly confident that I could make it fit and work.
I also chose this setup because it is designed to wipe glass of which it is not mounted to. This means that it has a "park" feature that can stow the blade off of the glass when not in use. Also, the Explorer setup is very simple to wire as it only needs two powers and a ground, since the solid state controller (for parking) is internal to the motor. Finally, a very minor thing, but the early Explorers have the wiper/washer switch on the dash (as opposed to the turn signal stalk) so adding it to a different dash is much easier and gives a very clean look.
I thought I`d give a quick update since its been about four months since I installed this wiper setup. This thing has worked out great! Everything is holding up really well and it seems like I use it on a daily basis. We just recently got our first decent snow of the season and I snapped a couple pics that are at the bottom of this page.
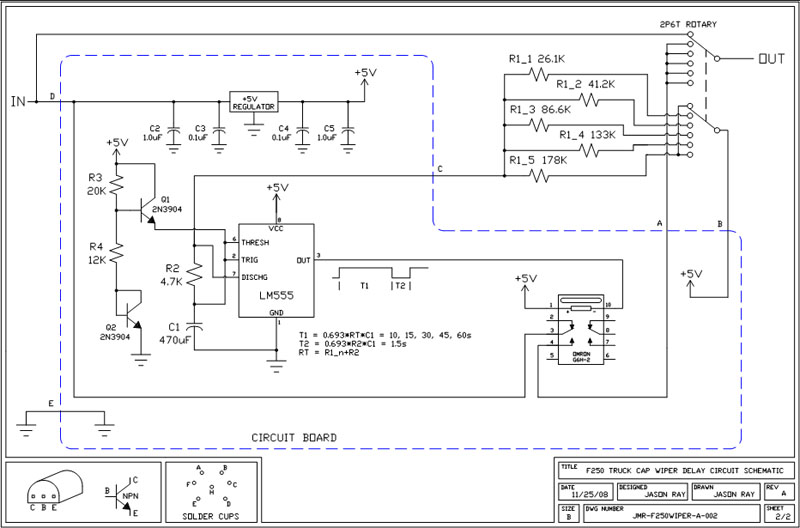
Also, I found while driving in the rain that it would be nice to have this wiper operate on an interval. So, I came up with a circuit to put inline with the wiper motor signal to either operate continuously or on a selectable delay interval.
More info about this at the bottom of this page. I was able to obtain a complete rear wiper/washer system from a fellow member of The Serious Explorations Forum, thanks Bill! This included the wiper motor, wiper arm/blade, washer tank w/pump, washer nozzle, all tubing, the switch for the dash, and the bracket where the wiper arm rests when not in use.
The first thing I did was set up a mock up of the system by clamping the motor to a table and setting up a piece of cardboard to make a template of the wiper pattern and motor location. Its a little hard to tell, but there are two patterns shown. One drawn (roughly) with the black sharpie is the pattern based on the original wiper arm and 14" blade.
This pattern turned out to not quite fit on my glass, so I decided to make a second pattern (shown in blue sharpie) based on shortening the wiper arm 2" and using a shorter 12" wiper blade. This pattern fits nicely on my back glass. Note the swipe area is enclosed by the two dashed lines at each end, and the PARK location is shown, considerably away from the wiping area.
The next step was to shorten the wiper arm by 2". I drilled out the rivet, cut off 2" of the wiper arm, re-bent and drilled to match the original, and put it back together. Now that I have the wiper arm shortened, and a 12" wiper blade, I got a different piece of cardboard and made a new version of the template.
The black line represents the pattern with the original 14" wiper blade and the purple line represents the pattern with a 12" wiper blade. You can also see t
To implement the retrofitting of the rear wiper/washer system from the 1991-1994 Ford Explorer into a truck cap, a detailed understanding of the components and their arrangement is essential. The system comprises several key elements: the wiper motor, wiper arm, wiper blade, washer tank with pump, washer nozzle, and the control switch. The wiper motor is the heart of the system, responsible for driving the wiper arm across the glass surface. The motor's internal solid-state controller simplifies wiring, as it only requires power and ground connections, eliminating the need for external control circuits.
The wiper arm needs to be precisely measured and potentially modified to ensure it fits the specific dimensions of the truck cap's rear window. The original arm may need to be shortened, as indicated by the adjustment made from 14 inches to 12 inches, allowing for a more suitable wipe pattern on the glass. The adjustment process involves drilling out rivets, cutting the arm, and re-bending it to maintain its functionality while ensuring it aligns correctly with the new blade length.
The washer tank and pump are mounted in a location that allows for easy access to the washer fluid reservoir, ensuring that the system can be refilled conveniently. The washer nozzle must be positioned to effectively spray the fluid onto the glass surface, optimizing visibility during adverse weather conditions. The integration of the dashboard switch from the Explorer provides a clean and functional interface for the user, allowing easy activation of both the wiper and washer functions.
For enhanced functionality, the addition of an interval control circuit can be implemented. This circuit can be designed to modify the signal sent to the wiper motor, allowing it to operate in a continuous mode or switch to a delay mode where the wiper operates at set intervals. Such a feature is particularly useful during light rain, where continuous wiping may not be necessary. The design of this circuit should ensure compatibility with the existing motor and control mechanisms, maintaining the reliability and performance of the wiper system.
Overall, the retrofitting of the rear wiper/washer system from a 1991-1994 Ford Explorer into a truck cap can significantly improve visibility and safety in various weather conditions, while also providing a clean and professional installation. Proper measurement, modification, and integration of components are crucial to achieving a successful outcome.A rear wiper/washer similar what every SUV on the road has. this kit has the motor mounting through the glass, which the end users cannot do since the glass is tempered. The truck cap manufacturers can have the glass drilled appropriately, before tempering. This company does offer another kit that has the motor mounted to the wide metal section, at the bottom of the glass.
This is a decent solution except having the motor mounted at the bottom of the glass is somewhat undesirable, at least to me. So, since my particular truck cap has a lot of space above the glass, I decided to try to retrofit a rear wiper/washer system from of a 1991-1994 Ford Explorer. I chose this setup, mainly, because I own a 1994 Explorer which allowed me to get good measurements of the wiper arm, swipe area, etc so I was fairly confident that I could make it fit and work.
I also chose this setup because it is designed to wipe glass of which it is not mounted to. This means that it has a "park" feature that can stow the blade off of the glass when not in use. Also, the Explorer setup is very simple to wire as it only needs two powers and a ground, since the solid state controller (for parking) is internal to the motor. Finally, a very minor thing, but the early Explorers have the wiper/washer switch on the dash (as opposed to the turn signal stalk) so adding it to a different dash is much easier and gives a very clean look.
I thought I`d give a quick update since its been about four months since I installed this wiper setup. This thing has worked out great! Everything is holding up really well and it seems like I use it on a daily basis. We just recently got our first decent snow of the season and I snapped a couple pics that are at the bottom of this page.
Also, I found while driving in the rain that it would be nice to have this wiper operate on an interval. So, I came up with a circuit to put inline with the wiper motor signal to either operate continuously or on a selectable delay interval.
More info about this at the bottom of this page. I was able to obtain a complete rear wiper/washer system from a fellow member of The Serious Explorations Forum, thanks Bill! This included the wiper motor, wiper arm/blade, washer tank w/pump, washer nozzle, all tubing, the switch for the dash, and the bracket where the wiper arm rests when not in use.
The first thing I did was set up a mock up of the system by clamping the motor to a table and setting up a piece of cardboard to make a template of the wiper pattern and motor location. Its a little hard to tell, but there are two patterns shown. One drawn (roughly) with the black sharpie is the pattern based on the original wiper arm and 14" blade.
This pattern turned out to not quite fit on my glass, so I decided to make a second pattern (shown in blue sharpie) based on shortening the wiper arm 2" and using a shorter 12" wiper blade. This pattern fits nicely on my back glass. Note the swipe area is enclosed by the two dashed lines at each end, and the PARK location is shown, considerably away from the wiping area.
The next step was to shorten the wiper arm by 2". I drilled out the rivet, cut off 2" of the wiper arm, re-bent and drilled to match the original, and put it back together. Now that I have the wiper arm shortened, and a 12" wiper blade, I got a different piece of cardboard and made a new version of the template.
The black line represents the pattern with the original 14" wiper blade and the purple line represents the pattern with a 12" wiper blade. You can also see t
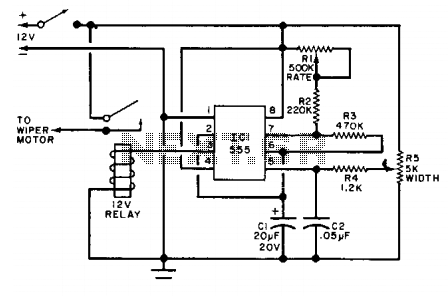
Wiper speed controller
The relay that supplies power to the wiper motor is activated at regular intervals by the timer circuit, which closes the contacts for the wiper motor. Potentiometer R1 functions as the pulse rate control, while potentiometer R5 is used for...
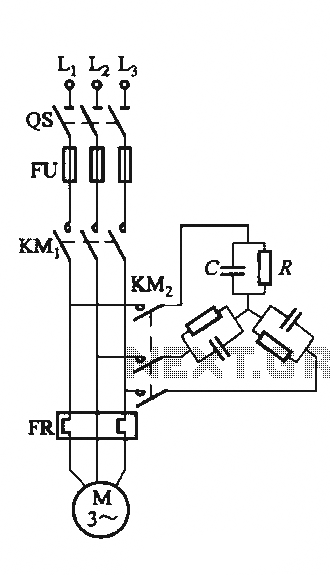
Single-speed motor excitation from the electrical braking circuit
The circuit illustrated in Figure 3-151 consists of capacitor banks arranged in a specific configuration. Figure 3-151 (a) depicts capacitor banks connected in a shaped configuration, which is suitable for shaped or Y-connected motors. Figure 3-151 (b) shows Y-connected capacitor...
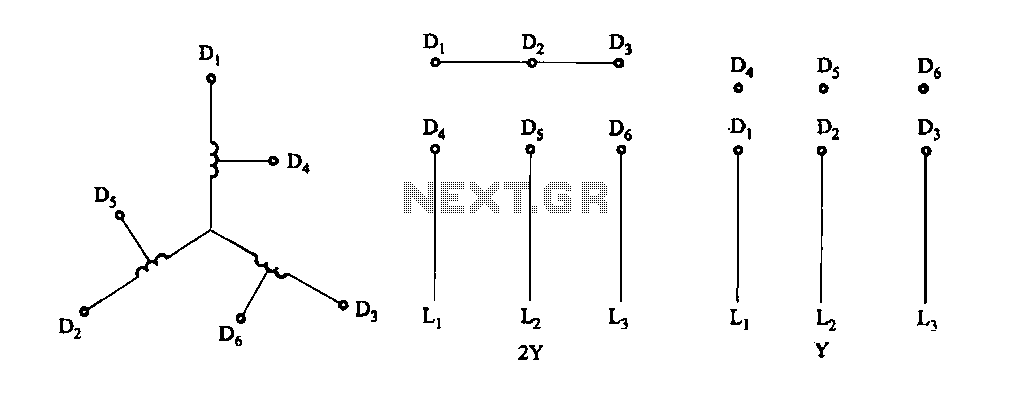
Two-speed motor stator winding 2Y-Y connection
Figure 3-100 illustrates the lead wiring diagram for the stator windings of a two-speed motor configured in a 2Y/Y connection.
The two-speed motor stator wiring diagram depicted in Figure 3-100 provides a clear representation of the electrical connections required for the...
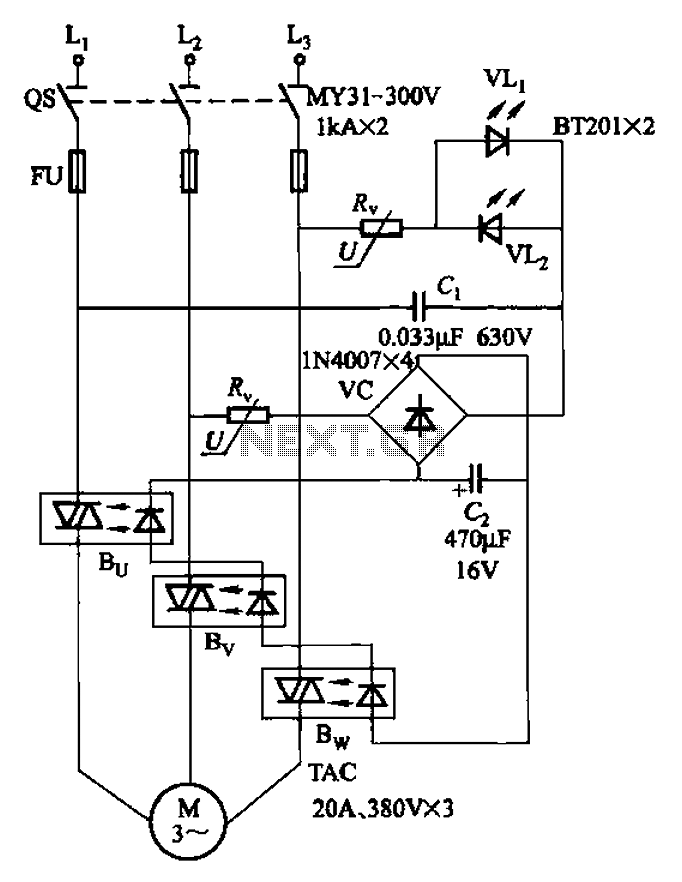
Three-way operation allows the motor-controlled circuits
The circuit depicted in Figure 3-93 is integrated with an optical phase sequence protection relay.
The circuit in question is designed to provide phase sequence protection using an optical relay mechanism. Optical phase sequence protection relays are crucial in applications where...
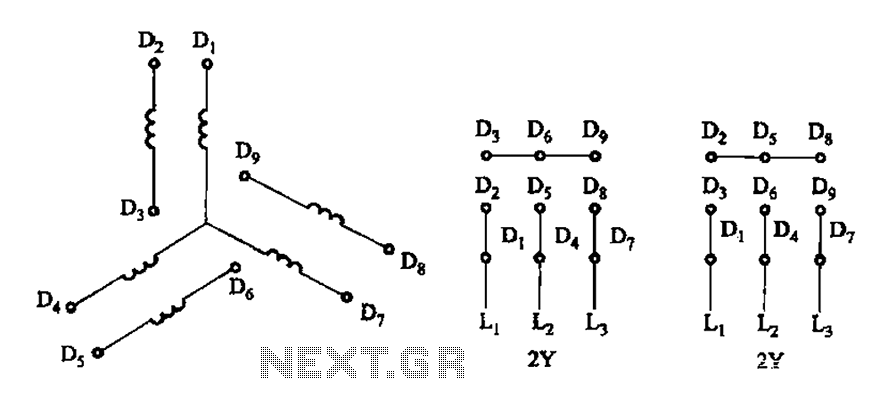
Two-speed motor stator winding 2Y-2Y connection
As illustrated in Figure 3-105, this diagram depicts the lead wiring configuration for a two-speed motor stator with a 2Y/2Y connection.
The two-speed motor stator wiring diagram is essential for understanding the configuration and operation of the motor. In this setup,...
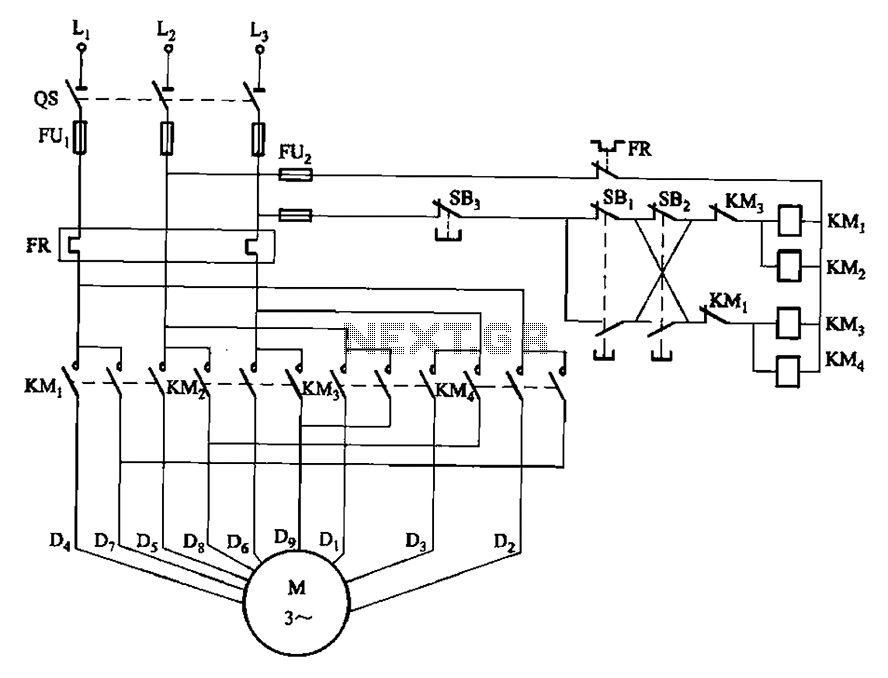
two-speed motor contactor control circuit two speeds in the same direction
The circuit depicted in Figure 3-112 features two operation buttons: SBi, which serves as the first speed operation button, and SBz, which operates the second speed class. Both buttons facilitate two speeds in the same direction.
The circuit design incorporates two...
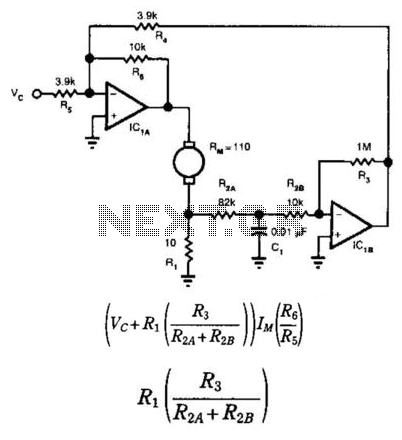
Tachometerless Motor Speed Control
This circuit provides bidirectional speed regulation for small motors and does not require a tachometer. The voltage applied to the motor's windings, which is determined by summing amplifier IC1A, is expressed as a function of the command voltage (Vc) and...
Gray Tube Replication 85
The information regarding operating the motor without the tubes is new to the individual. There is a desire to learn more about this subject.
The operation of a motor without the use of tubes can be a significant topic in the...
Single-speed motor excitation from the electrical braking circuit
The circuit illustrated in Figure 3-151 consists of capacitor banks arranged in a specific configuration. Figure 3-151 (a) depicts capacitor banks connected in a shaped configuration, which is suitable for shaped or Y-connected motors. Figure 3-151 (b) shows Y-connected capacitor...