


resistors calculating resistance for LED strips to use as parking lamps and turn signals
#LED strips
#resistors
#parking lamps
#turn signals
#automotive lighting
#DIY
#car modification
#electrical calculation
#tail lamps
#LED conversion
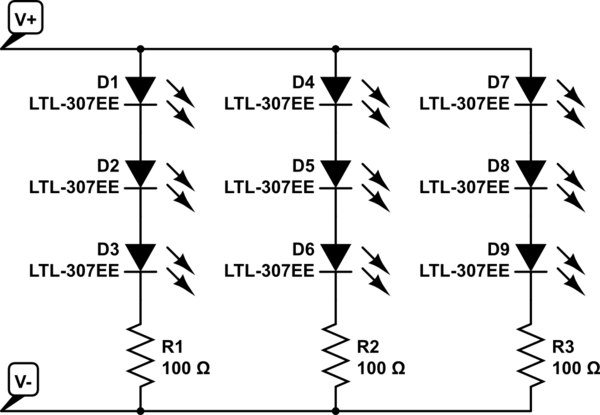
Description: The project involves installing LED strips in a car's tail lamps to replace conventional bulbs. The required lengths for the LED strips are 16 inches, 15 inches, and 14 inches to fit properly within the housings. The selected LED strips measure 19.7 inches and contain approximately 1.5 LEDs per inch, necessitating segmentation into groups of three LEDs for optimal placement. It is understood that two diodes and a resistor are needed for the installation. One diode will be connected to the parking lamp power, and the other will be connected to the turn signal/brake power. A resistor will be placed on the parking lamp wire to reduce the voltage sufficiently, allowing the LEDs to function as parking lamps while ensuring they remain distinguishable from the brighter turn/brake lamps. The operating voltage at the rear lamps, when the vehicle is running, is approximately 13.8V, and it is estimated that the LEDs should be powered at around 7V to function effectively as parking lamps.
The installation of LED strips in automotive tail lamps presents a modern solution to enhance visibility and aesthetics. The LED strips, chosen for their length and density, will be cut into segments to create three-LED groups. This segmentation is crucial for maintaining uniform brightness and ensuring that the LED strips fit seamlessly within the existing housings.
The circuit design requires careful consideration of voltage and current to ensure the LEDs operate within their specified limits. The use of two diodes serves a dual purpose: one diode will protect the circuit from reverse polarity on the parking lamp line, while the second diode will do the same for the turn signal/brake line. Selecting the appropriate diodes is essential; typically, 1N4001 or similar silicon diodes rated for at least 1A and 50V will suffice for automotive applications.
The resistor in the circuit is critical for reducing the voltage supplied to the LEDs to approximately 7V. To calculate the resistor value, the following formula can be used:
\[ R = \frac{(V_{supply} - V_{LED})}{I_{LED}} \]
Where:
- \( V_{supply} \) is 13.8V,
- \( V_{LED} \) is the forward voltage drop of the LED (usually around 2V for standard LEDs),
- \( I_{LED} \) is the desired current through the LED (typically between 20mA to 30mA).
For example, if the forward voltage drop of the LED is 2V and the desired current is 20mA (0.020A), the calculation would be as follows:
\[ R = \frac{(13.8V - 2V)}{0.020A} = \frac{11.8V}{0.020A} = 590 \Omega \]
A standard resistor value of 560Ω or 620Ω could be used, depending on availability and desired brightness.
In summary, this project involves a systematic approach to converting conventional tail lamps to LED technology, ensuring that proper components are selected to achieve the desired functionality while maintaining safety and efficiency in the automotive electrical system.Installing LED strips in car`s tail lamps to convert it from conventional bulbs to LEDs. This is the product I`m planning on working with and I need a length of 16", 15" and 14" to make then look correct in my housings. When I did the math the 19. 7" strips have about 1. 5 LEDs per inch and need to be segmented into 3 LED groups so I may have to get creative with the placement.
Ffom what I understand I need 2 diodes and a resistor. One diode on the parking lamp power, and one on the turn signal/brake power and then a resistor on the parking lamp wire to step down the voltage enough to make them dim enough to use as a parking lamp and distinguish it from the brighter turn/brake lamps. Does anyone know what size resistor and what size diode to use in this project The voltage, with the car running, is around 13.
8V to the rear lamps. I figure it should be running around 7V to the LEDs to light them as parking lamps.
The installation of LED strips in automotive tail lamps presents a modern solution to enhance visibility and aesthetics. The LED strips, chosen for their length and density, will be cut into segments to create three-LED groups. This segmentation is crucial for maintaining uniform brightness and ensuring that the LED strips fit seamlessly within the existing housings.
The circuit design requires careful consideration of voltage and current to ensure the LEDs operate within their specified limits. The use of two diodes serves a dual purpose: one diode will protect the circuit from reverse polarity on the parking lamp line, while the second diode will do the same for the turn signal/brake line. Selecting the appropriate diodes is essential; typically, 1N4001 or similar silicon diodes rated for at least 1A and 50V will suffice for automotive applications.
The resistor in the circuit is critical for reducing the voltage supplied to the LEDs to approximately 7V. To calculate the resistor value, the following formula can be used:
\[ R = \frac{(V_{supply} - V_{LED})}{I_{LED}} \]
Where:
- \( V_{supply} \) is 13.8V,
- \( V_{LED} \) is the forward voltage drop of the LED (usually around 2V for standard LEDs),
- \( I_{LED} \) is the desired current through the LED (typically between 20mA to 30mA).
For example, if the forward voltage drop of the LED is 2V and the desired current is 20mA (0.020A), the calculation would be as follows:
\[ R = \frac{(13.8V - 2V)}{0.020A} = \frac{11.8V}{0.020A} = 590 \Omega \]
A standard resistor value of 560Ω or 620Ω could be used, depending on availability and desired brightness.
In summary, this project involves a systematic approach to converting conventional tail lamps to LED technology, ensuring that proper components are selected to achieve the desired functionality while maintaining safety and efficiency in the automotive electrical system.Installing LED strips in car`s tail lamps to convert it from conventional bulbs to LEDs. This is the product I`m planning on working with and I need a length of 16", 15" and 14" to make then look correct in my housings. When I did the math the 19. 7" strips have about 1. 5 LEDs per inch and need to be segmented into 3 LED groups so I may have to get creative with the placement.
Ffom what I understand I need 2 diodes and a resistor. One diode on the parking lamp power, and one on the turn signal/brake power and then a resistor on the parking lamp wire to step down the voltage enough to make them dim enough to use as a parking lamp and distinguish it from the brighter turn/brake lamps. Does anyone know what size resistor and what size diode to use in this project The voltage, with the car running, is around 13.
8V to the rear lamps. I figure it should be running around 7V to the LEDs to light them as parking lamps.
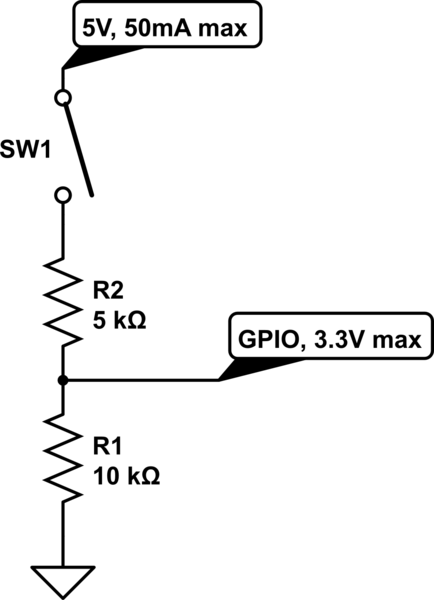
resistors Current flows from the source towards the sink
The circuit is designed to limit the maximum voltage between the GPIO input pin and the current source to 3.3V. This is achieved through a voltage divider configuration where the voltage across the 10K resistor is 3.3V, while the voltage...
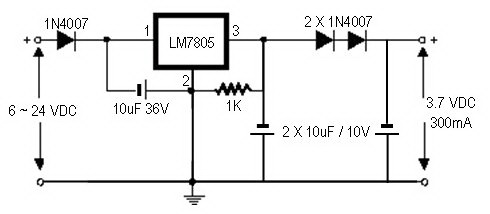
how to convert a 9v battery to 3.7v
A regulator circuit is needed for this DIY project. Familiarity with electronic components, circuitry, the use of a multitester, and a soldering iron is essential. The schematic diagram provided can accept an input voltage ranging from 6 to 24 volts...
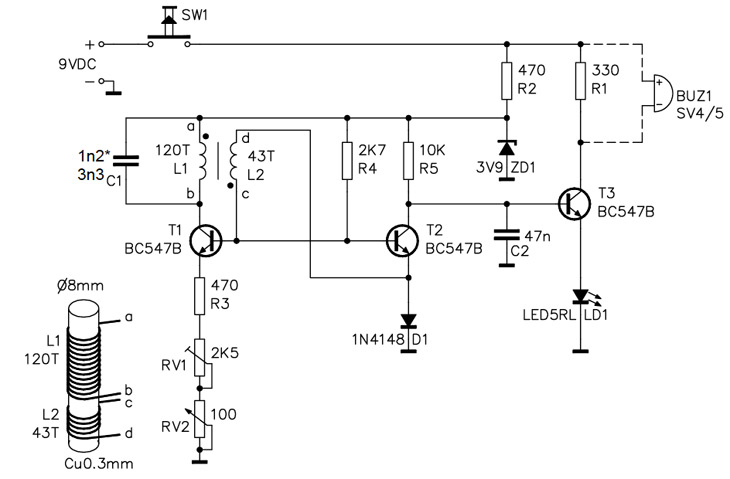
Homemade Metal Detector Kit
A simple home project can quickly become problematic if it encounters electric cables, gas, or water pipes, or the central heating system. Using a metal detector allows one to check for metal objects within walls, ceilings, or floors beforehand. An...
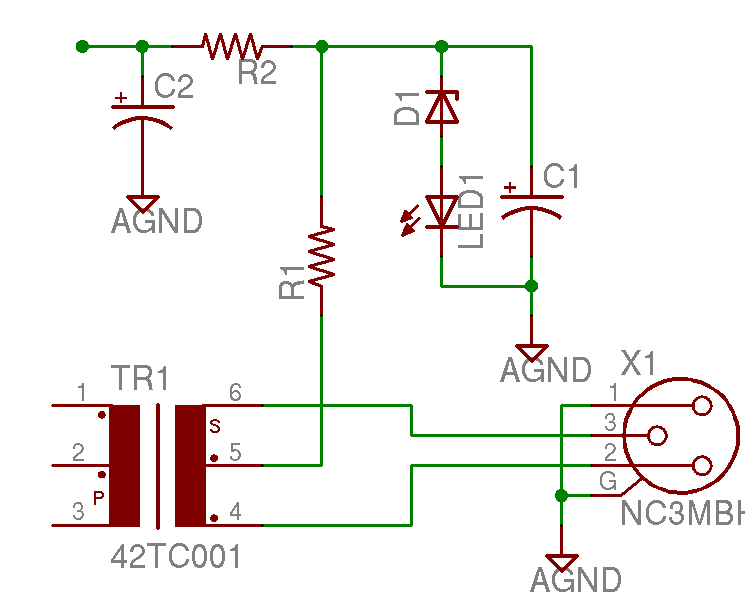
Help with a schematic please
A project is underway to construct the CountryHick DI as illustrated on DIYFactory, incorporating a few minor modifications. The final design aims to be a 1U unit with four inputs.
The CountryHick DI (Direct Injection) box is a crucial tool in...
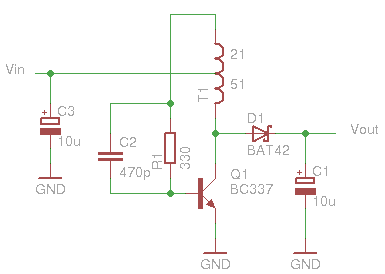
Glue stck torch
This project, developed around 2005, involves constructing a torch using a glue stick, which conveniently accommodates an AA battery within its plastic casing. To create a functional battery holder, contacts for both the positive and negative connections are necessary. The...
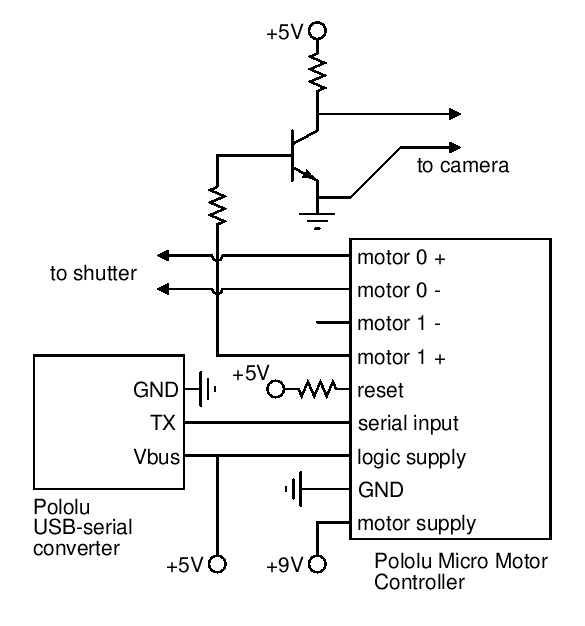
5 Minute Signal
For the past year and a half, a group based in Ann Arbor, Michigan, named GO-Tech has been formed, uniting individuals interested in creating projects using technology, such as hardware, software, metal, and wood. This initiative is referred to as...
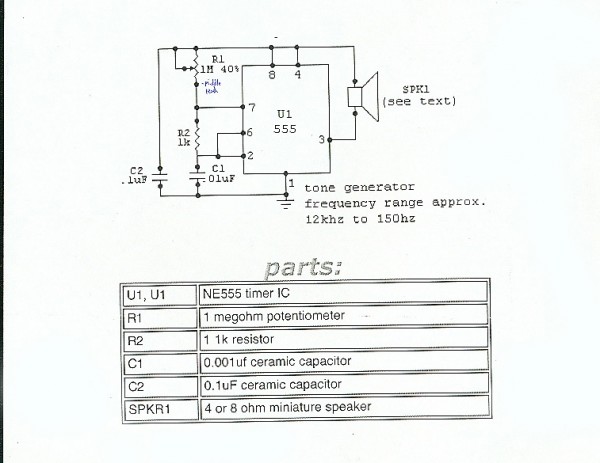
Circuits
To prevent soldering errors, students were instructed to place all their resistors on the board first. Once their placements were verified, they could proceed with soldering. Capacitors were next, followed by LEDs and other components. The middle school class demonstrated...

turret diy
For maximum mini-security, this RC Tupperware Turret delivers a formidable deterrent against food theft. While it lacks motion sensors, potential food thieves will think twice before attempting to swipe baked goods. This 11-hour project, designed by Chris of PyroElectro, emphasizes...
MePADS
If you are considering building the Desert Ratt 2, it is advisable to read all the accompanying text, as it contains relevant construction details. Engaging with the comments and replies can also provide additional insights, as previous blog posts have...