


12V Power Inverter Using 555
#555 timer
#12V inverter
#240V output
#power inverter
#DC to AC
#small power devices
#voltage conversion
#electronics project
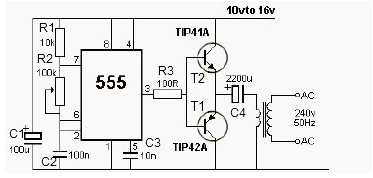
Description: This 12V power inverter circuit can be utilized to supply power to small devices that require 240 volts. It is particularly beneficial when there is a need to operate equipment designed for 240 volts.
The 12V power inverter circuit is designed to convert a 12V DC input into a 240V AC output, making it suitable for powering various small electrical devices that typically operate on standard AC voltage. The circuit generally consists of several key components, including a DC-DC converter, an oscillator, a transformer, and an output stage.
The DC-DC converter steps up the 12V input to a higher DC voltage, which is then fed into an oscillator circuit. This oscillator generates a high-frequency square wave signal, which is crucial for driving the transformer. The transformer is responsible for stepping up the voltage to the desired 240V AC level.
In many designs, the inverter may also include a feedback mechanism to regulate the output voltage and ensure stability under varying load conditions. Additional components such as capacitors and inductors may be used to filter the output waveform, improving the quality of the AC signal and reducing harmonic distortion.
Protection features are often integrated into the circuit to safeguard against overloads, short circuits, and thermal issues. These can include fuses, thermal cutoff switches, and current sensing circuits.
Overall, this 12V power inverter circuit is an efficient solution for converting low-voltage DC power into high-voltage AC power, enabling the use of various electrical devices in off-grid or mobile applications.This 12V power inverter circuit can be used to power small power devices that need a 240 volts. It is very useful when you want to use a 240 volts consume..
The 12V power inverter circuit is designed to convert a 12V DC input into a 240V AC output, making it suitable for powering various small electrical devices that typically operate on standard AC voltage. The circuit generally consists of several key components, including a DC-DC converter, an oscillator, a transformer, and an output stage.
The DC-DC converter steps up the 12V input to a higher DC voltage, which is then fed into an oscillator circuit. This oscillator generates a high-frequency square wave signal, which is crucial for driving the transformer. The transformer is responsible for stepping up the voltage to the desired 240V AC level.
In many designs, the inverter may also include a feedback mechanism to regulate the output voltage and ensure stability under varying load conditions. Additional components such as capacitors and inductors may be used to filter the output waveform, improving the quality of the AC signal and reducing harmonic distortion.
Protection features are often integrated into the circuit to safeguard against overloads, short circuits, and thermal issues. These can include fuses, thermal cutoff switches, and current sensing circuits.
Overall, this 12V power inverter circuit is an efficient solution for converting low-voltage DC power into high-voltage AC power, enabling the use of various electrical devices in off-grid or mobile applications.This 12V power inverter circuit can be used to power small power devices that need a 240 volts. It is very useful when you want to use a 240 volts consume..
Space Horticulture Circuit
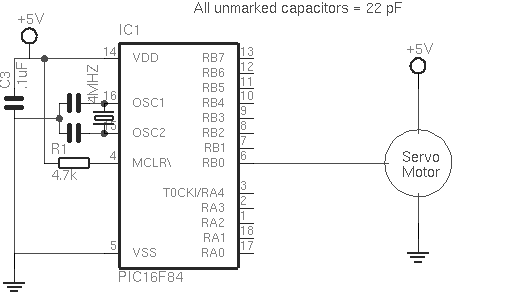
The optimal duty cycle and frequency for the strobe photoperiod need to be established. The circuit designed operates at 3Hz with a 50% duty cycle, selected based on the use of a 1µF capacitor with a 555 timer IC. The...
Clap switch using timer 555
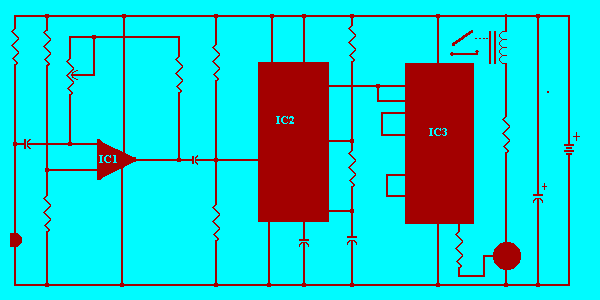
A single hand clap will be picked up by the electric mic which is coupled through C1 into the op amp IC1. The output of IC1 triggers the 555 IC timer IC2 which is configured as a monostable multivibrator. The...
Magnetic Gun
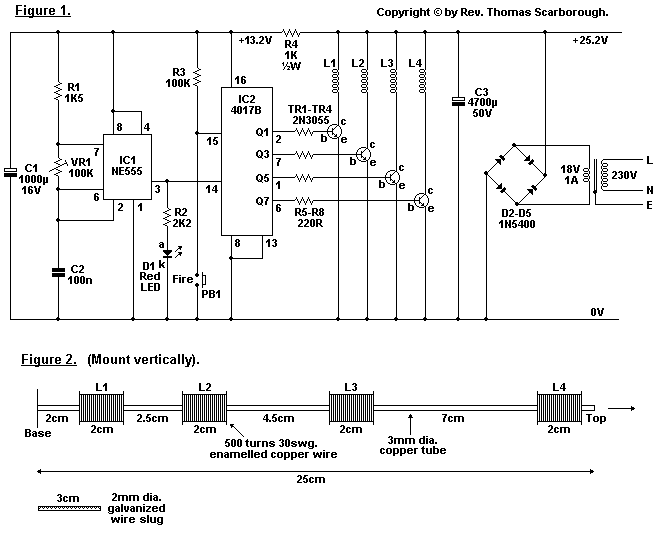
Pictured in Figure 1 is a miniature magnetic gun. When optimally tuned, it will propel a small slug about 1.5 metres high, or 2.5 metres horizontally. IC1 is a 555 timer in astable mode, sending approx. 10 ms pulses to...
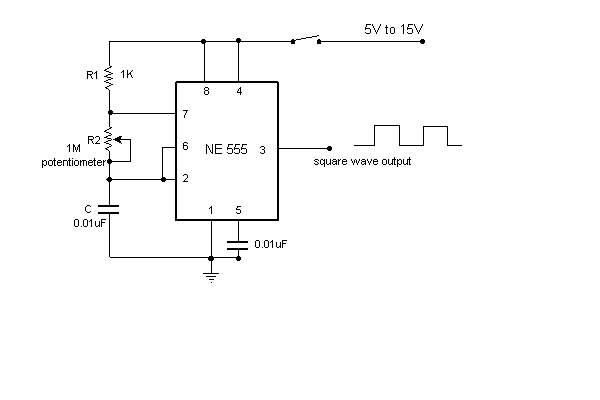
Simple variable frequency oscillator
A simple variable frequency oscillator utilizing a 555 timer IC to generate a square wave frequency that can be adjusted using a potentiometer.
The circuit operates primarily on the principles of astable multivibrator configuration using the 555 timer IC, which is...
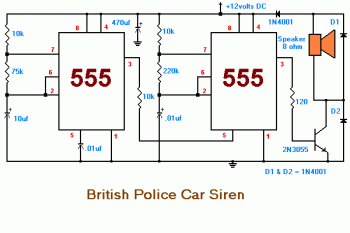
British Police Car Siren circuit diagram
The 555 timer on the right is configured as an alarm sound generator, while the second 555 timer on the left functions as a 1 Hz astable multivibrator. The output from the left timer modulates the frequency of the right...
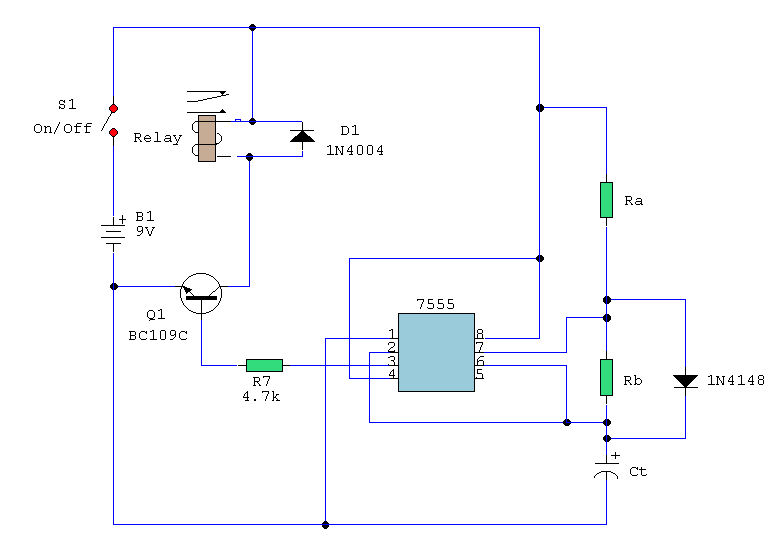
Asymmetric Timers
A simple astable timer made with the 555 timer IC allows independent adjustment of the mark (on) and space (off) values. The timing circuit comprises resistors Ra, Rb, and capacitor Ct. The capacitor Ct charges through resistor Ra, which is...
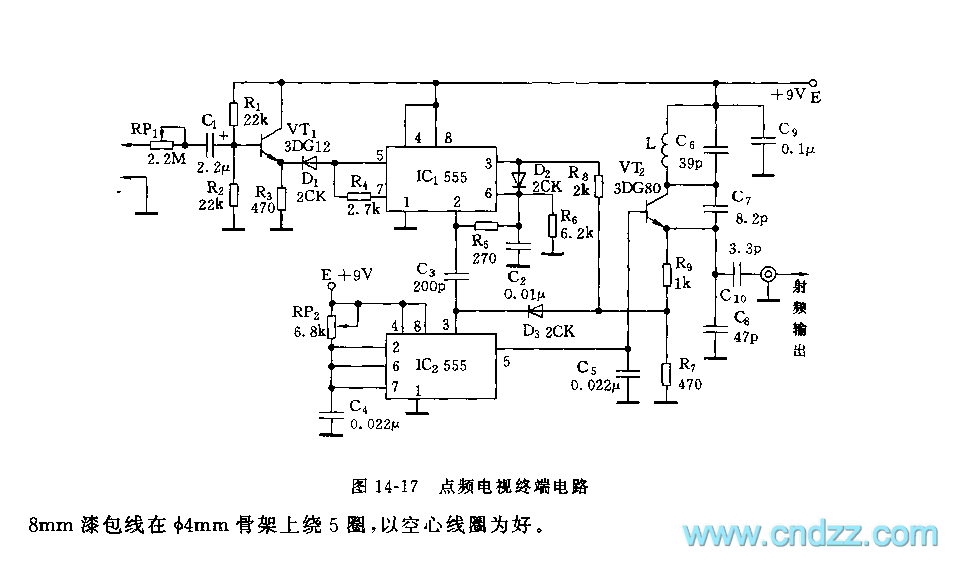
555 point-frequency TV terminal circuit
As shown in figure 14-17, this circuit consists of the input circuit, the line frequency synchronization generator, the sample-and-hold circuit, the voltage control delay generator, and the RF modulator. The input circuit includes the input attenuator RP1 and the emitter...
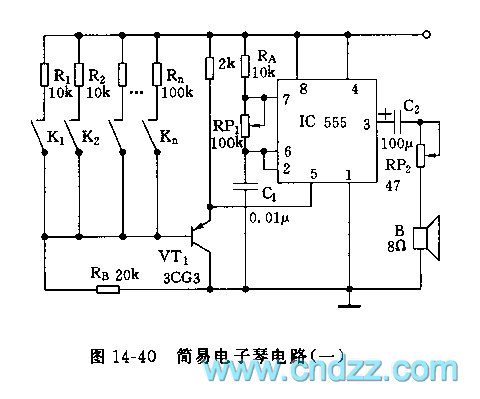
555 simple electronic keyboard circuit
The controllable multivibrator, as illustrated in figure 14-40, consists of a 555 timer along with resistors RA, RP1, and capacitor C1. The oscillation frequency is influenced by the control voltage applied to pin 5. This control voltage is determined by...
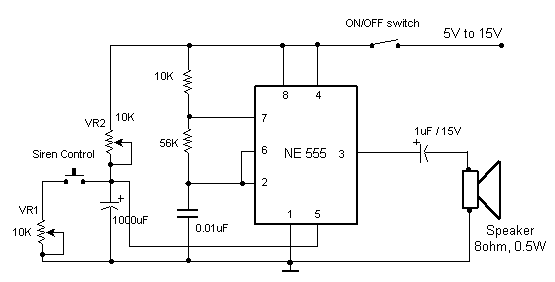
Electronic Siren
This circuit produces a sound similar to a factory siren. It makes use of a 555 timer IC used as an astable multivibrator of a center frequency of about 300Hz. The frequency is controlled by pin 5 of the IC....