


DIY 12v Dimmable Power Compact Driver
#dimmable
#12v
#LED
#aquarium lighting
#power driver
#lighting hood
#flouro tubes
#10
#000K
#Actinic
#DIY
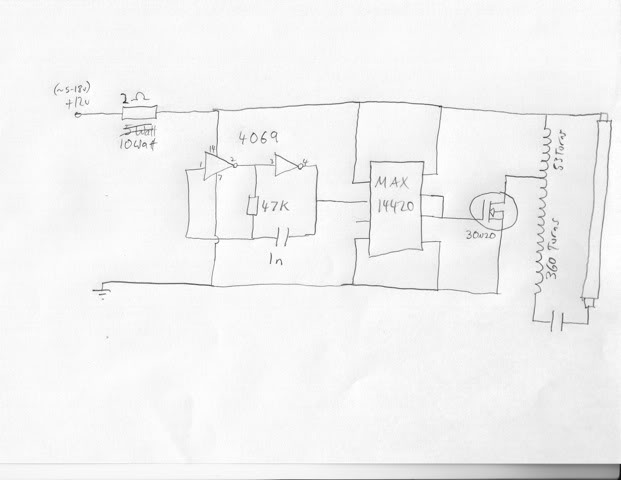
Description: The lighting hood of the AquaOne AR-320 tank typically comes with low-quality tubes that have inadequate power output and a color spectrum conducive to algae growth. Various improvement methods exist, such as replacing the hood with a metal halide pendant or using strong LEDs. However, the decision was made to utilize 10,000K/Actinic 50/50 fluorescent tubes, known for their effectiveness. Additionally, there was a desire to control the brightness of the lighting through a separate DIY controller to simulate dawn and dusk. This task is challenging with mains-powered designs; however, many 12V circuits are suitable for adjusting the tube's brightness by regulating the supply current. This project presents a straightforward solution to achieve these goals, with the added advantage of avoiding "mains" wiring, making it accessible for non-electricians. Modifications to the original circuit included a transformer wound on a ferrite rod with specific windings, a MOSFET (a 30N20 from ON Semiconductor), and a MOSFET driver chip (MAX4420) to ensure quick switching and prevent overheating.
Winding the transformer correctly is essential; an excessive turns ratio between the small and long winding results in lower voltage operation, while a minimal ratio may prevent the tube from igniting on a 12V supply. A ratio of 53:360 was effective, starting from a higher ratio of over 80:360 and gradually unwinding until the circuit ignited at 11 volts. A 2-ohm resistor was included for testing or operation with a constant voltage source. The tube begins to glow at approximately 5 volts and ignites around 11 volts, producing bright light. It is advisable to operate the circuit from a constant current source when not utilizing the resistor; after ignition, the voltage stabilizes around 9 volts at 500mA and 10 volts at 2A. Supplying 12 volts without the resistor could lead to excessive current draw, risking damage to the 18-watt tube. When powered by a constant current source, the tube starts glowing at roughly 300mA and brightens progressively, with a notable increase in brightness upon ignition at around 700mA. For control purposes, varying the current rather than the voltage is recommended, necessitating further circuit design. Additionally, frequency adjustments were noted; operating at lower frequencies yields effects similar to increasing the turns ratio. At 30kHz, the tube may ignite at 13 volts and operate at 11 volts, while reducing the frequency to 20kHz (by modifying the 47k resistor) results in lower voltage ignition and operation.
This concludes the description of the modifications made to the lighting hood.The lighting hood of AquaOne AR-320 tank. These small tanks generally come with crappy tubes with low power output and an algae-friendly colour spectrum. There are numerous ways to improve the lighting such as replacing the hood with a metal halide pendant, or dropping in some strong LEDS, but I chose to stick with the tried and tested 10, 000K/Actinic 50/50 flouro tubes since I`ve used them before and know they work.
I also wanted to be able to control the brightness of the lighting from a separate DIY controller (ie. simulated dawn/dusk). This isn`t very easy to do with mains-powered designs, but I found that many 12v circuits are inherently suited to varying the tube`s brightness by simply regulating their supply current.
This project is one of the simplest solutions I could think of to achieve my goals, and as an added bonus there is no "mains" wiring, so it`s probably legal for us non-electricians to do as well. The only changes I made to the aforementioned circuit were the transformer (i wound mine on a ferrite rod with different windings), the mosfet (i used a 30n20 which was a free sample from ON Semiconductor but similar to the one used in the example), and a mosfet driver chip (MAX4420, another free sample) which I added to the circuit to switch the mosfet fast and keep it from getting hot.
Winding the transformer is a crucial part of the project. I found that with too great a turns ratio between the small and long winding the circuit runs at a lower voltage (otherwise current draw will get out of hand) and with too small a ratio, the tube may never fire at all on a 12v supply. 53:360 worked well for me, but I started with a ratio of more than 80:360 then gradually unwound the primary coil until the circuit would fire at 11 volts (which happened to be at 53 turns).
The 2 Ohm resistor is in there for testing or running from a constant voltage source. The tube starts glowing at around 5 volts and fires at around 11 volts creating a bright light. I found it`s best to have the circuit running from a constant current source if you`re not using the resistor, since after the tube fires, the voltage likes to sit around 9 volts @ 500mA and 10 volts at 2A. If you were to supply 12 volts to the circuit without the resistor in place the current would go through the roof and the tube will fry (remember i`m only using an 18watt tube).
Running the circuit from a constant current source, it starts to glow at around 300mA and gets progressively brighter as you ramp up the current, except there`s a bit of a jump in brightness when the tube fires at around 700mA. For controlling purposes I think varying the current instead of the voltage is the best way to go. This will take some more circuit designing methinks. Another design note is the frequency. I found that running the circuit at lower frequencies has the same effect as increasing the turns ratio.
Ie. @ 30KHz the tube may fire at 13volts and run at 11, whereas reducing the frequency to 20KHz (by altering the 47K resistor) caused it to fire and run at a lower voltage. Here ends my description of my hood mods. Please feel free to ask questions and make suggestions for improvements. I hope someone out there in reefland finds this useful!
Winding the transformer correctly is essential; an excessive turns ratio between the small and long winding results in lower voltage operation, while a minimal ratio may prevent the tube from igniting on a 12V supply. A ratio of 53:360 was effective, starting from a higher ratio of over 80:360 and gradually unwinding until the circuit ignited at 11 volts. A 2-ohm resistor was included for testing or operation with a constant voltage source. The tube begins to glow at approximately 5 volts and ignites around 11 volts, producing bright light. It is advisable to operate the circuit from a constant current source when not utilizing the resistor; after ignition, the voltage stabilizes around 9 volts at 500mA and 10 volts at 2A. Supplying 12 volts without the resistor could lead to excessive current draw, risking damage to the 18-watt tube. When powered by a constant current source, the tube starts glowing at roughly 300mA and brightens progressively, with a notable increase in brightness upon ignition at around 700mA. For control purposes, varying the current rather than the voltage is recommended, necessitating further circuit design. Additionally, frequency adjustments were noted; operating at lower frequencies yields effects similar to increasing the turns ratio. At 30kHz, the tube may ignite at 13 volts and operate at 11 volts, while reducing the frequency to 20kHz (by modifying the 47k resistor) results in lower voltage ignition and operation.
This concludes the description of the modifications made to the lighting hood.The lighting hood of AquaOne AR-320 tank. These small tanks generally come with crappy tubes with low power output and an algae-friendly colour spectrum. There are numerous ways to improve the lighting such as replacing the hood with a metal halide pendant, or dropping in some strong LEDS, but I chose to stick with the tried and tested 10, 000K/Actinic 50/50 flouro tubes since I`ve used them before and know they work.
I also wanted to be able to control the brightness of the lighting from a separate DIY controller (ie. simulated dawn/dusk). This isn`t very easy to do with mains-powered designs, but I found that many 12v circuits are inherently suited to varying the tube`s brightness by simply regulating their supply current.
This project is one of the simplest solutions I could think of to achieve my goals, and as an added bonus there is no "mains" wiring, so it`s probably legal for us non-electricians to do as well. The only changes I made to the aforementioned circuit were the transformer (i wound mine on a ferrite rod with different windings), the mosfet (i used a 30n20 which was a free sample from ON Semiconductor but similar to the one used in the example), and a mosfet driver chip (MAX4420, another free sample) which I added to the circuit to switch the mosfet fast and keep it from getting hot.
Winding the transformer is a crucial part of the project. I found that with too great a turns ratio between the small and long winding the circuit runs at a lower voltage (otherwise current draw will get out of hand) and with too small a ratio, the tube may never fire at all on a 12v supply. 53:360 worked well for me, but I started with a ratio of more than 80:360 then gradually unwound the primary coil until the circuit would fire at 11 volts (which happened to be at 53 turns).
The 2 Ohm resistor is in there for testing or running from a constant voltage source. The tube starts glowing at around 5 volts and fires at around 11 volts creating a bright light. I found it`s best to have the circuit running from a constant current source if you`re not using the resistor, since after the tube fires, the voltage likes to sit around 9 volts @ 500mA and 10 volts at 2A. If you were to supply 12 volts to the circuit without the resistor in place the current would go through the roof and the tube will fry (remember i`m only using an 18watt tube).
Running the circuit from a constant current source, it starts to glow at around 300mA and gets progressively brighter as you ramp up the current, except there`s a bit of a jump in brightness when the tube fires at around 700mA. For controlling purposes I think varying the current instead of the voltage is the best way to go. This will take some more circuit designing methinks. Another design note is the frequency. I found that running the circuit at lower frequencies has the same effect as increasing the turns ratio.
Ie. @ 30KHz the tube may fire at 13volts and run at 11, whereas reducing the frequency to 20KHz (by altering the 47K resistor) caused it to fire and run at a lower voltage. Here ends my description of my hood mods. Please feel free to ask questions and make suggestions for improvements. I hope someone out there in reefland finds this useful!
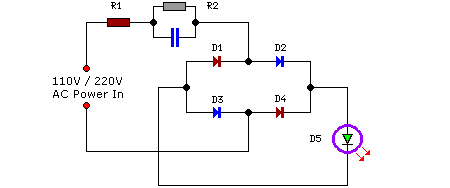
Mains Operated LED Circuit
This is a straightforward and effective LED circuit that can be powered directly from an AC mains supply ranging from 100 volts to 230 volts. The circuit can serve as a mains power indicator or a night lamp. Resistors R1...
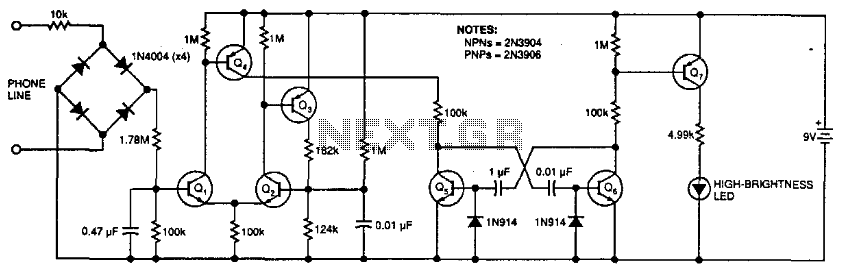
Phone Message Flasher
This circuit flashes an LED to indicate that a phone rang during the user's absence. A differential amplifier with hysteresis (Q1, Q2, and Q3) detects high line voltage (ringing), which activates Q4, a multivibrator composed of Q5 and Q6, and...
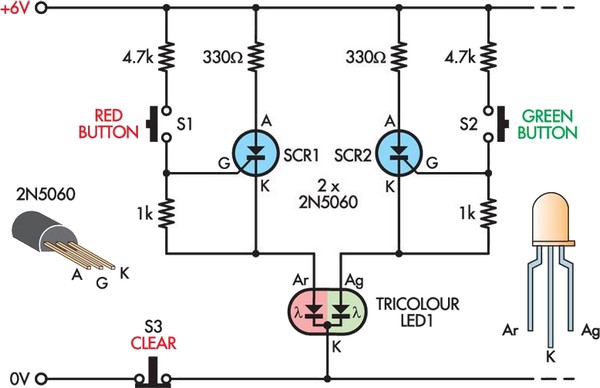
led noughts and crosses
This is a modern twist on the classic game of noughts and crosses, utilizing nine 10mm tri-color LEDs arranged in a 3 x 3 grid. One player has nine red buttons while the other player has nine green buttons, both...
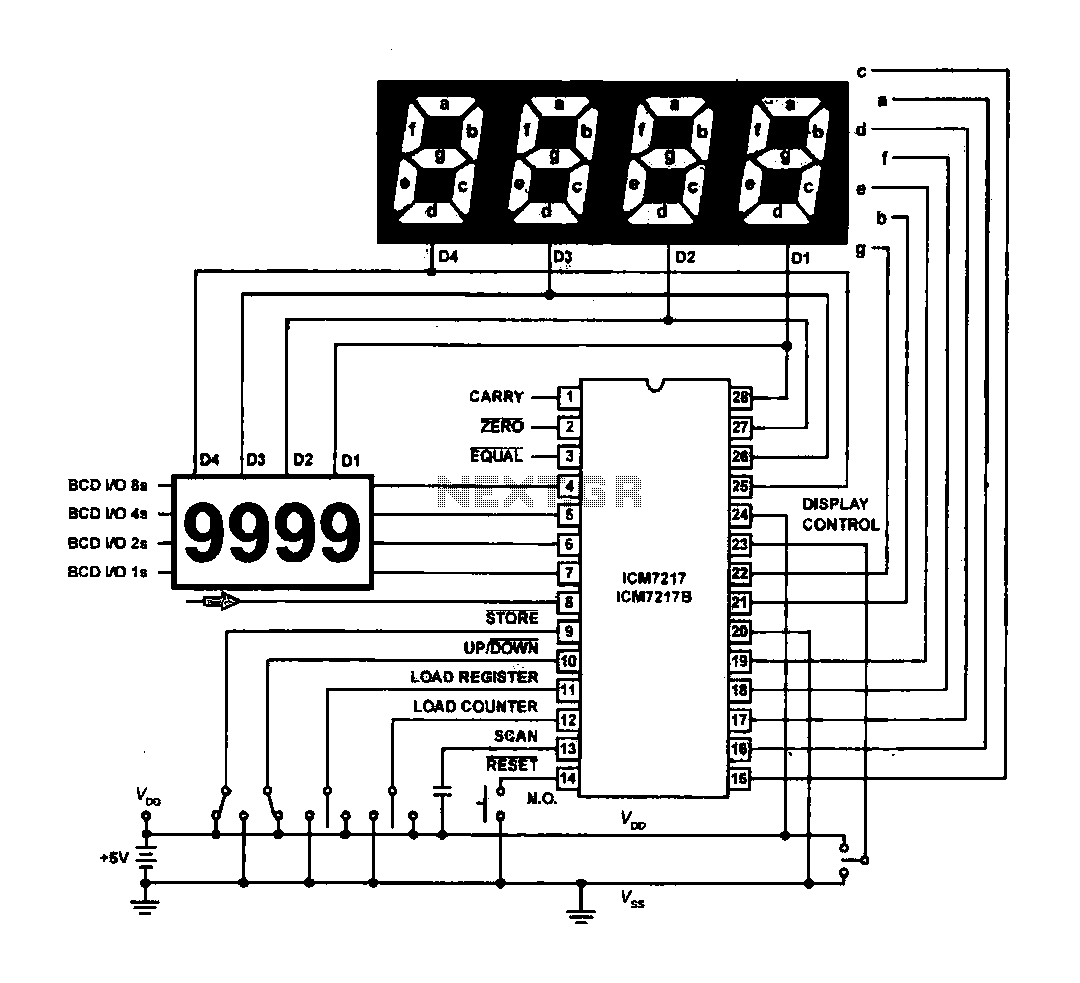
Light emitting diode LED displays the basic structure of the driving circuit
The circuit drives the light-emitting diode in a digital display configuration. The count signal is fed into the ICM7217 chip, which processes the count and subsequently drives the digital display board. The connection between the thumbwheel switches is illustrated in...
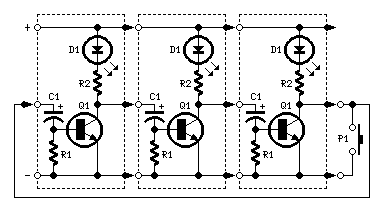
LEDs or Lamps Sequencers
The purpose of this circuit is to create a ring in which LEDs or lamps illuminate sequentially. Its main feature is high versatility; it can accommodate any number of LEDs or lamps, as each illuminating device has its own small...
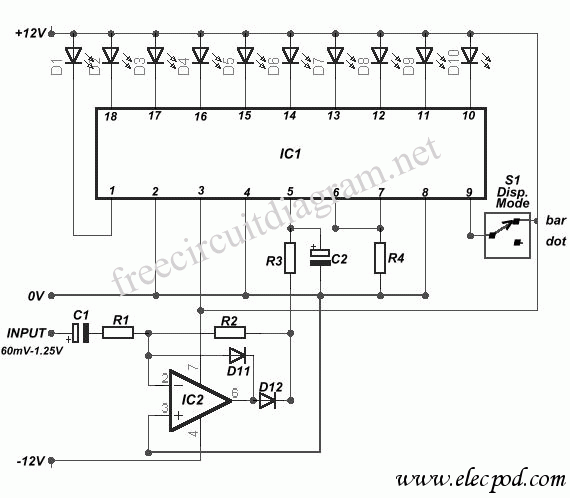
10 led VU Meter using LM3915
The circuit diagram represents a straightforward circuit-level indication featuring 10 LEDs. It utilizes a series of half-wave rectification controlled by the precision operational amplifier IC2 TL071. The LM3915 integrated circuit is employed to manage the LEDs, functioning as a VU...
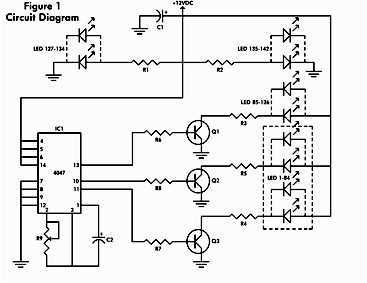
LED flashing circuit for toys
It consists of a 4047 low-power monostable/astable multivibrator, IC1, used in the astable mode to provide the timing pulses to control the flash rate of the LEDs. To accomplish the astable mode, pins 4, 5, 6, and 14 are connected...
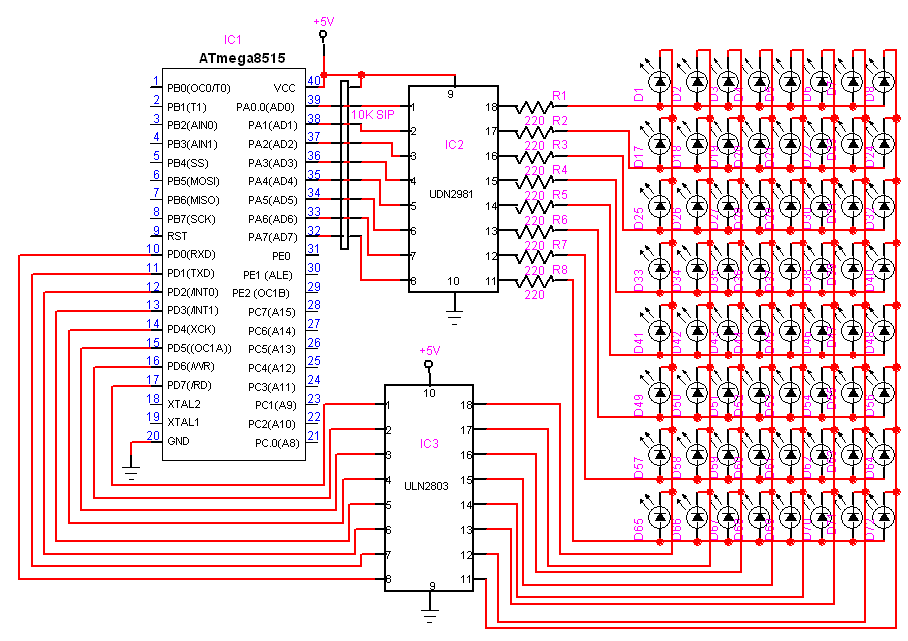
8G—8 Dotmatrix Scrolling LED display using atmega8515
Here is another project that creates a scrolling LED display. This display consists of 64 LEDs arranged in a matrix configuration. The anodes are driven through a driver circuit.
The scrolling LED display project utilizes a matrix of 64 LEDs, typically...
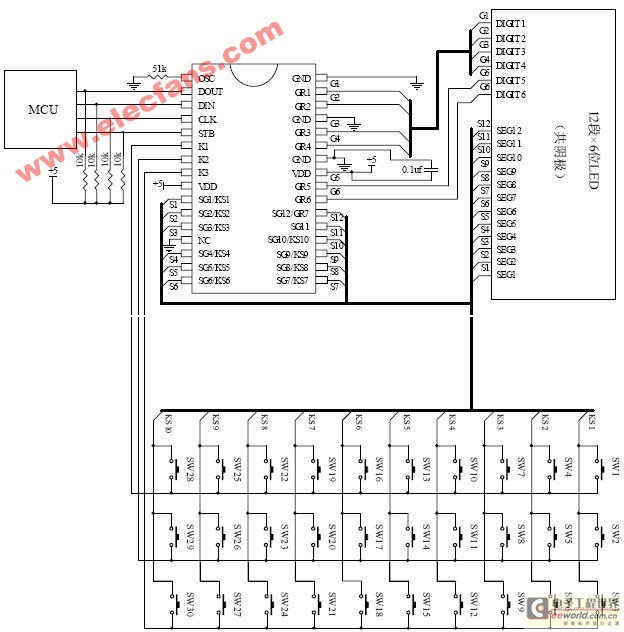
LED control drive circuit diagram
The ET6201 is a LED display control drive circuit with a duty cycle of 1/7 to 1/8. It features 11 segment output gates and 1 segment/gate output, along with a display memory, control circuit, and key scanning circuit, which collectively...