
CodeLock AVR
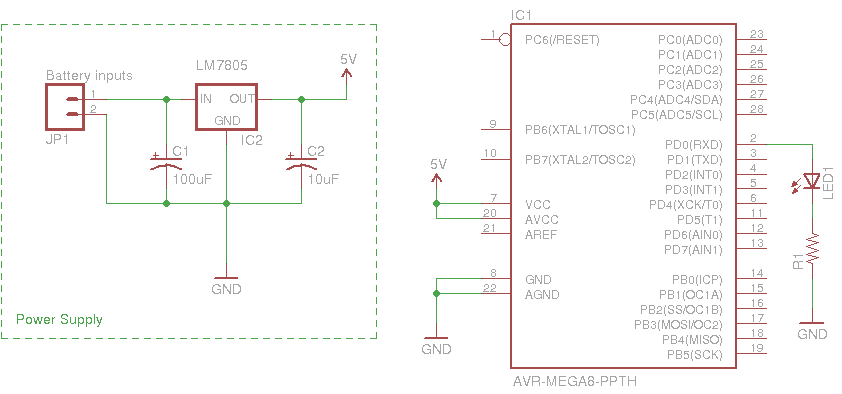
The CodeLock system utilizes an Atmel AVR microcontroller, specifically the AT90S2313 or ATtiny2313, as the core processing unit. The microcontroller is programmed with a 2 kB hex code that manages the logic for user code entry and validation. The user code can consist of 1 to 4 digits by default, but if a specific chip variant is purchased, it can support user codes of up to 8 digits.
The system is designed to operate with a 12V power supply. An initial user code of "1234" is preset and can be configured through the use of a jumper. This jumper must be inserted prior to connecting the power supply to the circuit. Once the system is powered on, the jumper must be removed after the unit emits two beeps, which indicates the end of the setup period (5 to 15 seconds).
User interaction with the system is facilitated through a 3x4 matrix keypad, which allows for easy input of the user code. Upon successful entry of the correct code, the microcontroller triggers a relay that activates an electric striker mechanism installed in the door. This relay remains energized for 1 second to allow the door to unlock before automatically switching off.
An LCD display can be integrated into the system to provide user feedback, such as prompts for code entry or confirmation of successful unlock attempts. This feature enhances user experience by providing visual confirmation of actions taken.
The components required for assembling the CodeLock system include the microcontroller, a relay, an electric striker, a 3x4 matrix keypad, and an LCD display, along with necessary passive components for interfacing and circuit stability. The design emphasizes security and usability, making it suitable for various applications where controlled access is necessary.CodeLock AVR electronic combination lock is realised with Atmel AVR microcontroller AT90S2313 or ATtiny2313. Program in hex code is 2 kB long. User code is consisted of 1 to 4 digits. If you buy the chip than user code is consisted of 1 to 8 digits. If the code is entered in the correct sequence, then after 1 second the relay and the electric striker (in the door) switch on for 1 second and then switch off again.
User code can be changed via 3x4 matrix keypad. Keypad for CodeLock can be bought at local electronic shop. Initial user code (1234) is set up with a jumper. The jumper must be inserted before the voltage (12V) connection. The jumper must be removed after 2 beeps (after 5 to 15 seconds). LCD display 🔗 External reference
Related Circuits
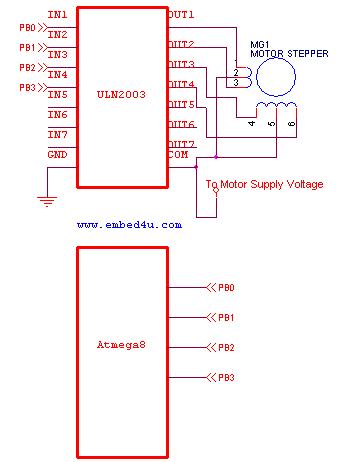
This tutorial utilizes the ATmega8 microcontroller with a 4 MHz crystal oscillator and unipolar stepper motors. The ULN2003, a Darlington pair driver integrated circuit, is employed for motor control. The ATmega8 microcontroller is a versatile 8-bit device from the AVR...
The schematic includes programmable AVRs. For other members of the AVR family or additional programmable ICs compatible with Ponyprog, there is a J1 connector (CON10) that facilitates hardware expansion of the programmer. Additional information about compatible ICs can be...

Program an ATmega1284P using an AVR Dragon and the Arduino IDE. The mighty1284p library has been installed, and after writing the sketch, it is compiled using the Arduino IDE. The compilation process creates a hex file in a temporary...
The following circuit diagram illustrates a very simple AVR microcontroller setup (source: unknown). It requires minimal components and is easy to construct on a general-purpose matrix PCB. PonyProg2000 software can be used to program the AVR microcontroller with this...
This instrument requires two precision components: A precision capacitor and a precision inductor. You only need to start with one precision component, either the reference capacitor or the reference inductor, and using this meter, you can select or adjust...
The most eloquent code in the history of embedded systems is rendered worthless without a means to execute it on the hardware. In embedded systems design, the execution of code on hardware is a critical aspect that determines the overall...
Warning: include(partials/cookie-banner.php): Failed to open stream: Permission denied in /var/www/html/nextgr/view-circuit.php on line 713
Warning: include(): Failed opening 'partials/cookie-banner.php' for inclusion (include_path='.:/usr/share/php') in /var/www/html/nextgr/view-circuit.php on line 713