
Telegraph Transmitter in the Pilot Radios Radio Design magazine 1930s
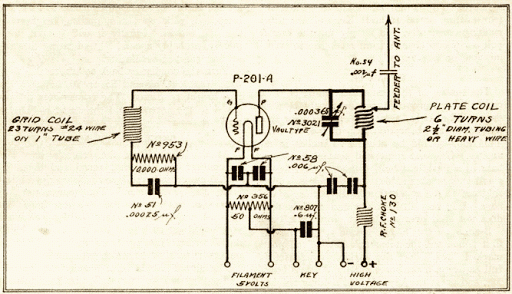
A baseboard measuring 12 inches long and 10 inches wide serves as the foundation for the transmitter, with any dry piece of lumber being suitable; there is no necessity for expensive bakelite panels or sub-panels. The completed transmitter is assembled on this board, with CF indicating the bypass capacitors across the filament and CB representing the plate blocking capacitors. The midget capacitor in front of the grid coil is unnecessary. The components are arranged as depicted in the accompanying illustration. The setup includes a grid coil made of 23 turns of No. 24 cotton-covered wire wound around a one-inch tube and a plate coil constructed from six turns of 1/4 inch copper tubing with a diameter of 2 1/2 inches. The grid coil is mounted on a pair of small double-L-shaped legs, while the ends of the plate coil are flattened, drilled, and secured directly to the terminals of the Vaultype capacitor.
Six binding posts are affixed to a bakelite strip, which is elevated above the edge of the board using wood screws that pass through thick washers. All components, except the variable capacitor, are secured with wood screws; the variable capacitor is held in place by two machine screws that extend from the bottom of the baseboard into tapped holes in the frame. The circuit utilized by this transmitter follows the tuned-grid, tuned-plate design, known for its simplicity and reliability. The transmitter features a single control, making it easier to construct and operate compared to most short-wave receivers. The theory of operation is thoroughly explained in the Handbook and will not be elaborated on here.
For wiring, standard hookup wire should be used, ensuring that all joints are soldered securely. The effectiveness of any short-wave transmitter heavily relies on the antenna system. While nearly any exposed wire can suffice for receiving, the transmitting aerial must be carefully installed and of a precise length. For this specific transmitter, the top section of the antenna should measure exactly 66 feet and be as straight as possible. The lead-in wire, more accurately referred to as the "feeder," must be connected precisely 23 feet, 11 inches from one end and should descend vertically.TPTG transmitter was transformed into a trendy TNT. You can use your present K-111 power pack for this transmitter as well as for the receiver, and thus save the expense of a separate power supply unit. Build this little transmitter and go "on the air. " The one-tube short-wave transmitter shown on page 53 of the Volume 3, Number 3 issue of RADIO DESIGN aroused a great deal of interest, and many
readers asked about building this outfit with Pilot parts and using it on a K-111 power pack. The requests for "dope" were so numerous that we built an actual transmitter, following the general description given in The Radio Amateur`s Handbook. It worked without trouble the first time it was turned on, and was so easy to make that we are sure many short-wave fans will find it interesting.
A piece of wood 12 inches long and 10 inches wide was used as the baseboard. Any dry piece of lumber is satisfactory ; no expensive bakelite panels or sub-panels are needed. The following parts all of standard Pilot make and available throughout the world were used: The completed transmitter assembled on a board. CF are the by-pass condensers across the filament; CB - the plate blocking condensers. The midget condenser in front of the grid coil is not needed. sic! The parts were arranged as shown in the illustration on this page. In addition to the material listed, the set uses a grid coil consisting of 23 turns of No. 24 cotton covered wire on a one inch tube, and a plate coil consisting of 6 turns of 1/4 inch copper tubing wound 2 1/2 inches in diameter.
The grid coil is mounted on a pair of little double-L shaped legs, while the ends of the plate coil are flattened, drilled, and fastened directly to the terminals of the Vaultype condenser. The six binding posts are mounted on a strip of bakelite, which is supported above the edge of the board by a couple of wood screws passing through thick washers.
Wood screws hold all the other parts except the variable condenser, which is held by two machine screws running up from the bottom of the baseboard into the tapped holes in the frame. The circuit employed by this transmitter is of the tuned-grid, tuned-plate type, and is favorably known for its simplicity and reliability.
It has only one control, and is simpler in construction and operation than most short-wave receivers. We will not attempt to describe its theory of operation, as this is admirably handled in the Handbook.
For the wiring, use ordinary hook-up wire, being careful to solder all the joints solidly. Much of the success of any short-wave transmitter depends on the antenna system. While almost any piece of exposed wire serves for receiving purposes, the aerial for transmitting use must be carefully erected and must be of a certain exact length. For this particular transmitter, the top section must be exactly 66 feet long, and should be as straight as possible.
The lead-in wire, which is more properly called the "feeder, " must be attached exactly 23 feet, 11 inches from one end, and should drop down at right 🔗 External reference
Related Circuits
The telemetric physiologic monitors transmit measurements of bodily functions from beneath the skin of a live animal to a receiver beneath the animal's cage. The smallest transmitters the company produces are known as "mouse" transmitters, which garnered particular interest...

FAN7710 Ballast Control circuit design for Compact Fluorescent Lamps electronic project. The FAN7710 is a specialized integrated circuit designed for the control of ballast systems in compact fluorescent lamps (CFLs). This circuit typically operates in a high-frequency range, facilitating efficient...
This SMD FM transmitter operates within a frequency range of approximately 80 to 115 MHz. Under optimal conditions, the signal can be received at a distance of around 200 meters. Although it is classified as low-power, its use may...

The circuit design philosophy allows for debugging without any RF instruments. Although its performance may not match that of professional equipment, it should be adequate for hobbyists, with audio-visual transmission effects comparable to general-purpose machines. The transmitter consists of...

Here is the circuit diagram of a four RF stage FM transmitter. The stages include a very high frequency (VHF) oscillator built around the HF transistor BF494, a pre-amplifier using the BF200 transistor, a driver transistor 2N2219, and a...

An oscillator circuit capable of generating a high-quality sine wave with a frequency of at least 500 MHz, intended for RFID applications. There have been attempts to utilize a class E oscillator, but the design has not yet been...
Warning: include(partials/cookie-banner.php): Failed to open stream: Permission denied in /var/www/html/nextgr/view-circuit.php on line 713
Warning: include(): Failed opening 'partials/cookie-banner.php' for inclusion (include_path='.:/usr/share/php') in /var/www/html/nextgr/view-circuit.php on line 713