
Wireless Coupled Frequency Meter

To use it, the input leads are attached to the signal to be measured, the meter is placed next to the base unit, and it is switched on. The activity LEDs blink on both enclosures as the frequency meter sends its command menu, and the menu prints on the computer screen, indicating that the system is ready for taking measurements.
After the frequency meter sends its command menu, it "disconnects" from the RF channel. It does not respond to commands or send data until it receives an ASCII control-A character, which is its reconnect command. A control-B character from the keyboard disconnects the meter from the channel again. Other devices use different control codes; for example, the scanning voltmeter uses control-C to connect and control-D to disconnect. This discipline allows multiple Minimum Mass Wireless Coupler equipped devices to share the same Base Unit without interfering with each other.
The circuit uses the simplest possible implementation of the Minimum Mass Wireless Coupler. As long as the input signal swings through the chip's logic switching thresholds, it will be counted. As the battery voltage drops, the 1N916 protection diodes will keep the input pin on the controller from exceeding the maximum current specified in the data sheet. Additional protection is provided by an upside-down transistor connected as a low-current zener diode, which safeguards against large signals applied to the input leads when the power is off.
A battery saver feature shuts down the controller and power to the bias resistors if the circuit does not receive a command for an extended period. This feature has proven effective in prolonging battery life, reducing the frequency of battery replacements.
The frequency meter circuit utilizes the ATMega8 microcontroller, which is programmed to measure frequency within a range of 0 to 2 MHz. The Minimum Mass Wireless Coupler facilitates wireless communication with the Base Unit, allowing for a compact and efficient design. The input signal is connected through a pair of wires, and the microcontroller processes the signal, converting it into a frequency reading.
The protection diodes (1N916) are critical for ensuring that the microcontroller's input does not exceed safe operating conditions, particularly as battery voltage decreases. The inclusion of an upside-down transistor as a zener diode provides an additional layer of protection against potential over-voltage conditions when the device is powered down.
The battery saver feature is implemented using a timer interrupt within the microcontroller, which monitors the activity of the device. If no commands are received within a predetermined time frame, the microcontroller enters a low-power sleep mode, significantly extending the operational life of the frequency meter.
Overall, the design prioritizes simplicity and functionality, making it a valuable tool for frequency measurement in various applications, particularly in test and measurement environments. The wireless capability enhances usability by eliminating the need for cumbersome connections, thereby streamlining the measurement process.A 0 to 2 MHz ferquency meter with a Minimum Mass Wireless Coupler, based on the ATMega8.Range to the Minimum Mass Base Unit is 10 to 15 cm. Since the frequency meter is battery operated, it can be floated from ground, making life in and around the test bench a lot simpler.
No need to connect it to the computer or LCD display - just turn in on and place it next to the base unit. A simple one chip frequency meter was the first instrument I updated with the Minimum Mass Wireless Coupler.
The frequency meter is self-contained, including batteries. The only external electrical connection is pair of wires to connect to the signal being measured. To use it, I merely attach the input leads to the signal I want to measure, place the meter next to the base unit and switch it on. The activity LEDs blink on both enclosures as the frequency meter sends its command menu and -voila! -the menu prints on my computer screen and the system is ready for taking measurements. After the frequency meter sends its command menu, it "disconnects" from the RF channel. In other words, it does not respond to commands or send data until it receives an ASCII control-A character, which is its reconnect command.
A control-B character from the keyboard disconnects the meter from the channel again. Other devices use different control codes, for example, the scanning voltmeter uses control-C do connect and control-D to disconnect. This discipline allows multiple Minimum Mass Wireless Coupler equipped devices to share the same Base Unit without interfering with each other.
The circuit shown on this page uses the simplest possible implementation of the Minimum Mass Wireless Coupler. As long as the input signal swings through the chip's logic switching thresholds, it will be counted.
As the battery voltage drops lower and lower, the 1N916 protection diodes will keep the input pin on the controller from exceeding the maximum current shown on the data sheet. A further protection is the upside-down transistor connected as a low current zener diode, just in case the batteries a large signal is applied to the input leads when the power is off.
A battery saver shuts down the controller and power to the bias resistors if the circuit does not receive a command for a long period of time. This one feature has saved me from having to replace the batteries a number of times already. 🔗 External reference
Related Circuits
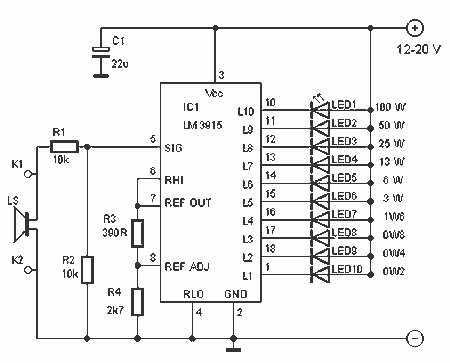
This indicator lets you see how much power an amplifier produces. The circuit uses an LM 3915, the logarithmic variation of the known IC LED VU Meter LM 3914. The circuit is connected directly to the speaker output of...
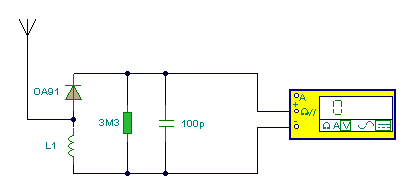
The multimeter should be set to the lowest DC volts range for maximum sensitivity, typically at 200mV DC for most meters. The circuit operates effectively at VHF frequencies, around 100MHz, yielding satisfactory results. The inductor L1 consists of 7...

The beacon controller is designed to telemeter data from the VUSAT in Morse code, allowing ham radio operators to decode the information without requiring expensive or complex equipment. The design adheres to the KISS (Keep It Simple, Stupid) principle,...
This is a CMOS-compatible (and ideally also TTL-compatible) input that includes over-voltage and under-voltage protection. Schmitt triggers are utilized to accommodate inputs with long transition times. It has been verified to function at frequencies up to 30 MHz. The described...

This circuit is designed to measure the inductance of an inductor labeled LX. The output of the circuit generates a TTL square wave, with its frequency being directly related to the inductance being measured. The output from the inductance...
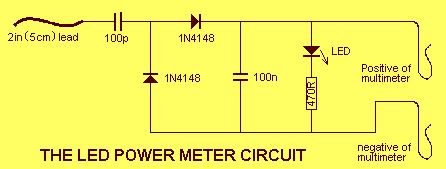
The LED power Meter is a simple RF detector using diodes to charge a capacitor. The voltage developed across the capacitor is indicated by a multimeter set to a low voltage range. The circuit is soldered together without the...