
Serial COM port using ATmega8

The circuit described allows for the transformation of USB AVR Programmers into functional USB to Serial converters, facilitating UART communication with modern laptops lacking native serial ports. The basic operation involves reconfiguring the USB programmer's firmware and making specific wiring adjustments.
To implement this circuit, the following components are essential: a USB AVR Programmer (such as the USBasp), a microcontroller (ATTiny45, ATTiny2313, or ATmega8), and necessary passive components like resistors and capacitors for stability and signal conditioning. The microcontroller will handle the UART communication, converting USB signals to serial signals suitable for standard COM port communication.
The circuit schematic begins with the USB connection interfacing with the microcontroller's USB pins. The microcontroller's UART pins are then connected to a level shifter if necessary, to ensure compatibility with the target device's voltage levels. Resistors may be used to pull up or pull down lines to prevent floating states, which can lead to erratic behavior.
In terms of firmware, a suitable bootloader must be uploaded to the microcontroller, allowing it to handle USB communication and convert it to serial data. This software layer is crucial as it manages the data flow between the USB interface and the serial output, ensuring that baud rates match the requirements of the connected device.
The versatility of this circuit allows it to be used in various applications, from debugging embedded systems to facilitating communication between devices in a project. The ability to adjust baud rates by selecting different microcontrollers provides an additional layer of flexibility, accommodating a wide range of devices and communication speeds.
Overall, this USB to Serial converter circuit not only provides a practical solution for modern computing environments but also serves as an educational tool for those interested in understanding the intricacies of UART communication and USB interfacing.Many times, I have written code for UART communication and when it came to testing, my laptop does not have a serial port. I bought a USB to serial port converter but it didnt worked. I felt frustated and finally thought of buying a Serial to Com port module in an electronics hobby store.
After seeing that I got the idea of making one myself. I ha ve 2 USB AVR Programmers with me. I tried different circuits but they didnt worked for Windows 7 because of driver problems. I googled for the circuit and finally came to know that the circuit of USB Programmer and USB to Serial port are both same. I just have to connect some wires in the programmer and change the firm ware of the programmer and it became USB to Serial Converter!
Voila! My laptop has a serial port now! There are other methods in internet, but you can only them in old PC`s of with Windows 98 or XP. You will find support for high end operating systems like Windows 7. This circuit is tested and it is working 100%. I started using COM port for all my projects because you can give different inputs and debugging became even more simple using serial port. In the above link you will find the details of the circuit. You can build the circuit using ATTiny45 or ATTiny2313 or ATmega8. But the baud rate speeds will vary depeding upon the device you use. 🔗 External reference
Related Circuits

The LA1600 is an AM tuner integrated circuit (IC) housed in a 9-pin single in-line package (SIP). It provides the functionality of an AM tuner and is capable of operating within the shortwave (SW) band range. This IC is...
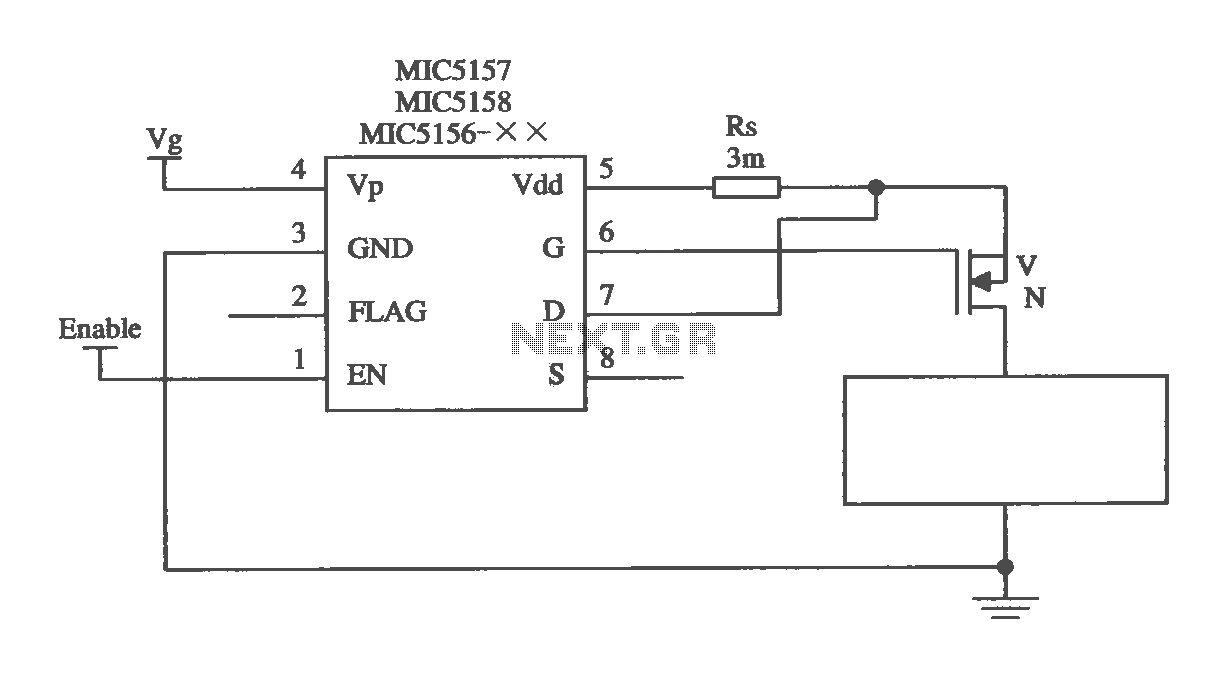
The MIC5156 is a device that incorporates a current limiting function, allowing it to handle high output currents. It can operate with or without a switching regulator circuit. The S terminal is left vacant, and a 16V Zener diode...

The following circuit illustrates an Automatic Light Dimmer Circuit Diagram utilizing a 1N4007 diode. Features include integration within a wall-mounted box. The Automatic Light Dimmer Circuit is designed to adjust the brightness of a light source automatically based on ambient...

This section discusses a series of 5-band equalizer circuits utilizing a single integrated circuit (IC) BA3812L, which is designed for high-fidelity (hi-fi) audio applications. The BA3812 IC features a 5-point equalizer with all functions integrated within the chip. The...

Create a simple "Hello World" example of serial communication to a PC using a microcontroller's USART. The project involves establishing serial communication between a microcontroller and a personal computer (PC) using the Universal Synchronous/Asynchronous Receiver-Transmitter (USART) interface. The primary objective...

The DC motor drive controller can control two DC motors of varying current or voltage ratings, depending on the relay specifications. The circuit includes two shaft encoders that provide positional feedback to a computer. The motor control circuit connects...