
Animated LED for Bike Turning Signal

This circuit utilizes a series of light-emitting diodes (LEDs) arranged to represent the bike's turning signal. The sequence begins with LED D1, which represents the right turn signal, illuminating first. Following this, the signal progresses through LEDs D2, D3, and D4, before finally illuminating LED D5, which represents the left turn signal. This sequential blinking creates a visual effect that simulates a directional signal, enhancing the visibility of the bike's intentions to other road users.
To achieve this effect, a microcontroller or a timer IC can be employed to control the timing of the LED illumination. A simple microcontroller circuit can be programmed to turn each LED on and off in a specific sequence with defined time intervals between each activation. Alternatively, a 555 timer IC can be configured in astable mode to generate a pulse that drives a transistor or MOSFET, which in turn controls the LEDs.
The circuit may include current-limiting resistors for each LED to prevent excessive current from damaging the components. Additionally, a power supply appropriate for the LEDs and control circuitry must be provided, ensuring that the voltage and current ratings are within safe limits.
Overall, this design not only provides a functional turning signal for bicycles but also improves safety by making the bike more visible during turns, particularly in low-light conditions.Using circuit below, we can animate the bike turning signal using LED. The bike turning signal will blink from the right side (D1) to the left side (D5) in a.. 🔗 External reference
Related Circuits
Colour temperature refers to the tonal quality or shade of light. White light, for instance, is subjective and available in various hues. This guide aims to assist in identifying the most suitable shade for specific situations. A "warm" white...

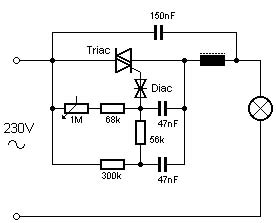
Create LED lighting powered directly from the AC mains (120-Volt AC) due to the unavailability of inexpensive and safe enclosures for the circuitry. While collecting old failed CFLs for recycling, it was noted that the body of CFLs (also...

This is a simple 1.5V powered LED flasher circuit diagram. This circuit can flash 1.7V or 2.3V LEDs (depending on the color) using a 1.5V DC input. The LED will turn on when the 100µF capacitor is charged by...
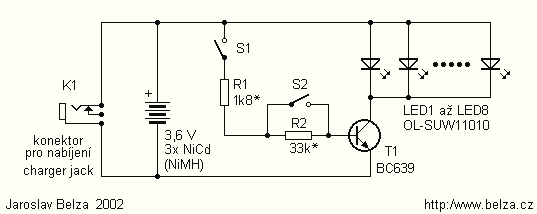
Presented circuit is very simple. With more sampling, I refrained from using the converter and lamp designed for powering three NiCd or NiMH batteries. Because the voltage difference between the battery and the LED is very small, this arrangement...

New design techniques in LED driver circuits promise to deliver significant energy savings that will help TV manufacturers meet stringent power consumption requirements. The advancement of LED driver circuits through innovative design techniques has the potential to yield substantial energy...

This is a relay circuit that detects the presence of sound to activate the relay. This sound-controlled relay can be utilized as a voice-operated switch or for controlling lights. The sound-activated relay circuit typically employs a microphone or a sound...