
DIY Homemade Kirlian Photographs
The Kirlian effect is a phenomenon where high voltage electrical discharges create a visual representation of the energy field surrounding an object, often referred to as its "aura." To build a Kirlian effect camera, several key components and steps must be considered.
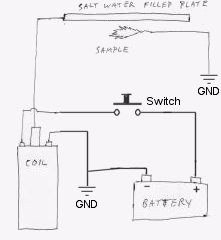
The primary components required are a high-voltage power supply, a transparent conductive surface (such as a glass plate coated with a conductive material), a camera capable of long exposure times, and a suitable grounding mechanism.
1. **High-Voltage Power Supply**: A transformer or a high-voltage power supply capable of generating voltages in the range of 10kV to 30kV is necessary. This power supply should be equipped with safety features to prevent accidental shocks.
2. **Conductive Surface**: The glass plate should be coated with a conductive layer, such as aluminum foil or a thin conductive paint. This layer will allow the electrical discharge to occur when an object is placed on top of it.
3. **Camera Setup**: A digital or film camera must be positioned above the glass plate. If using a digital camera, ensure it has the capability for manual settings to adjust exposure time, as longer exposures will capture the intricate details of the corona discharge.
4. **Grounding**: The system must be grounded properly to ensure safety and to provide a return path for the electrical current. This can be accomplished by connecting the conductive surface to a grounding rod or a grounded electrical outlet.
5. **Photographing Process**: To capture the Kirlian effect, place the object of interest on the conductive surface and activate the high-voltage power supply while triggering the camera to take a long exposure photograph. The electrical discharges will create a colorful aura around the object, which will be recorded by the camera.
Safety precautions must be strictly observed when working with high voltages. It is essential to ensure that all connections are secure and that the working area is clear of any conductive materials that could cause accidental discharges. Proper insulation and protective gear, such as gloves and goggles, should be used to minimize the risk of electrical shock.
By following these guidelines, a Kirlian effect camera can be constructed to explore the fascinating interplay between electricity and the visual representation of energy fields around objects.How to make a simple kirlian effect camera for photographing high voltage corona around objects. Otherwise known as aura photography.. 🔗 External reference
Related Circuits
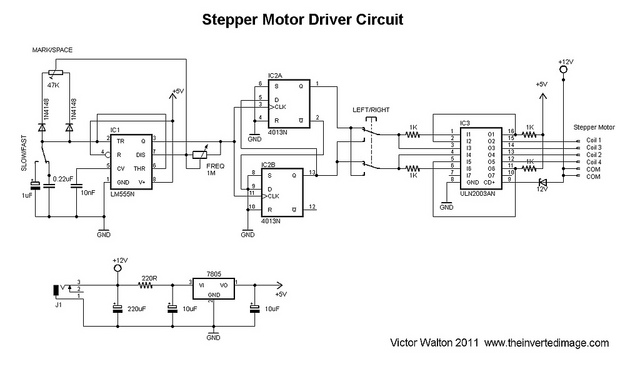
The commonly used 555 timer is configured for a variable mark/space ratio, which is essential for this application. Additionally, two D-type flip-flops (4013) are employed to provide the necessary count for the ULN2003 stepper motor driver. ULN2003 components may...
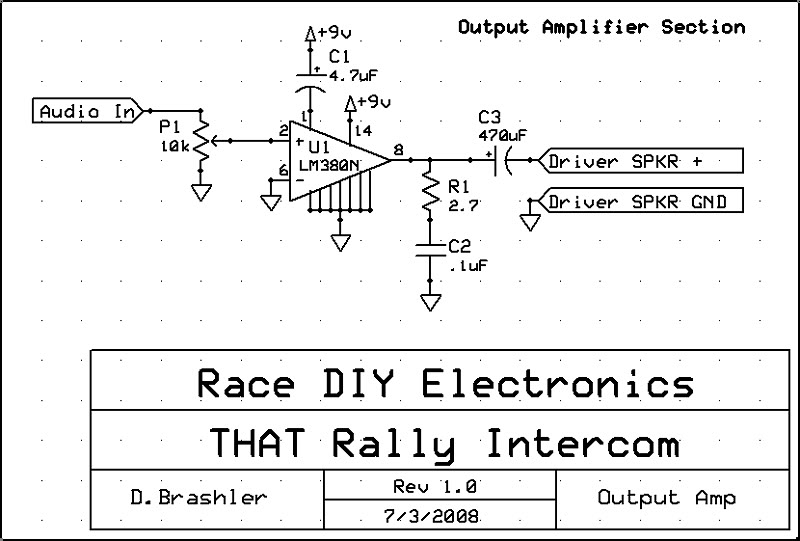
There is nothing wrong with that setup in my opinion. An older Peltor FMT15 amplifier is used in a Golf, which works well for two Peltor headsets. The issue arises when mixing Peltor and Terraphone headsets/amps. All three of...
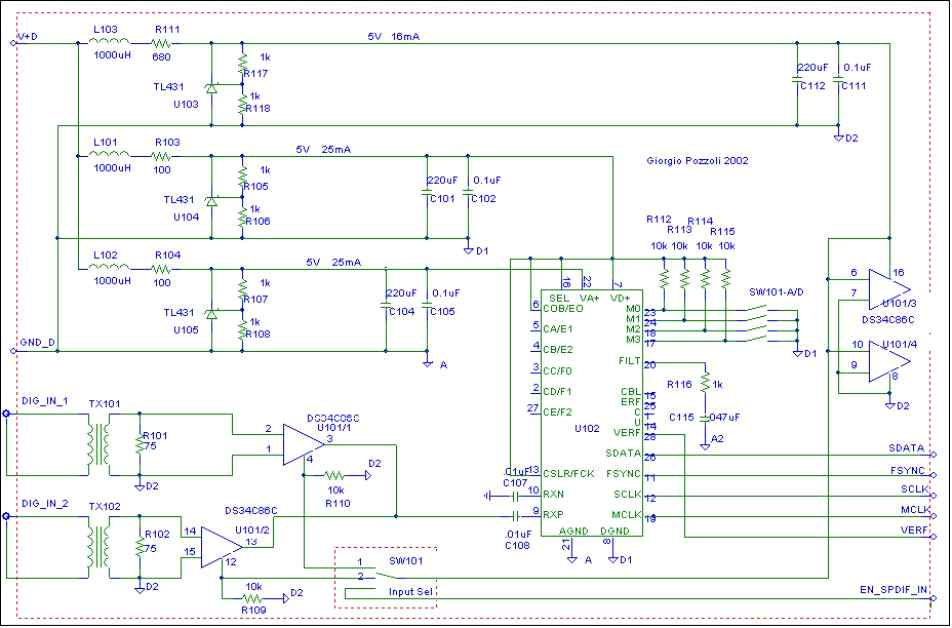
The TNT Convertus is a notable design that has gained significant attention as one of the first DIY DAC projects published in Italy. Although several modifications have been made to the original Convertus design, time constraints have prevented further...
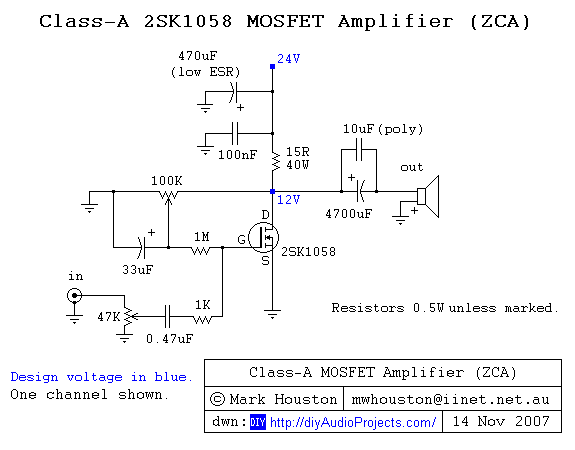
A straightforward DIY Class-A MOSFET amplifier project that utilizes a single Hitachi 2SK1058 N-channel MOSFET in a single-ended configuration. This Class-A MOSFET amplifier design is characterized by its simplicity and effectiveness, making it suitable for audio amplification applications. The core...
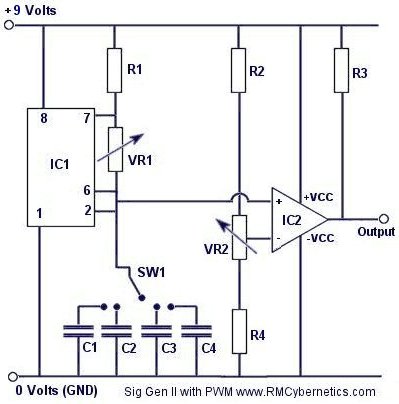
Construct a signal generator using readily available components. It should produce a square wave with variable frequency and adjustable pulse width. This device can be utilized for various applications, including DC motor speed regulation, dimming of lamps or LEDs,...
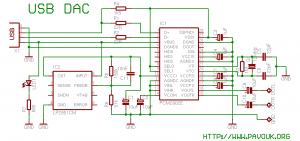
There is a significant interest in audio DAC design, particularly in creating a low-cost yet powerful audio DAC. This guide will provide instructions on how to build a personal audio DAC using the PCM2902 circuit. The project involves designing...