


Bass and Treble Controller- Audio Equalizer Circuit
#equalizer
#bass control
#treble control
#audio signal
#frequency response
#amplifier
#tone adjustment
#sound engineering
#audio processing
#music
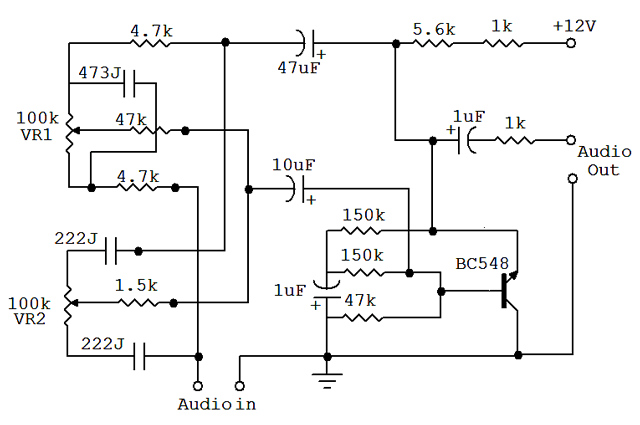
Description: An audio equalizer circuit is utilized to modify the frequency response of an audio signal. This particular equalizer circuit is designed for adjusting the bass and treble (tone) levels of an audio amplifier. To integrate this equalizer circuit with an amplifier, the output of the equalizer must be connected to the input of the amplifier, allowing for control over the bass and treble of the main audio signal prior to amplification. The bass and treble controller circuit features two variable resistors (VR1 and VR2) to adjust the bass and treble levels, respectively, with VR1 dedicated to bass control and VR2 to treble control. This circuit requires a 12V power supply, which is standard in most audio amplifier circuits. Since the equalizer is intended for use with an audio amplifier, no additional power supply is necessary for this equalizer. The audio equalizer circuit is straightforward to construct and offers high-quality performance.
The audio equalizer circuit typically consists of a series of filters that manipulate the audio signal's frequency components. The two variable resistors, VR1 and VR2, are positioned within the circuit to function as adjustable potentiometers. These allow the user to fine-tune the audio output by varying the resistance, which in turn alters the gain of specific frequency bands corresponding to bass and treble.
The circuit may utilize operational amplifiers (op-amps) configured in a non-inverting mode to achieve the desired amplification and frequency response shaping. The design can include passive components such as capacitors and inductors to create low-pass and high-pass filters, effectively defining the cutoff frequencies for bass and treble adjustments.
The choice of a 12V power supply is significant as it aligns with the operational requirements of most audio amplification systems, ensuring compatibility and minimizing the need for additional power sources. The layout of the circuit should be optimized to reduce noise and interference, which can degrade audio quality. Shielding and proper grounding techniques are essential to maintain signal integrity.
In summary, this audio equalizer circuit is an effective tool for enhancing audio playback quality, providing users with the ability to customize their listening experience by adjusting the bass and treble levels according to personal preference. Its simplicity in design, combined with high-quality output, makes it an appealing option for audio enthusiasts and engineers alike.An audio equalizer circuit is used to adjust the frequency response of an audio signal. This is a simple equalizer circuit for controlling the bass and treble (tone) of an audio amplifier. For use this equalizer circuit in amplifier, equalizer`s output should be given in the input of amplifier. So that the main input audio signal`s bass and trebl e could be controllable before the amplify section. As shown here the bass and treble controller circuit has two variable resistor(VR1 & VR2) to control the bass and treble. VR1 for Bass Control and VR2 for Treble Control. This Bass and Treble controller circuit needed a 12Volt power supply. I would have designed it in that way because 12V is used in most of the audio amplifier circuit. and since equalizer circuit is used with audio amplifier, so there no extra power supply will required for this Equalizer.
This audio equalizer circuit is very easy to build and has a very good quality.
The audio equalizer circuit typically consists of a series of filters that manipulate the audio signal's frequency components. The two variable resistors, VR1 and VR2, are positioned within the circuit to function as adjustable potentiometers. These allow the user to fine-tune the audio output by varying the resistance, which in turn alters the gain of specific frequency bands corresponding to bass and treble.
The circuit may utilize operational amplifiers (op-amps) configured in a non-inverting mode to achieve the desired amplification and frequency response shaping. The design can include passive components such as capacitors and inductors to create low-pass and high-pass filters, effectively defining the cutoff frequencies for bass and treble adjustments.
The choice of a 12V power supply is significant as it aligns with the operational requirements of most audio amplification systems, ensuring compatibility and minimizing the need for additional power sources. The layout of the circuit should be optimized to reduce noise and interference, which can degrade audio quality. Shielding and proper grounding techniques are essential to maintain signal integrity.
In summary, this audio equalizer circuit is an effective tool for enhancing audio playback quality, providing users with the ability to customize their listening experience by adjusting the bass and treble levels according to personal preference. Its simplicity in design, combined with high-quality output, makes it an appealing option for audio enthusiasts and engineers alike.An audio equalizer circuit is used to adjust the frequency response of an audio signal. This is a simple equalizer circuit for controlling the bass and treble (tone) of an audio amplifier. For use this equalizer circuit in amplifier, equalizer`s output should be given in the input of amplifier. So that the main input audio signal`s bass and trebl e could be controllable before the amplify section. As shown here the bass and treble controller circuit has two variable resistor(VR1 & VR2) to control the bass and treble. VR1 for Bass Control and VR2 for Treble Control. This Bass and Treble controller circuit needed a 12Volt power supply. I would have designed it in that way because 12V is used in most of the audio amplifier circuit. and since equalizer circuit is used with audio amplifier, so there no extra power supply will required for this Equalizer.
This audio equalizer circuit is very easy to build and has a very good quality.
Audio Equalizer Circuits
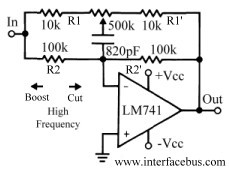
This discussion continues from the audio tone control topic, which introduced both passive and active tone controls. The follow-up topics may include a 2-Band Active Tone Control or a 3-Band Active Tone Control. An audio equalizer is utilized to adjust...
Bassman Modifications
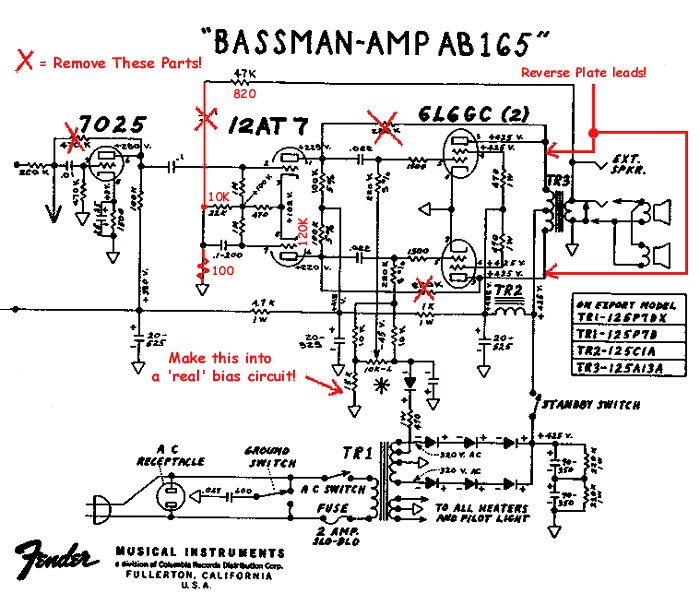
Upgrading to a 3-prong AC cord is a common modification, as is the replacement of filter capacitors. Switching coupling capacitors to brands like Orange Drops or other boutique options is also popular, often enhancing the appeal in online auctions. Additional...
amplifier How does this circuit attenuate high frequencies
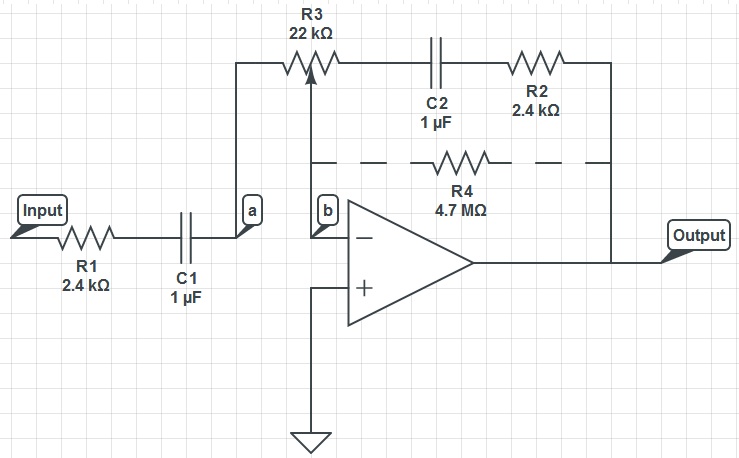
This circuit can function as a treble control circuit, with high-frequency gain occurring when resistor R3 is set to a value that makes points a and b equal (denoted as k=0). Conversely, high-frequency attenuation occurs when R3 is set to...
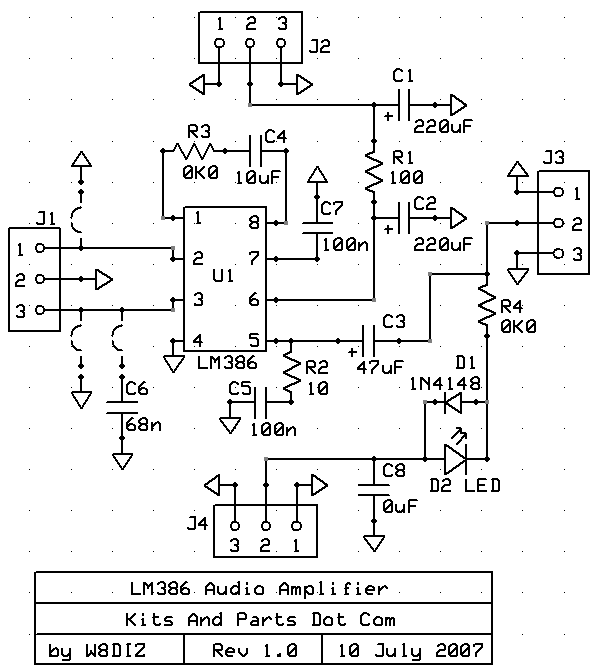
audio amp
Install the red LED at D2. Align the flat side of the LED with the PCB outline. Install a jumper wire at R4 and install a 220µF electrolytic capacitor at C8 with the negative side connected to ground. Connect pin...
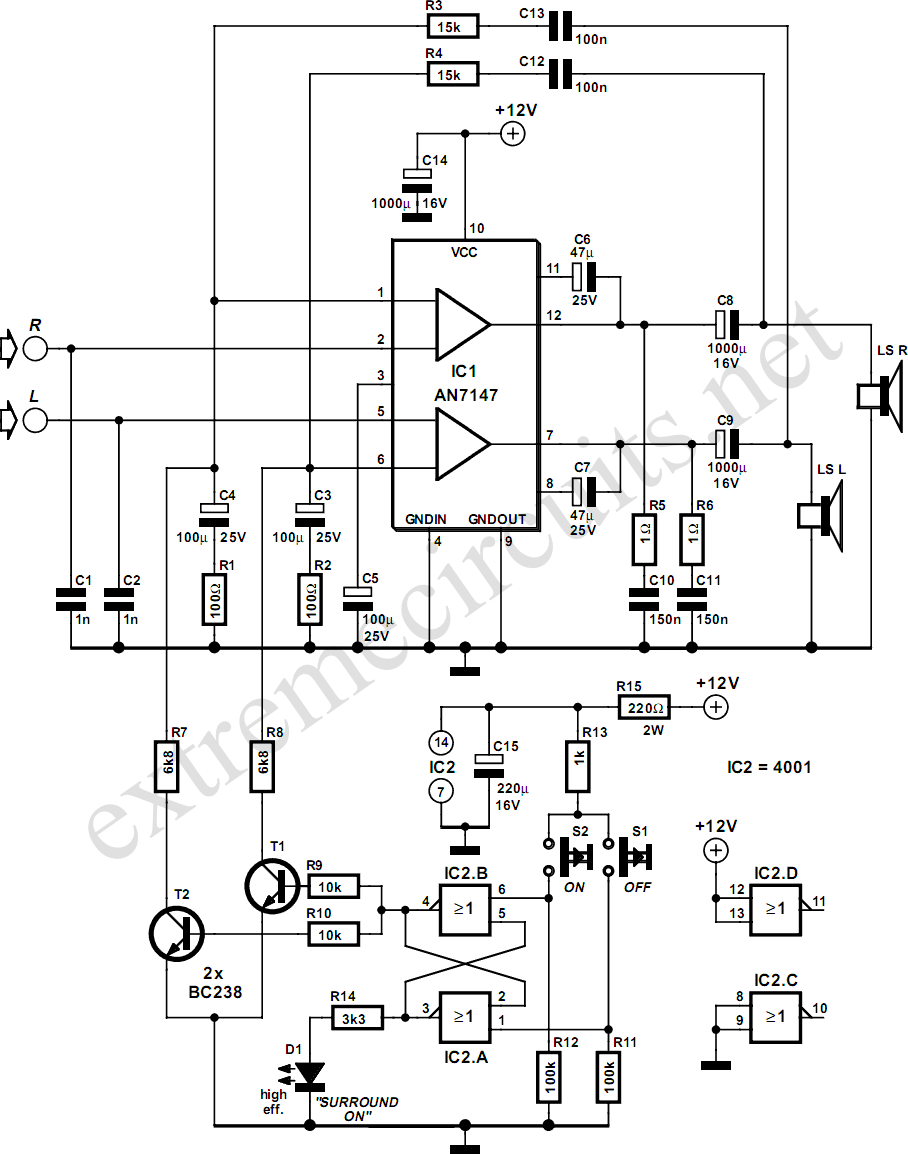
5.3W Amplifier With Surround System
The AN7147 Dual 5.3-watt Audio Power Amplifier from Panasonic is categorized as a replacement type, indicating its anticipated availability in the market for an extended period. When combined with additional components, it can be configured to create a simple surround-sound...
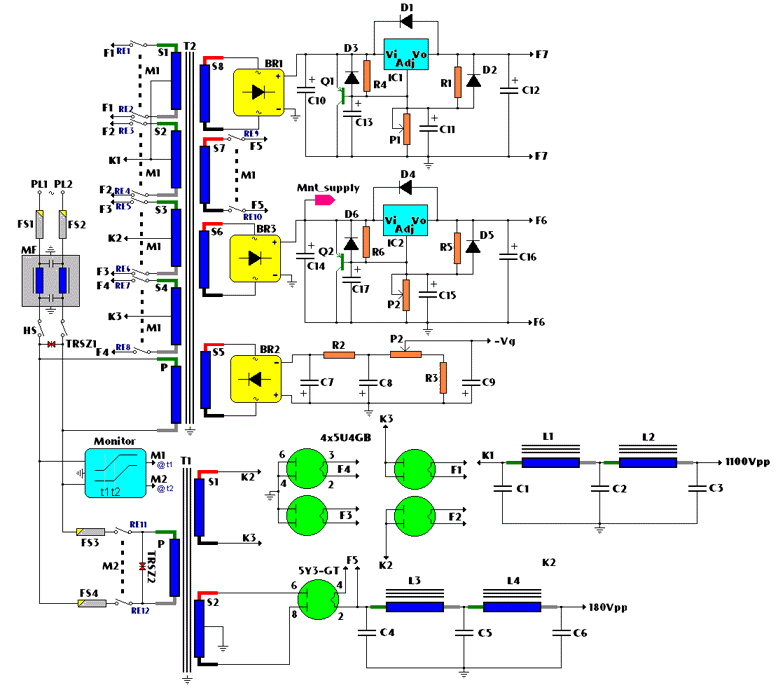
Power Supply For Amplifier
The following circuit illustrates a power supply for an amplifier circuit diagram. Features include ease of construction and adequate electrical response.
The power supply circuit for an amplifier is a crucial component that ensures the amplifier operates effectively. It typically consists...
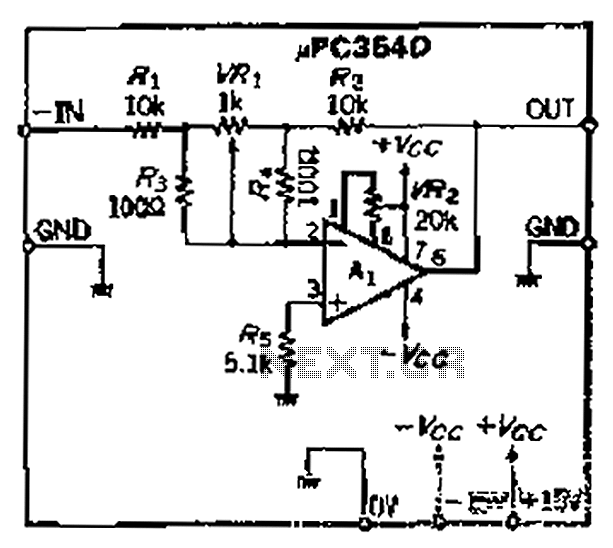
Precision polarity switching circuit by conventional elements
The loop gain of the operational amplifier (OP) is primarily influenced by the ratio of the input resistor to the feedback resistor. Consequently, any resistance error can lead to a corresponding gain error, which necessitates the use of high-precision resistors,...
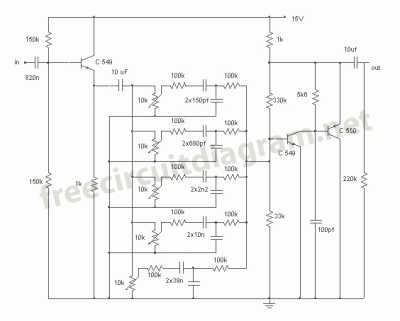
Simple 5 Band Equalizer Circuit
This circuit is a five-channel equalizer designed for a single line channel. The working principle of this series involves a series of frequency filters with a center frequency of 10 Hz.
The five-channel equalizer circuit is structured to manipulate audio signals...
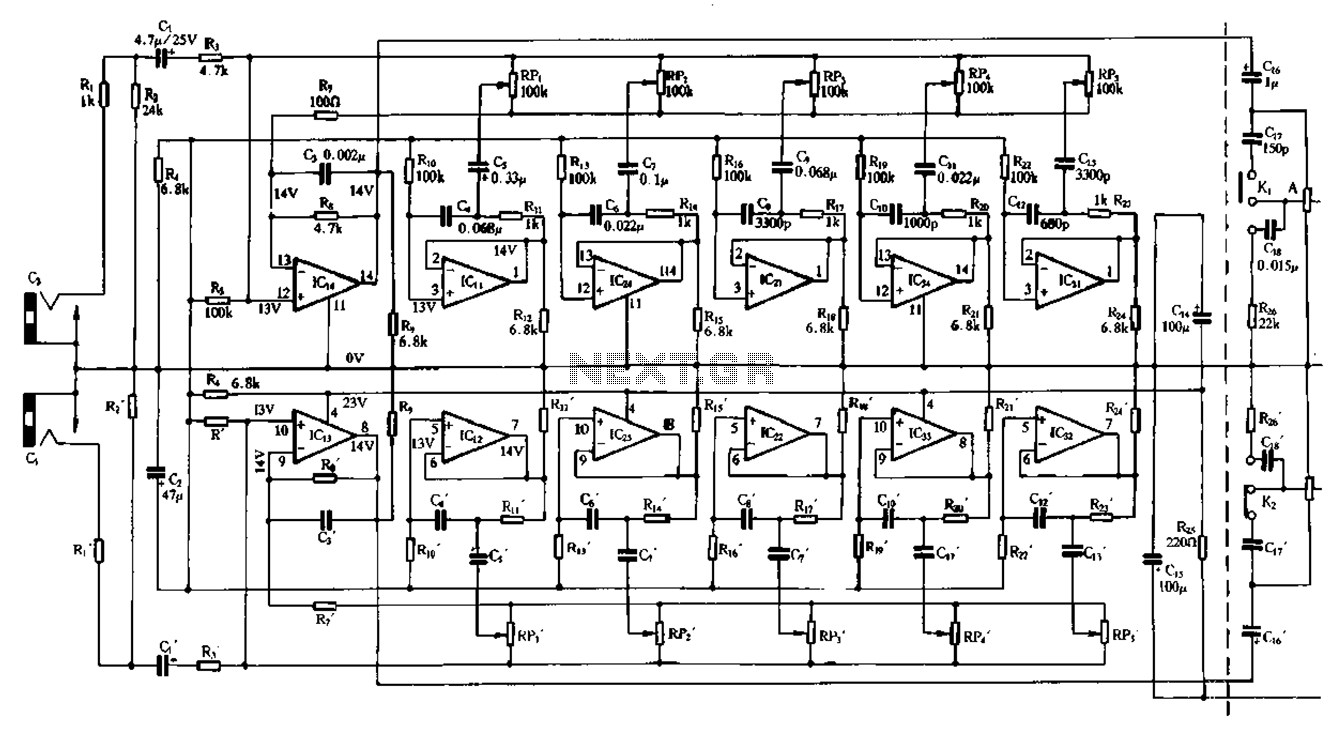
Double five-band equalizer circuit
Figure 1-98 illustrates a double five-band equalizer circuit featuring a secondary connection. In this configuration, IC1 and IC14 serve as voltage amplifiers for each channel of the equalizer. The circuit also includes IC11, IC24, IC2, IC34, IC31, IC12, IC23, IC22,...