
LCD Display printer cable with HD44780
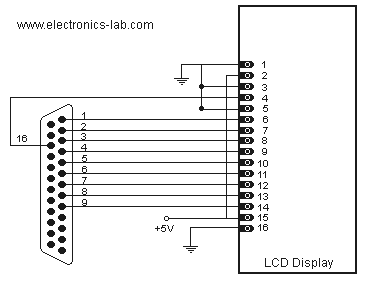
The project involves connecting a 2x16 character LCD display, specifically the SSC2B16DLYY model with an HD44780 compatible controller, to a personal computer via the LPT (parallel) port. The HD44780 controller is widely used in LCD modules and supports various configurations, allowing for flexibility in display size and functionality.
To establish communication between the LCD module and the PC, a total of 12 wires are required: 10 for data and control signals and 2 for power supply. The data wires connect to the data pins (DB0 to DB7) of the LCD, while the control wires connect to the RS (Register Select) and E (Enable) pins. The power wires connect to the VCC and GND pins of the LCD, providing the necessary voltage and ground reference for operation.
The LPT port on the computer will serve as the communication interface. The data pins of the LPT port will be mapped to the corresponding data pins on the LCD. The control signals from the LPT port will manage the display's operation, allowing the PC to send commands and data to the LCD for rendering text.
For software control, several free programs are available that facilitate communication between the PC and the LCD display. These programs typically allow for easy configuration of the LPT settings and provide a user-friendly interface for sending text data to the LCD. The combination of hardware setup and software control enables real-time data display, making it an exciting project for electronics enthusiasts and hobbyists.
In summary, this project demonstrates the integration of an LCD display with a personal computer, utilizing the LPT port for data transfer and control, while leveraging the HD44780 controller's capabilities to create an interactive display solution.Connecting a LCD display to your personal computer is an easy job. Displaying data from your PC to a LCD can be proven very exiting, so give it a try and build your own today! In this article we will use a 2 lines x 16 characters LCD display with Hitachi HD44780 onboard controller.
You can use any size of LCD like 1x16, 2x40, 4x20 e.t.c but keep in mind that it must have HD44780 or or compatible controller which is the most popular at this kind of LCD displays. We will use a free printer port (LPT) for communication between LCD module and PC. For this interconnection we only need 10 wires between LCD and LPT and two additional wires for power. A LCD display. This one is a 2x16 with HD44780 compatible chipset and backlight. The model number is SSC2B16DLYY. As you see in image we bought it 14.5 Euro. To control the LCD there are some free programs that can do that job very well and providing many capabilities.
We will discover them later. 🔗 External reference
Related Circuits

An LCD can display a brief moving message when interfaced with a microcontroller. This project features an AVR-based moving-message display utilizing a 16G-2 LCD that incorporates the HD44780 controller. The 16G-2 LCD is capable of displaying 16 characters per...
The intention is to utilize this code in future projects involving 7-segment displays. For those interested in learning more about 7-segment displays, additional information can be found in a related post. 7-segment displays are widely used in electronic devices for...
This resource provides a variety of PIC Microcontroller tutorials that cater to both beginners and advanced users. These tutorials enable individuals to gain expertise in microcontroller programming and circuit design without the need for costly embedded system courses. The tutorials...

8051SBC USB and GLCD Expansion Board, electronic circuit schematic wiring diagram for the 8051SBC USB and GLCD Expansion Board. The 8051SBC USB and GLCD Expansion Board is designed to enhance the functionality of the 8051 microcontroller system by providing additional...
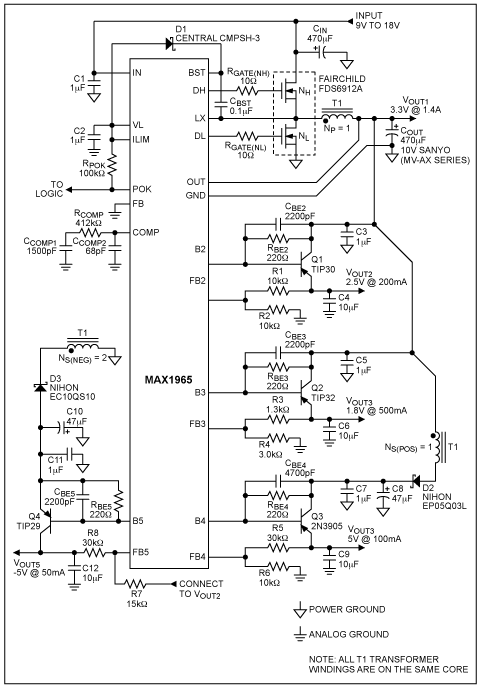
The power-supply controller features staggered voltage-output sequencing. Four voltage outputs are activated simultaneously for voltage tracking; two outputs are designated for core and I/O supplies during power-up, while the other two outputs cater to line driver supplies where tracking...
Function: Used to measure the voltage change minute by management before the temperature diodes. Component: IC, Diode, Resistor, 3-1/2 digit LCD (SP521PR). The circuit described functions as a voltage measurement system designed to monitor minute voltage changes, particularly in relation...