
Arduino UNO Tutorial NightLight

The circuit consists of an LDR connected in series with a 4.7K ohm resistor, forming a voltage divider. The LDR is connected to the analog input pin A0 of the Arduino, while the junction between the LDR and the resistor connects to this pin. The Arduino reads the voltage at this junction, which varies based on the light falling on the LDR. The output pin 13 of the Arduino is configured to drive an LED, which serves as the nightlight. A 220-ohm resistor is used in series with the LED to limit the current flowing through it, ensuring it operates within safe parameters.
In the Arduino sketch, the setup function initializes pin 13 as an output and begins serial communication for debugging purposes. The loop function continuously reads the analog value from the LDR. If the value falls below 400, indicating darkness, the LED is turned on; otherwise, it is turned off. The commented-out serial print statements can be uncommented for debugging to observe the ADC readings in real-time, assisting in calibrating the threshold value for the light detection. The circuit is simple yet effective, providing a practical solution for an automatic nightlight based on ambient light conditions.A Light Dependent Resistor (LDR) to create a simple childrens bedroom nightlight which turns on automatically when it gets dark and turns off when it gets light. An LDR`s resistance changes depending upon the amount of light hitting the sensor. For the LDR we are going to use the resistance reduces as the light falling on the device increases. Used in conjunction with a 4. 7K resistor this forms a simple voltage divider where the voltage across the LDR changes dependent upon the light. We can then input this into one of the Analog to Digital inputs in the Arduino to measure the voltage. Then its a simple matter of checking whether the value is above or below a threshold value and to turn one of the outputs on or off.
The circuit diagram is shown below. As the light increases, the LDR`s resistance drops and hence the voltage across it drops. Thus the voltage across the resistor increases, so the voltage into the Arduino ADC increases. The opposite is true as it gets darker. Below is the Arduino Sketch. In this sketch we are simply turning on the built-in LED if the ADC value drops below a specific value. To make a nightlight, a brighter led (with limiting resistor ~220 ohms) can be connected to the pin 13 output.
In the code you will notice that there are some serial output statements that are commented out. If you uncomment these you will see on the serial monitor the current value of the voltage being read by the Arduino ADC input. This value is between 0 and 1024. Cover the LDR with your hand and shine a light on it to see the effect. /* *NightlightLDRtestprogram *Created06Feb2010 * *Thisexamplecodeisinthepublicdomain. * */ int sensorPin = A0; // select the input pin for the ldr unsigned int sensorValue = 0; // variable to store the value coming from the ldr void setup() { pinMode(13, OUTPUT); //Start Serial port Serial.
begin(9600); // start serial for output - for testing } void loop() { // read the value from the ldr: sensorValue=analogRead(sensorPin); if(sensorValue<400) digitalWrite(13, HIGH); // set the LED on else digitalWrite(13, LOW); // set the LED on // For DEBUGGING - Print out our data, uncomment the lines below //Serial. print(sensorValue, DEC); // print the value (0 to 1024) //Serial. println(""); // print carriage return //delay(500); } 🔗 External reference
Related Circuits
A large mirror is installed on the left wall, enhancing the brightness of the room. However, when watching movies, a dark environment is preferred, as reflections of the film appear in the mirror, which can be distracting. To address...
Climber A ascends a route while Climber B remains on the ground, tracking Climber A's progress with a laser pointer. The Redpointer device records the exact route taken. In Mode 1, the recorded route is played back in real-time,...
The Arduino library can be utilized with other Integrated Development Environments (IDEs) to enhance code organization, particularly for extensive projects. This approach facilitates the integration of code not specifically designed for Arduino and serves as a pathway to more...

The concept involves using infrared light that is reflected by a disc, except for a dark red line. The sensor receives the reflected light, allowing the Arduino to track the number of revolutions. The infrared sensor is tuned to...

This Lazy Old Geek is also an Arduino enthusiast. One of the common microcontrollers used by Arduinos is the Atmega328 chip. To utilize Arduino software, the Atmega must be equipped with bootloader software. There is a notable difference between...
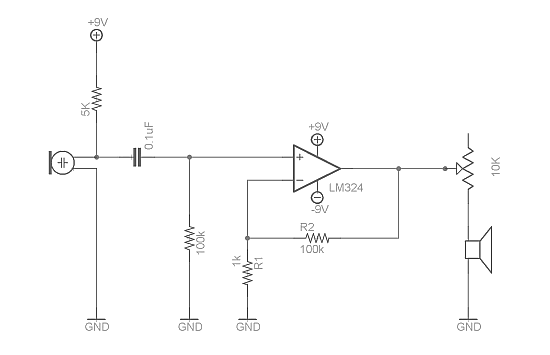
Afroman discusses the fundamentals of utilizing an operational amplifier to amplify small voltage signals and constructs a circuit designed to detect very faint sounds using a microphone. For further details about amplifiers, it is recommended to search for inverting...