
Core Remote Control Unit

The internal lithium battery replacement process involves careful handling of the unit's components. The design of the unit necessitates disassembly to access the PCB where the lithium battery is mounted. Proper soldering techniques should be employed to ensure a reliable connection, minimizing the risk of future failures. It is advisable to utilize a soldering iron with a fine tip to avoid damaging surrounding components during the unsoldering and soldering process.
When reprogramming the microcontroller, the user must ensure that the firmware is compatible with the specific version of the unit. The serial interface circuit may require additional components such as resistors and capacitors, which should be selected based on the specifications provided in the serial interface manual. Building this circuit accurately is crucial, as it serves as the communication link for downloading the operating system.
Once the operating system is successfully reloaded, it is essential to test the unit thoroughly to confirm that all functionalities are restored. This includes checking the display, controls, and any other features that may be affected by the firmware. The IR key code information, which can be lost during the battery replacement, should be backed up using the provided program before any significant changes are made. This precaution ensures that the unit can be restored to its previous state without complications.
Overall, the steps outlined provide a comprehensive approach to maintaining and restoring functionality to the unit after a prolonged period of inactivity, emphasizing the importance of careful handling and adherence to the manufacturer's guidelines.If the unit has been sitting idle for a long period time (dead AAA batteries) and you see only garbage on the display or the unit doesn`t operate, the first item required is probably a new internal lithium battery. Although the unit was exceptional for its day, a major flaw with the unit was allowing the firmware to be lost if this battery ever lost power (no flash memory back then!)
. I don`t think the designers ever thought the unit would be idle for long periods of time with the user-replaceable batteries going low. This battery is available at Digi-Key and must be soldered to the PCB. You must take the unit apart and unsolder the old battery, then solder in the new one. Once you have replaced the lithium battery, you are ready to reprogram the micro controller. It should be noted that the front panel cover should be removed very carefully until you know just how easy it is when its done right (very slightly pull up on it as you slide it over the `bump`).
Also, verify the hidden switches (documented in the manual), are set correctly. Get the serial interface manual and read it carefully. Build the serial interface circuit then download the programs required to reload the OS. Once you have the serial unit, the whole process takes less than 15 minutes. Also included, is a program that allows you to save and restore the IR key code information. Highly recommended on this unit since it can be fairly easy to lose the memory. This makes it a snap to restore it. 🔗 External reference
Related Circuits
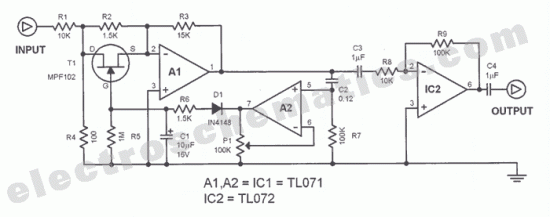
The function of this automatic volume control circuit is to amplify signals without distorting their dynamic compression. The amplitude differences in the signal are leveled off, eliminating disturbing effects. This technique avoids overcompensation in volume. The circuit is utilized...
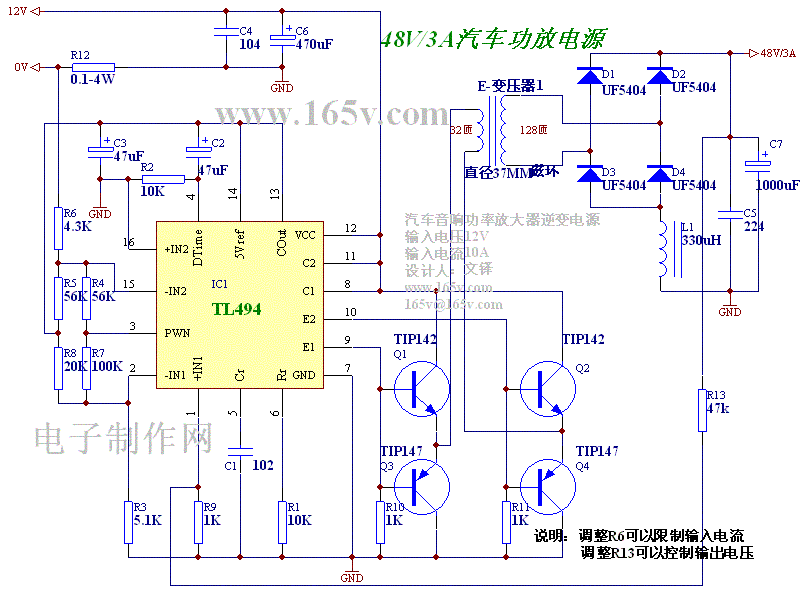
The TL494 controls a car's audio inverter power supply, which is a high-fidelity audio power supply designed for custom vehicles. It operates reliably without the need for adjustments according to the provided circuit diagram. The TL494 is a versatile integrated...
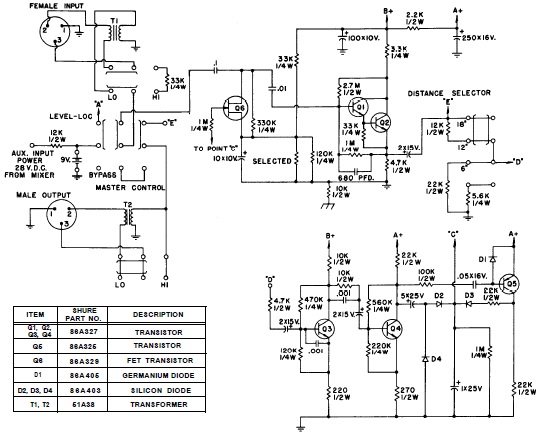
SHURE is an American corporation that manufactures consumer and professional audio electronics, including microphones, phonograph cartridges, and discussion systems. SHURE Incorporated is a well-established entity in the audio electronics industry, recognized for its innovative design and high-quality products. The company...
The lack of compensation facilitates the processes of development and testing. The figure of 6 billion frequently appears as the estimated number of cell phones in use globally. Published estimates indicate an average. The discussion of compensation in electronic circuits...
FGDF-3 is a three-phase low-temperature iron plating power commutation control switch and electronic circuit. The KGDF-3 serves as a low-temperature iron plating power supply device, incorporating the characteristics of a single-phase low-temperature iron plating power supply. This design facilitates...

A pulse width modulator (PWM) is a device that may be used as an efficient light dimmer or DC motor speed controller. The circuit described here is for a general purpose device that can control DC devices which draw...