Electronic thermometer
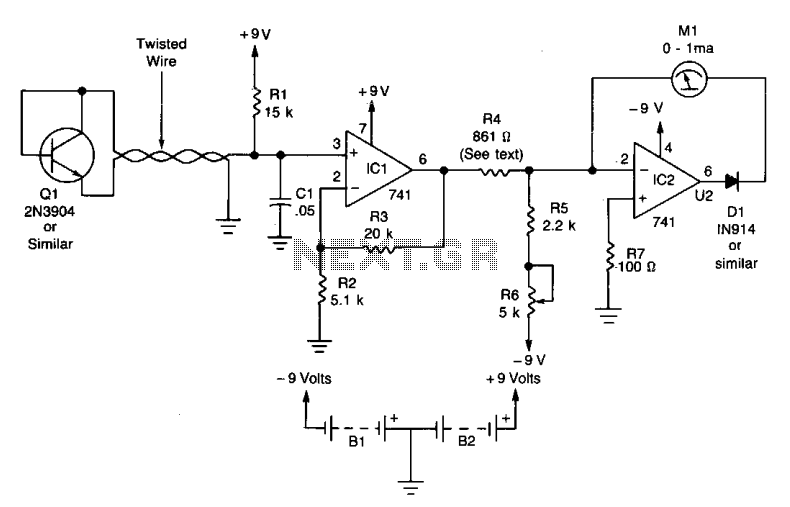
An inexpensive electronic thermometer is capable of measuring temperatures over a range from -30°F to +120°F. A diode-connected 2N3904 transistor used as the temperature sensor forms a voltage divider with R1. As temperature increases, the voltage drop across the transistor changes by approximately -1.166 millivolts per °F. Consequently, the current at pin 3 of IC1, a 741 operational amplifier with a gain of 5, decreases as the temperature measured by the sensor increases. A second 741 operational amplifier, IC2, is configured as an inverting amplifier. Resistors R5 and R6 calibrate the circuit. Calibration is straightforward; when properly done, a temperature of -30°F will result in a meter reading of 0 milliamps, while a temperature of 120°F will yield a meter reading of 1 milliamp. The scale between these points can be divided into equal segments, with the corresponding temperatures marked accordingly. Calibration is completed by placing the sensor in an environment with a known temperature, such as an ice-point bath, and adjusting R6 until the correct meter reading is achieved.
The electronic thermometer utilizes a 2N3904 transistor in a diode configuration to serve as the primary temperature sensor. This configuration leverages the transistor's base-emitter junction characteristics, which exhibit a predictable change in voltage drop with temperature variations. The voltage divider formed with resistor R1 allows for the translation of the temperature-induced voltage changes into a measurable output.
The output from the temperature sensor is fed into the first operational amplifier (IC1), configured with a gain of 5. This amplification is critical for enhancing the sensitivity of the measurement, enabling small changes in temperature to produce significant variations in output current. The output current from IC1 is then directed to pin 3, where it inversely correlates with temperature; as the temperature rises, the output current decreases due to the negative temperature coefficient of the transistor.
The second operational amplifier (IC2) operates as an inverting amplifier, further refining the output signal. The inverting configuration allows for the creation of a linear response that can be easily interpreted on a meter. Resistors R5 and R6 are pivotal in calibrating the circuit, ensuring that the output current corresponds accurately to the temperature range of interest.
Calibration is performed by establishing reference points at the extremes of the thermometer's range. The sensor is submerged in an ice-point bath to achieve the 0 mA reading at -30°F. Subsequently, adjustments to R6 are made to ensure that the meter reflects the correct output for the known temperature. This methodical approach to calibration guarantees that the thermometer provides accurate and reliable readings across its operational range.
Overall, this electronic thermometer design exemplifies a straightforward yet effective implementation of basic electronic components to achieve precise temperature measurement. The use of widely available components such as the 2N3904 transistor and 741 operational amplifiers makes this circuit both cost-effective and accessible for various applications requiring temperature monitoring.An inexpensive electronic thermometer is capable of measuring temperatures over a range of from -30°F to +120°F. A diode-connected 2N3904 transistor used as the temperature sensor forms a voltage divider with Rl. As temperature increases, the voltage drop across the transistor changes by approximately -1.166 millivolts-per°F.
As a result, the current at pin 3 of IC1, a 741 op amp with a gain of 5, decreases as the temperature measured by the sensor increases. A second 741 op amp, IC2 is configured as an inverting amplifier. Resistors R5 and R6 calibrate the circuit. Calibration is also straightforward. When properly done, a temperature of - 30°F will result in a meter reading of 0 milliamps, while a temperature of 120°F will result in a meter reading of 1 milliamp. Divide the scale between those points into equal segments and mark the divisions with the appropriate corresponding temperatures.
The calibration is completed by placing the sensor in an environment with a known temperature, such as an ice-point bath. Place the sensor in the bath and adjust R6 until you get the correct meter reading.


