
lcd interfacing
The Hitachi HD44780 LCD controller is widely used for displaying alphanumeric characters and is commonly interfaced with microcontrollers due to its simplicity and effectiveness. The 4-bit interfacing method allows for reduced pin usage, which is advantageous in microcontroller applications.
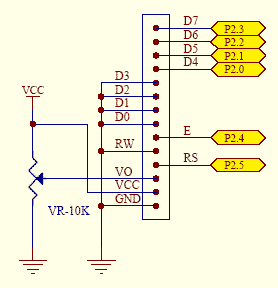
In this configuration, the 8051 microcontroller is connected to the LCD through a set of data and control lines. The data lines D4 to D7 are utilized for sending data in 4-bit mode, while the control lines include the Register Select (RS), Read/Write (R/W), and Enable (E) signals.
The RS line determines whether the data being sent is a command or character data. When RS is low, the microcontroller sends a command to the LCD. Conversely, when RS is high, character data is sent for display. The R/W line indicates the operation mode of the LCD; it is set low for writing data and high for reading data from the LCD. The Enable line is a strobe signal that triggers the LCD to read the data present on the data lines.
The initialization sequence for the HD44780 typically involves setting the display mode, clearing the display, and configuring the cursor. A typical sequence would involve sending a command to set the LCD to 4-bit mode, followed by commands to set the number of display lines and character font.
In conclusion, interfacing the Hitachi HD44780 LCD with the 8051 microcontroller using a 4-bit method is an efficient way to utilize the display capabilities of the LCD while conserving microcontroller I/O pins. The schematic represents the necessary connections and the sequence of operations required to achieve successful communication between the microcontroller and the LCD module.This is an example how to interface to the standard Hitachi-44780 LCD using an 8051 microcontroller and SDCC as C Compiler. I use a standard 16-character by 2-line LCD module, see schematic below. Here, I use 4-bit interfacing. 🔗 External reference
Related Circuits

The PSoC 3 Primer Kit is specifically designed to assist students in mastering the necessary skills in embedded systems. The kit is structured to enable easy utilization of all possible features of the microcontroller. It supports the FX2LP Programmer,...
The analog to digital converter (ADC) is commonly required in most of the projects. Analog voltage measurement can be done using the ADC hardware built in together in a PIC. The picture below shows a simple setup for measuring...
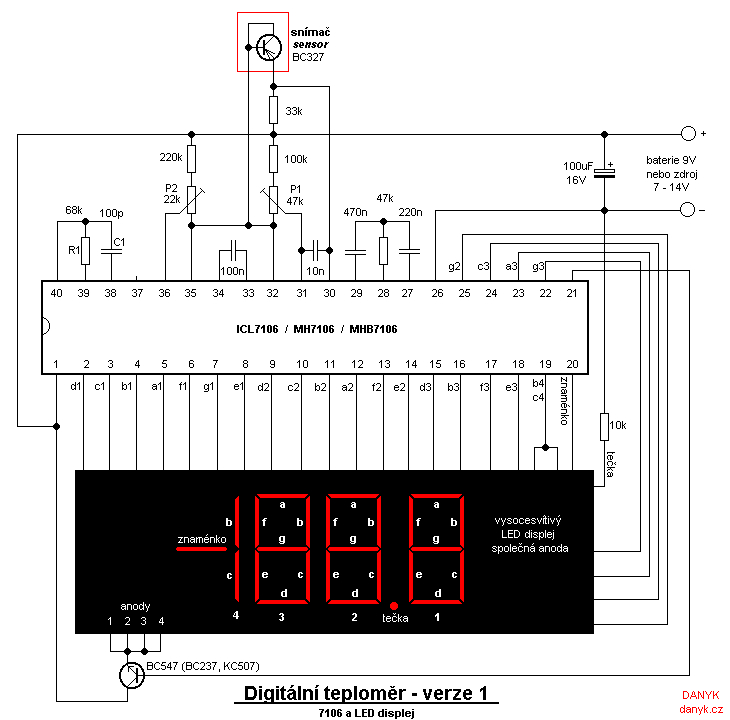
Two versions of a homemade digital thermometer utilizing the ICL7106 are presented. One version features an LED display, while the other employs an LCD display. Both variants utilize a silicon transistor as a temperature sensor, with temperature determined by...
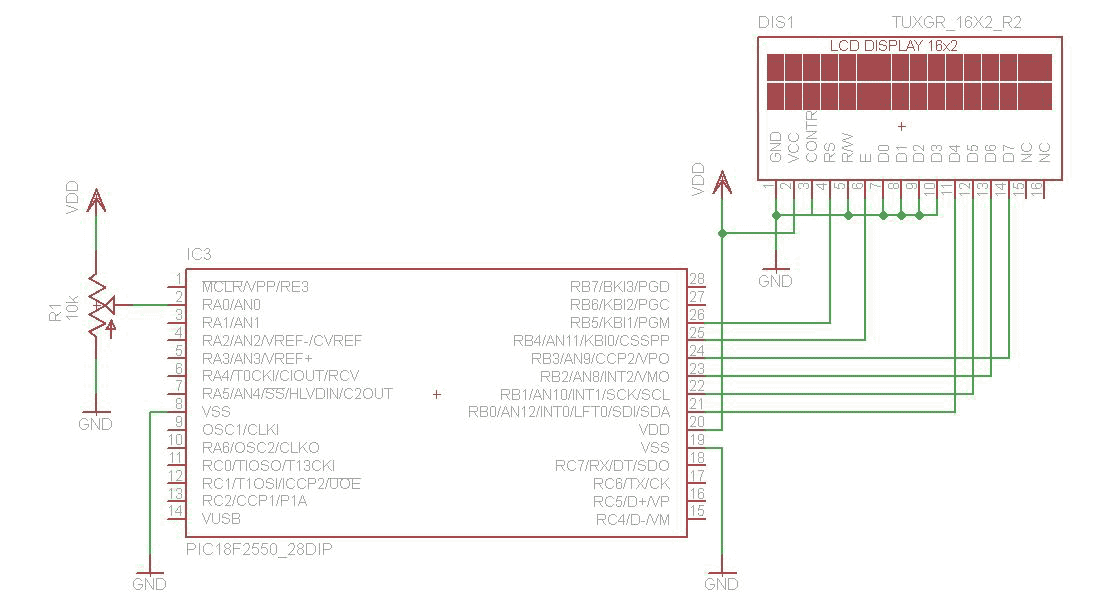
This is a practical expansion board designed for a PIC development board, intended for DIY use with a 16x2 alphanumeric LCD. The expansion board connects to the PIC development board, providing LCD support, which is essential for numerous projects...
You may find that there are too few, if your power is very noisy (as can happen in a car environment) it may help to place a 0.1uF and/or 10uF capacitor before and/or after the voltage regulator. At the...
This project involves an output port expander for the 8051 microcontroller. It focuses on interfacing a large load bank with the microcontroller. In this load bank project, up to 50 solid-state relays are connected to the microcontroller using the...