
LED Flasher III

The described circuit is a simple LED flasher that can be utilized in various applications, such as a visual alarm system or decorative lighting. The core components include a super-bright LED, resistors, a capacitor, and transistors configured in a feedback loop to create an oscillating signal.
The LED's brightness is controlled by resistor R3, which limits the current to approximately 20mA. This value can be modified depending on the specific LED color used, as different colors have varying forward voltage drops and current requirements. The use of a 390-ohm resistor as an alternative to 470 ohms provides flexibility in brightness adjustment, allowing for experimentation with different resistor values from available components.
The oscillation frequency, which dictates the flashing rate of the LED, is set by the combination of resistor R2 and capacitor C1. The formula for calculating the flash rate is approximately three time constants (3*R2*C1), meaning that the time it takes for the LED to turn on and off is directly influenced by these components. Careful selection of R2 and C1 will allow for tuning the flash rate to suit specific needs.
Transistor Q1 acts as a switch, controlled by the biasing provided through resistor R1. This resistor must be chosen carefully to avoid saturating transistor Q2 when the capacitor is disconnected, ensuring that the circuit can oscillate properly. If oscillation does not occur, adjustments to R1 or R2 may be necessary.
Diode D1 serves two primary functions: it enables higher duty cycle operation and limits the negative feedback at the base of Q1 to -0.7 volts, which helps stabilize the operation of the circuit. In applications where a lower supply voltage (6-9V DC) and low duty cycle are sufficient, D1 can be omitted, simplifying the circuit design.
Overall, this LED flasher circuit is versatile and adaptable, allowing for adjustments in component values to achieve desired performance characteristics while utilizing readily available electronic components.This circuit will flash a super-bright LED (5000+ mcd). Good for fake car alarm or other attention getting device. Component values are not critical, try anything else first from your junkbox. Obviously, the 470 ohm resistor (R3) determines the LED's brightness and limits the current flow to about 20mA. 390 ohm can also be used as a save value. If you decide to go with a green or yellow led, which draw more current, you may want to replace the 470 ohm with an appropriate value.
Flash rate is determined by R2 and C1 and is approximately three time constants (3*R2*C1). R1 provides bias to Q1 which should be low enough not to saturate Q2 with the capacitor disconnected. If the circuit does not oscillate, R1 may be too low or R2 too high. D1 allows for highter duty cycle operation and limits the feedback at the base of Q1 to -0.7 volts. D1 may be ommited for low supply power like 6 - 9Vdc and low duty cycle operation. 🔗 External reference
Related Circuits

This is a spectacular but completely useless project. It lights Ultra-Bright LEDs in a sequence and each LED flashes brightly very briefly. The LEDs light-up going around and around since they are mounted in a circle (on a CD),...

This single white LED torch can be housed in an empty glue stick tube and has a long rechargeable battery life. The proposed circuit design features a compact LED torch that utilizes a single white LED as the primary light...
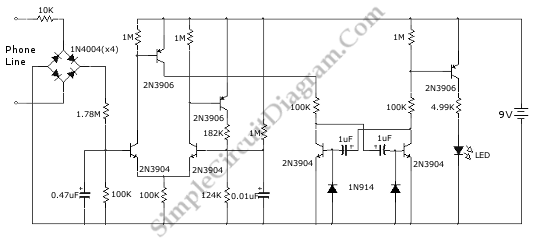
This circuit functions as a phone message flasher, providing an alternative method to alert users of an incoming call. When the phone rings, a high line voltage is activated. The phone message flasher circuit is designed to enhance the traditional...
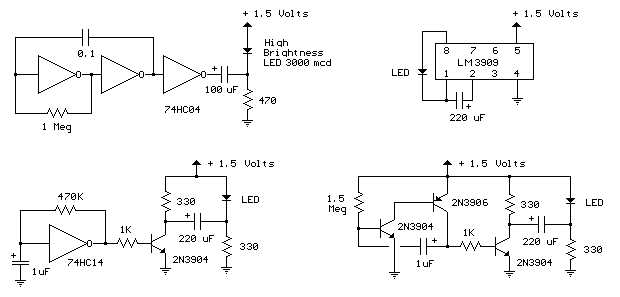
The LED flasher circuits operate on a single 1.5-volt battery. The circuit on the upper right utilizes the popular LM3909 LED flasher IC and requires only a timing capacitor and an LED. The LED flasher circuit using the LM3909 integrated...

A basic circuit of the 89C2051 can be constructed using point-to-point soldering on a universal printed circuit board (PCB). An ordinary 20-pin socket should be utilized, avoiding the use of a circular-pin socket. D1 represents a small dot LED....

The first "Hello World!" project preferred for microcontrollers is LED blinking. An ATMEL 89C51 (40-pins DIP) microcontroller, based on the 8051 architecture, is used, which is ideal for first-time learning of MCU chips. The program is very simple and...