
led blinking program with 8051 microcontroller

The LED blinking project serves as an introductory exercise for understanding microcontroller operations, particularly in the context of the ATMEL 89C51 microcontroller. This microcontroller features a 40-pin dual in-line package (DIP) and is known for its ease of use, making it suitable for beginners.
The circuit typically consists of the microcontroller, an LED, a current-limiting resistor, and a power supply. The LED is connected to one of the microcontroller's output pins (often port 1 or port 2), while the current-limiting resistor is placed in series with the LED to prevent excessive current that could damage the LED. The power supply usually provides a voltage of 5V, which is the standard operating voltage for the 89C51.
The software code for this project involves initializing the microcontroller, configuring the appropriate I/O ports, and implementing a delay function. The delay function can be created using a simple loop that counts to a certain value, effectively creating a pause in the program execution. This allows the LED to turn on and off at regular intervals, creating a blinking effect.
The program flow begins with the initialization of the microcontroller's registers and ports. The output pin connected to the LED is set to high to turn the LED on, followed by a call to the delay function. After the delay, the output pin is set to low to turn the LED off, and the delay function is called again. This cycle repeats indefinitely, resulting in a blinking LED.
This project not only demonstrates the fundamental concepts of microcontroller programming but also provides practical experience in circuit assembly and debugging. By completing this project, users gain valuable insights into the operation of microcontrollers and the basics of embedded systems design.The first “Hello World!†project I prefer for Microcontroller is LED Blinking. I have used ATMEL s 89C51 (40-pins DIP) 8051 architecture microcontroller which is ideal for first time learning MCU Chip. The program is very simple and straight forward, that uses a delay procedure loop based software delay. Source Code Here,i have written code in.. 🔗 External reference
Related Circuits

This colorful backlit aquarium light provides a natural appearance to the aquarium tank. The aquarium LED lighting circuit automatically turns on at sunset. The aquarium LED lighting system enhances the aesthetic appeal of the aquarium by simulating natural lighting conditions....
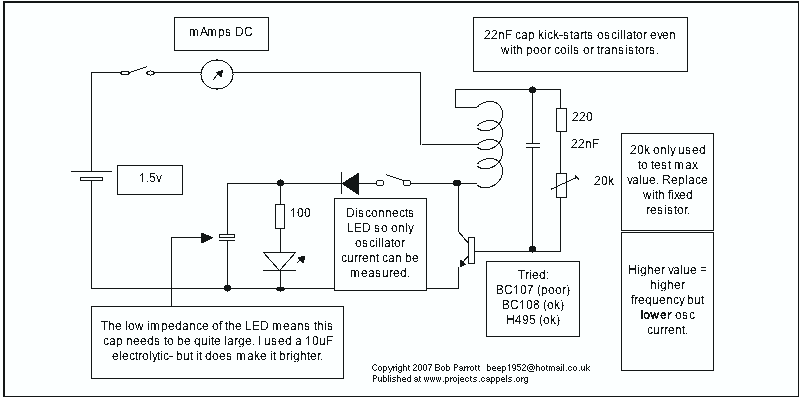
A minimum number of parts yields a compact switching converter that can provide sufficient voltage to drive white LEDs. The resulting lamp is much more efficient, in terms of lumen hours per pound of battery, than incandescent bulbs, and...

This voltage booster circuit for driving one or more white LEDs utilizes a 555 timer as its main component. The timer, designated as IC1, operates as a resettable astable multivibrator with R1, R2, and C2 serving as the timing...
When the oscillator starts, Q2 is in a conducting state; the current flows from the capacitor, charging it until the voltage across it is sufficient to allow current to flow through the inductor. As the current through the inductor...
The traffic light controller section consists of 12 point LEDs arranged in 4 lanes on the PS/8051 Trainer Kit. Each lane features a Go (Green), Listen (Yellow), and Stop (Red) LED. The PS-8051 board demonstrates the capabilities of the...

Microchip has announced the availability of new PIC16F1512 and PIC16F151213 XLP microcontrollers. These new XLP (EXtreme Low Power) microcontrollers feature enhanced power management capabilities, making them suitable for battery-operated applications. The PIC16F1512 and PIC16F151213 microcontrollers are designed to operate with...