
picaxe

The project involves the integration of several components to achieve a functional robotic arm. The decision to utilize a stepper motor for joint movement indicates an emphasis on precision and control in the arm's operation. Stepper motors are ideal for applications requiring accurate positioning, which is critical for tasks such as photography or complex manipulations.
The Picaxe-08 kits will serve as the microcontroller backbone for the project, allowing for programming and control of the stepper motors. These kits provide an accessible platform for prototyping, enabling the user to develop and test control algorithms effectively. The compact design of the Picaxe-08 is particularly suitable for integration into smaller robotic systems where space is at a premium.
The radio control system, consisting of a 6-channel transmitter and receiver, adds another layer of functionality to the robotic arm. This system allows for remote operation, which can be particularly useful for applications such as aerial photography, where the arm may need to be positioned at a distance. The compatibility with existing servos suggests that the project will incorporate various actuators for movement, enhancing the versatility of the robotic arm.
Overall, the combination of these components lays a solid foundation for the development of a sophisticated robotic arm capable of executing a range of tasks. Future projects may expand on this foundation, exploring more advanced control systems, additional sensors for feedback, and enhanced functionality through the incorporation of new technologies.I had a go at doing some mechanical work at the weekend. I tried to machine the acrylic I bought and create some kind of joint using a stepper motor. I have to say that I failed rather miserably! I tried scoring and snapping the stuff only to find that a cut length of anything longer than about 10cm was impossible! A hacksaw proved much better but I really don`t have the benches, vice, etc to make a decent job of it. I`m now thinking about getting something made up. The problem with that is that I`m finding it difficult to start designing when faced with a blank screen on a CAD package. It is holding the robot arm project up though. I purchased some bits off ebay. Firstly I bought some Picaxe compatible kits to help me prototype. Some of these are Picaxe-08 kits so I shall be making some compact stepper motor controls shortly. They were from rkeducation (they also have a web site ). Secondly, inspired by a kite aerial photography (and some RC ) videos I decided to buy some radio gear.
I now have a 6 channel transmitter and receiver which work well with the servos I have. I see a few more projects coming up 🔗 External reference
Related Circuits
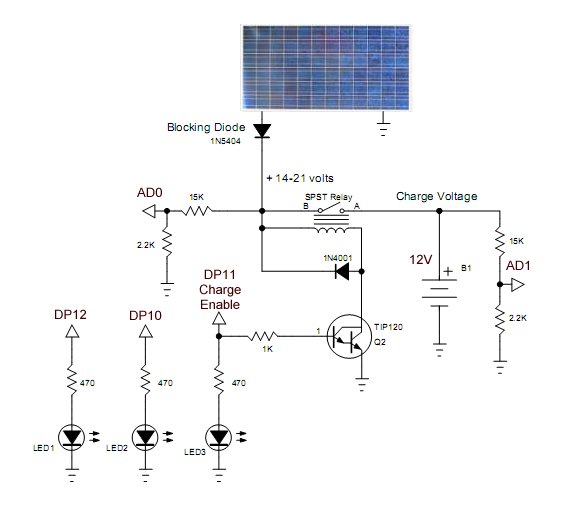
Construction and programming of a PICAXE solar panel battery charge controller. The PICAXE solar panel battery charge controller is designed to manage the charging process of batteries using solar energy. This system typically involves several key components: the solar panel,...

The PICAXE basic code is straightforward: the main loop continuously checks for a signal from the IR receiver using the irin command. When a code is received, it is stored in... The PICAXE microcontroller is designed for simplicity and ease...
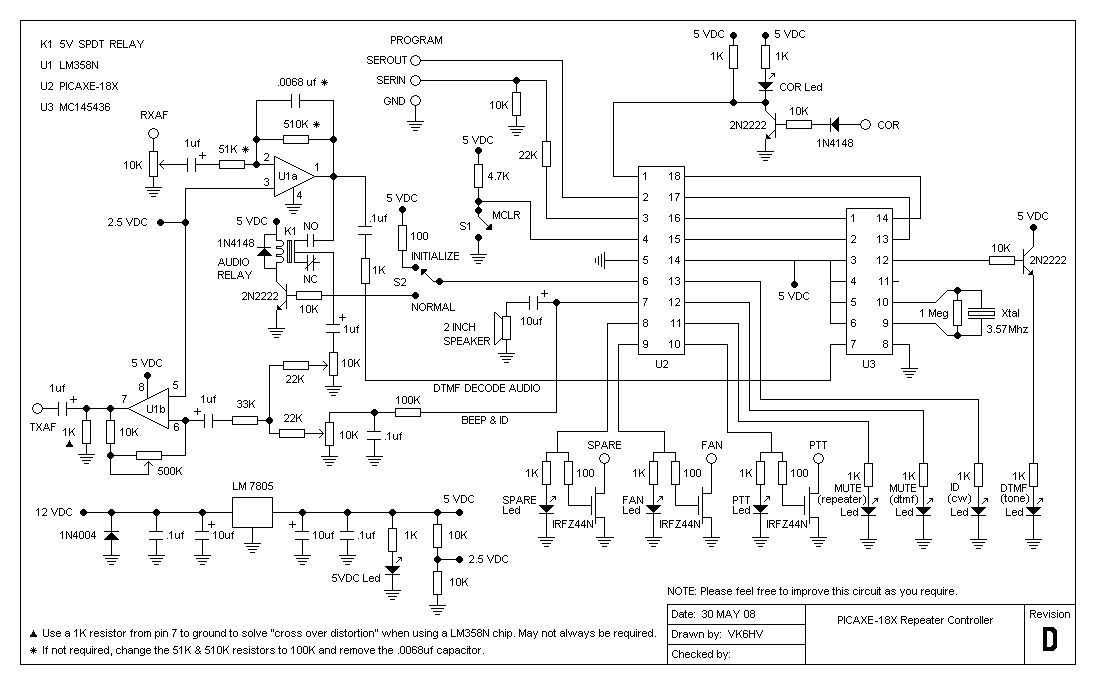
The project involves testing the capabilities of a PICAXE-18X chip operating at 4 MHz for a specific application. It includes designing the circuit, creating printed circuit board (PCB) artwork, etching the PCB, programming the PICAXE in BASIC, and connecting...
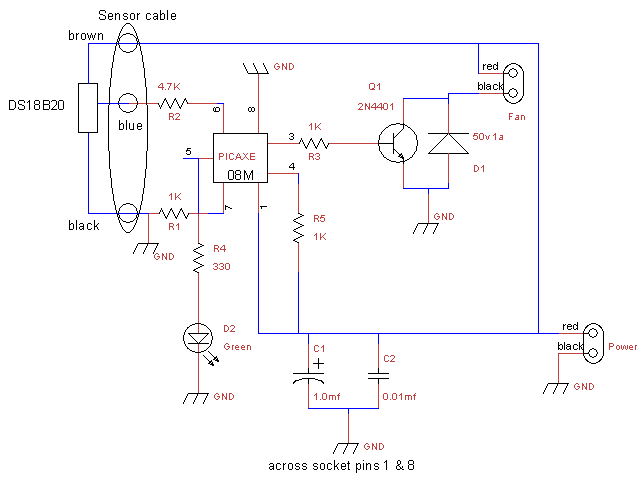
This is a fan controller designed for an audio/video cabinet. It utilizes a PICAXE 08M microcontroller and a DS18B20 temperature sensor. The fan activates at 30 degrees Celsius (approximately 86 degrees Fahrenheit) and deactivates at 28 degrees Celsius (around...
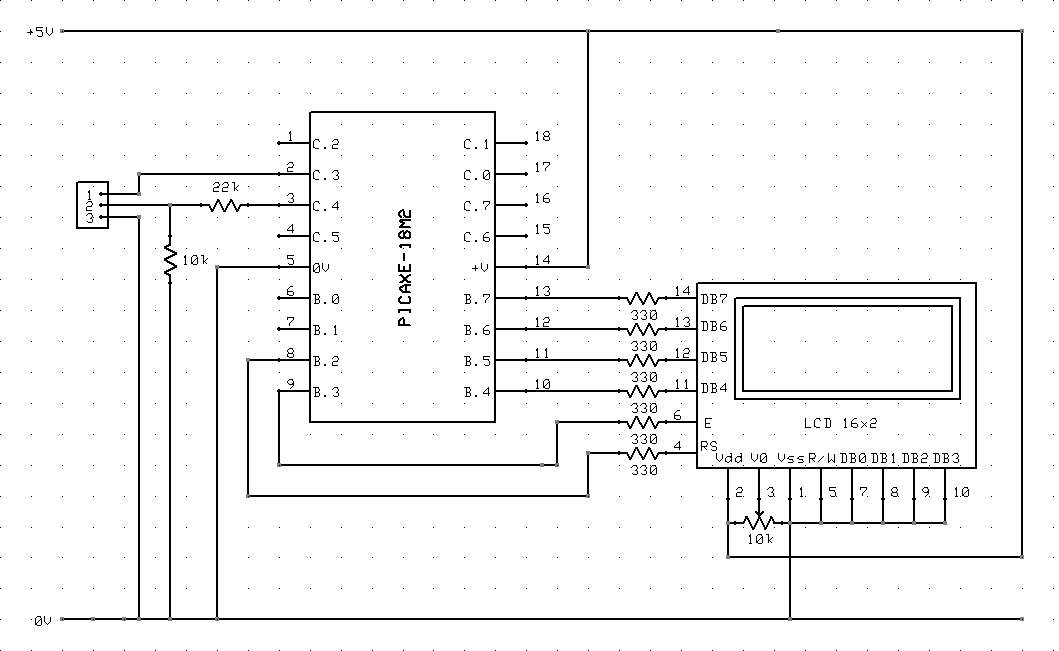
The circuit diagram and code on how to connect a 16x2 LCD to a PICAXE-18M2 microcontroller. The circuit involves interfacing a 16x2 Liquid Crystal Display (LCD) with a PICAXE-18M2 microcontroller. The 16x2 LCD is a popular display module that can...

Measures the temperature using the DS18B20 temperature sensor, displays the reading on a 2x16 character LCD, sends the data to a serial terminal, and checks the temperature against predefined limits. The output is set high if the temperature is...