
Programming

The project utilizes two Model B Raspberry Pis, which are configured to communicate with a home automation (HA) system. The choice of Raspberry Pi over Arduino stems from the desire for a more compact solution that can be discreetly placed under the fireplace. This design decision addresses the need for a less obtrusive installation while maintaining functionality.
To begin, a DHCP server is set up to assign static IP addresses to each Raspberry Pi. This allows the HA system to effectively manage the on/off states of the fireplaces. Raspbian is installed in a headless configuration, which minimizes resource usage by avoiding a graphical user interface. Proper configuration of the network interfaces is crucial, with specific attention to ensuring that the Ethernet and Wi-Fi connections are correctly established.
Power management features in Raspbian must be disabled to prevent the network adapter from entering sleep mode, which could disrupt communication with the HA system. The relay used in this project is a single pole, double throw type, which is critical for ensuring that the fireplace does not accidentally turn on during a power failure. The relay is connected to the GPIO pins of the Raspberry Pi, and scripts are implemented to manage the relay's state.
A Bash script is created for initializing the relay, allowing for easy control through system commands. The GPIO library is utilized for managing the relay's output, ensuring that the correct commands are sent to maintain the desired state of the fireplace. The script includes commands to start and stop the GPIO control, providing a straightforward interface for operation.
Furthermore, a simple PHP application is developed to facilitate external control of the relay. This application listens for HTTP GET requests, allowing the HA system to turn the fireplace on or off and to check its status. The PHP code handles different scenarios based on the input received, executing the appropriate GPIO commands and returning the current status of the fireplace.
Overall, this project exemplifies the integration of Raspberry Pi into home automation systems, showcasing the flexibility and power of small computing devices in managing household appliances. The careful consideration of safety and functionality underscores the importance of responsible implementation when working with automated controls in potentially hazardous environments.In that article I wrote about how I used an Arduino to create an interface that would allow me to directly control my fireplaces from my home automation system. That solution worked great and I was successful in running two fireplaces from the single controller for a year
with no issues. What I didn`t like though was that the completed project was bulky and I wanted something much smaller that I could put under the fireplace, thus out of sight! To accomplish this, I decided to buy a couple of Model B Raspberry Pi`s to replace the Arduino. WARNING: Let me interject here that one should exercise EXTREME caution before deciding to implement any kind of automated home controls such as those I will outline below!
If you`re not comfortable dealing with electrical circuits then STOP here. Also be aware that your fireplace is supplied with natural gas or propane and working with its components presents a hazard. If you don`t know what you`re doing STOP and hire a professional to help you. The first thing I did was set my DHCP server up to assign specific addresses to each Pi. These are the addresses that my HA system uses to trigger the on/off events. Start by installing Raspbian. My implementations will be headless so I chose not to run a desktop thus reducing a little bit of overhead.
There are tons of install examples online so I won`t cover that here. Once complete, run: auto lo iface lo inet loopback iface eth0 inet dhcp #iface wlan0 inet manual auto wlan0 allow-hotplug wlan0 iface wlan0 inet dhcp wpa-ssid "yourSSID" wpa-psk "yourPASSWORD" iface default inet dhcp wpa-roam /etc/wpa_supplicant/wpa_supplicant. conf By default, Raspian will try to manage the adapter`s power use by putting it to sleep. This causes all kinds of issues so we need to disable that feature . My relay is a single pole, double throw relay. Connect to the common and normally open side of the relay and use the following commands (note that wiringPi changes the pin numbers): With my setup, when connecting this way, it is CRUCIAL to use the normally open side of the relay.
If connecting to normally closed, a power failure would turn the fireplace on NOT the desired result. #! /bin/bash # /etc/init. d/relayinit # Carry out specific functions when asked to by the system case "$1" in start) echo "Starting Relay" # Turn 7 on which keeps relay off /usr/local/bin/gpio write 7 1 #Start Gpio /usr/local/bin/gpio mode 7 out ; stop) echo "Stopping gpio" ; *) echo "Usage: /etc/init.
d/relayinit {start|stop}" exit 1 ; esac exit 0 Now we need to set up an interface on the Raspberry Pi so we can control the relay from an external source (e. g. my HA system). A simple PHP application will serve this purpose perfectly: < php #Turn Fireplace Off if ($_GET["RELAY2"] = "2") { exec(`gpio write 7 1`, $output, $return); if ($return = 0) { echo "2"; } else { echo "problem"; } } elseif ($_GET["RELAY2"] = "1") { #Turn Fireplace On exec(`gpio write 7 0`, $output, $return); if ($return = 0) { echo "1"; } else { echo "problem"; } } else { #Get status exec(`gpio read 7`, $output, $return); if ($output[0] = 0) { echo "on"; } elseif ($output[0] = 1) { echo "off"; } else { echo "unknown"; } } > My regular readers know that I have implemented an extensive home automation system that allows full control and automation of everything from doors to lights to fireplaces to full multi-zone temperature management and includes various tracking and reporting functionality.
One of the items that I`ve been tracking for years is the level of ink in the family printer. When the level gets low, it sends emails to my wife and myself to remind us to change and, if necessary, purchase new cartridges. That functionality has been working just fine since 2011. About two weeks ago we started having problems with our printer. The issue turned out to be the print head. Unfortunately 🔗 External reference
Related Circuits
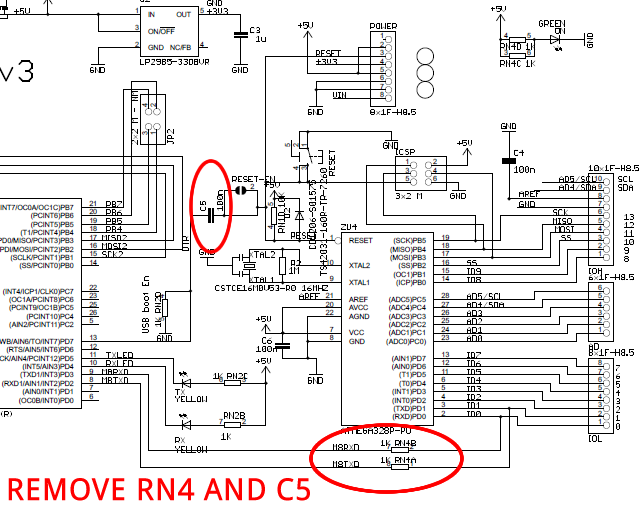
The Arduino Uno is a simple modification that bypasses the USB circuitry, allowing the device to be programmed using a serial port. The Arduino Uno is a widely used microcontroller board based on the ATmega328P microcontroller. It is designed to...
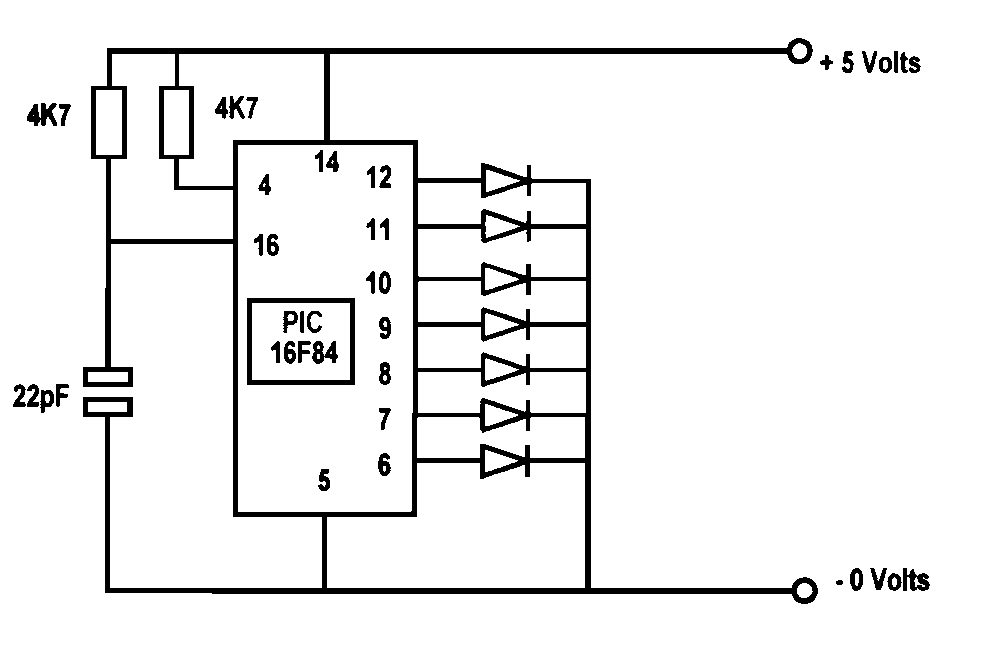
Several years ago, a colleague suggested the use of PICs for hobby projects, specifically amateur television. Extensive time was spent developing and experimenting with video mixers, faders, and effects units using analog and digital circuits (TTL gates), which often...
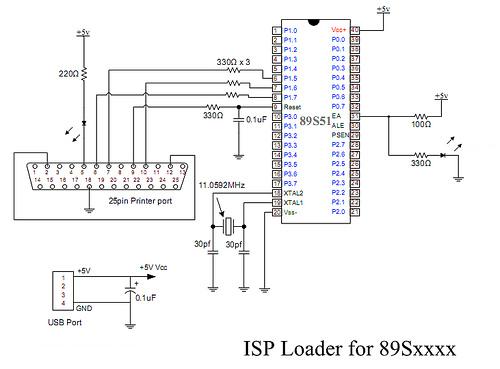
It is now possible to program microcontrollers at home with a cost-effective AT89S51 series microcontroller burning IC kit. The AT89Sxx series ICs feature an inbuilt ISP (In-System Programming) module, allowing for easy programming of the microcontroller. This document presents...
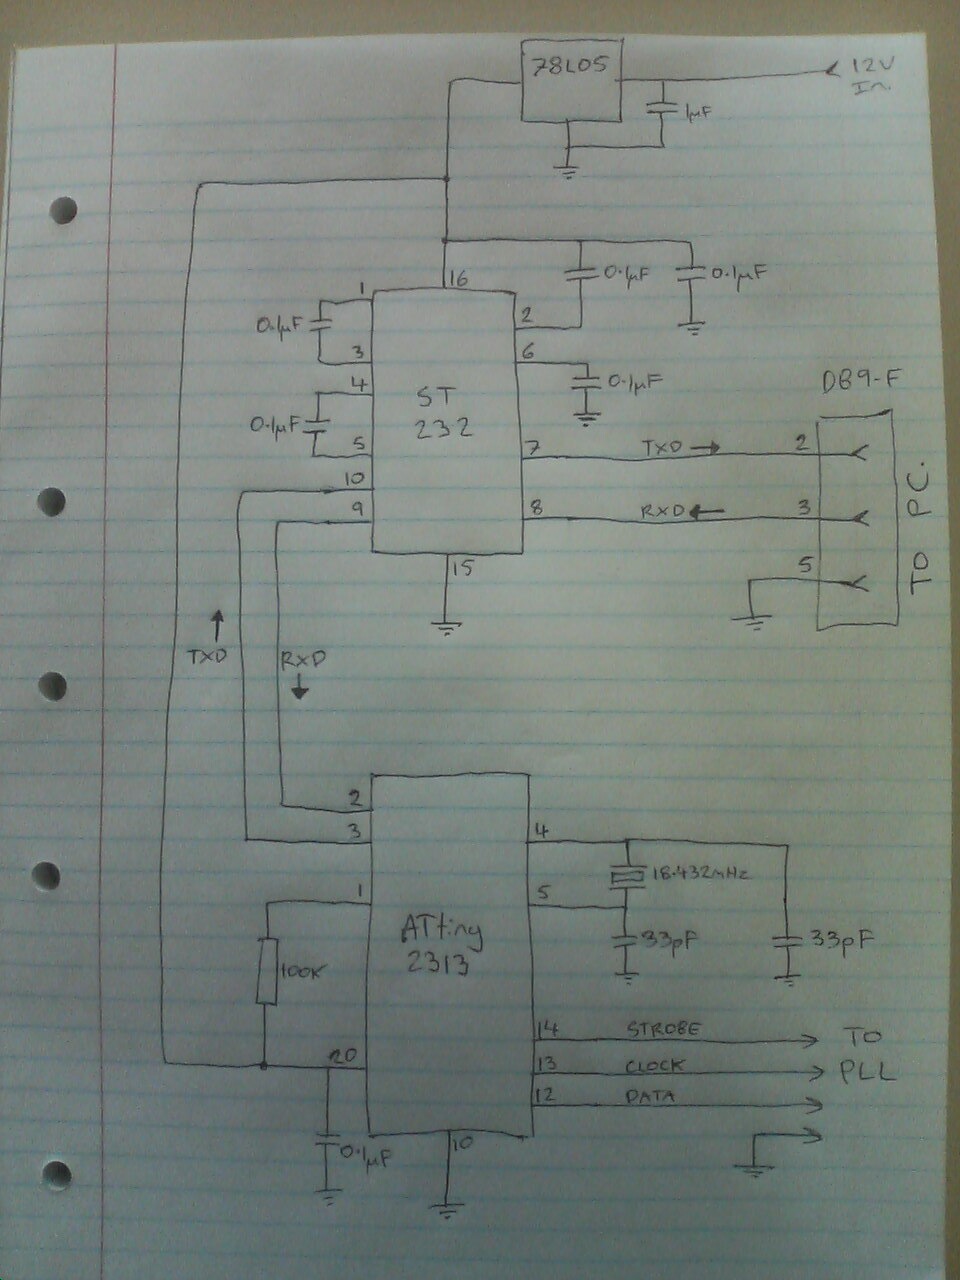
The objective was to modify this radio for functionality on the 70cm amateur radio band. However, this attempt failed because the voltage-controlled oscillator (VCO) did not oscillate at the required frequencies for 70cm operation, as the VCO control voltage...
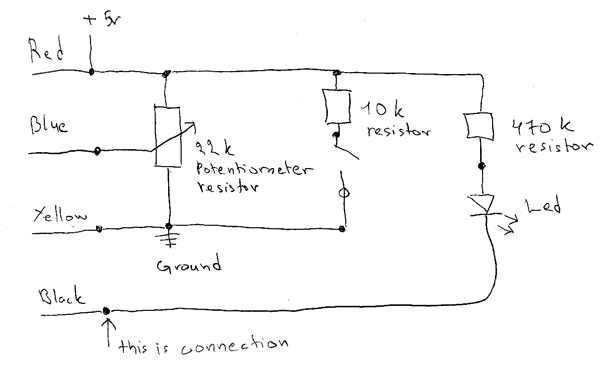
The circuit consists of a 10 kΩ resistor, a 470 kΩ resistor, a potentiometer, and an LED. This circuit is intended for learning Arduino programming in class. The circuit utilizes a combination of resistors and an LED to create...
The brain of the robot is composed of an Atmel Tiny2313 microcontroller. This MCU features In-System Programming, allowing programming of its memory using a low-cost programmer. A simple programmer connects to the parallel port and is described in the...