
USAT F3A Tips

The USAT F3A locomotive model is a robust piece of engineering, designed for durability and performance. It features a well-constructed chassis, which is significant for model railroading as it provides stability during operation. The locomotive is equipped with a DCC-compatible decoder that allows for precise control over speed and direction, enhancing the overall experience of operating the model. The inclusion of traction tires aids in improving the locomotive's grip on the track, especially important when navigating inclines or pulling heavier loads.
The electrical characteristics of the locomotive are noteworthy, particularly the stall current measurements, which indicate the potential for high power draw under certain conditions. The stall resistance readings suggest that the motors are capable of delivering substantial torque, making the F3A suitable for demanding tasks on the layout. However, careful management of current draw is essential to prevent overheating and damage to the wheels, especially given the high currents available from the DCC booster.
Maintenance considerations are also critical for the longevity of the locomotive. Regular cleaning of the track and wheels will help maintain optimal performance. The condition of the sliders is particularly important, as they contribute to power pickup. Ensuring that all components are in good working order will prevent issues related to intermittent power loss or stalling during operation.
In summary, the USAT F3A is a well-designed model that offers both aesthetic appeal and functional performance. With proper care and attention to its electrical characteristics, it can serve as a reliable addition to any model railroading setup.A used USAT F3A found it`s way into my possession today. I wasn`t planning on this, it just sort of happened. However, now I have another loco for the GIRR. The road number of the model is 26C. By the ATSF numbering scheme used at the time, this would be the trailing cab unit of an AA, ABA or ABBA set. The lead loco would be designated 26L. After ATSF stopped running them in matched sets, each loco would receive a unique number. Some of the locos in this class were eventually rebuilt as CF-7`s. This particular model is similar to the USA Trains GP-7/9 that I purchased in 1998 but it is of somewhat newer construction. I do not know the date of manufacture, but the switch board is dated 12 Aug 1999. This one has a bank of 5 slide switches underneath as opposed to the 4 switch configuration of my GP-9.
However, other than some wiring issues, it appears to be pretty much the same. The model is well detailed and heavily built. It still has wheels with traction tires and sliders. Since my investment in this loco is really small right now, I`m not going to go far out of pocket to upgrade it so the existing wheels and sliders will stay on this one. The wheels are somewhat worn indicating that this one has some miles on it. However, they are not seriously pitted now and I intend to keep them that way. My GP-9 had serious wheel problems due to a combination of conditions that I now know how to mitigate.
My layout has a really beefy DCC booster which can provide very high peak currents, in excess of 20 amps. The decoder I used in the GP-9 is also a very high current decoder to match the high current motors, which the F3A still has.
The combination of high available current, motors with nearly zero stall impedance and no current limiting results in burned up wheels. I`ll not let that happen again. I put the loco on my dirty track that hadn`t been cleaned in more than a month and it sputtered badly.
When I cleaned one section, it ran fine on that section. The sliders are also not in good condition, I will clean them up as they will be needed to offset the loss of 4 wheels worth of power pickup due to the traction tires. I did some initial current draw tests on this loco. Running light on DC it drew 1. 8 amps with the headlight on and smoke off. At full slip, it draws 3. 4 amps. I did not try to test the stall current as I knew it would be very high and I didn`t want to stress the thing by physically trying to stall it.
Instead, I measured the stall resistance. At the wheels, the stall resistance is about 1 ohm. Measured at the power pickup connectors on both trucks, the stall resistance is 0. 6 ohms. This results in a stall current of over 30 amps at 20 volts. This is in line with my measurements on the GP-9. The F3A is reasonably easy to get into if you have the right tools. It takes a long slender #1 Phillips screwdriver to reach down into the 9 places where there is a fastener. The tall posts are the locations of the screws. There are four along each side. The fuel tank has to be removed to access the center two on each side. It`s the one in the front that is difficult. It is centered right in front of, and partially obscured by, the front truck. This is where the long slender screwdriver comes in handy. The front truck has to be rotated so that the screwdriver can fit between a wheel back and the brick.
Then the 9th screw can be removed. The frame will then pull out but it might hang up on each side at the rear on a pin that holds the rear brake lines on. Push those details partially out so that the frame will clear. The strap hangers on the Blomberg type B trucks have a tendency to fall off. Over the years, I`ve lost two from the GP-9. I`ve found that a very small drop of gel CA (I use Loktite brand) placed at the bottom of the hanger will prevent the lower part of the hanger from being pushed outward which promotes the tab at the top coming loose.
This very small bond wi 🔗 External reference
Related Circuits

The Aristo ART-5474 Accessory Panel is a complete receiver designed to control accessories using buttons A through E on the Train Engineer transmitter. The ART-5474 is capable of controlling two turnouts, one constant load such as lights, and can...
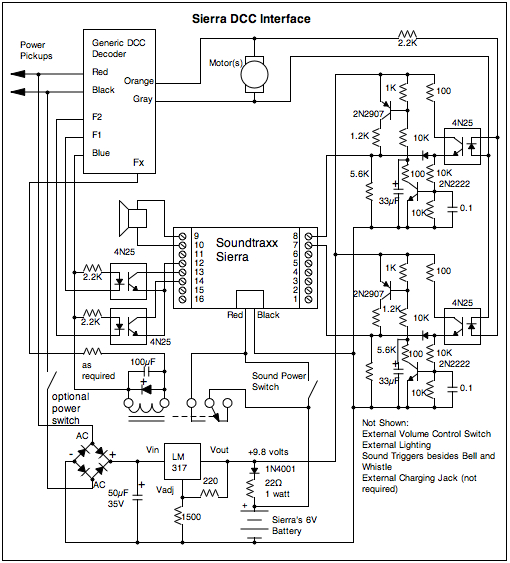
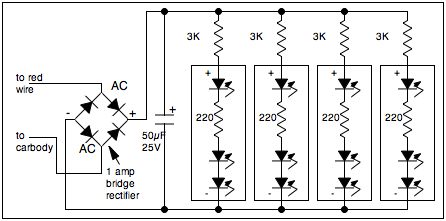
This document outlines the installation and operation of a Soundtraxx Sierra sound system. The Sierra performed adequately and was reasonably priced; however, it was discontinued in September 2008 without a direct replacement. A Soundtraxx Sierra sound system was purchased...
The streamliner passenger car was introduced just before World War II as part of dedicated passenger car and locomotive sets. These cars were designed to be lightweight, enabling high speeds with a relatively small diesel engine. Over time, railroads...
The Bachmann Big Hauler locomotive has significantly improved in appearance, reliability, and noise level over the past few years. However, the sound system remains basic, providing a poor imitation of exhaust sounds in the form of a chuff synchronized...

The EMD SD45 was manufactured starting in 1965, representing one of the newest prototypes available in large scale. SD45 locomotives continue to operate across the country, though their numbers are dwindling due to high mileage accrued over the past...
After extensive reading and discussion, plans have been finalized for the construction of a single-ended 300B integrated amplifier. The circuit... The single-ended 300B integrated amplifier is a popular choice among audiophiles due to its warm sound and high fidelity. The...