
AVR Inductance / Capacitance meter II
To do all these things, I need more flash memory for program space to perform computation. The flash in the ATTINY2313 of the original design was full with the basic LC meter program, so the first order of business was to get a controller with small footprint that has lots of flash - that turned out to be the ATTINY861 -8K in a 20 pin DIP. Oh, but look: there is no UART in the ATTINY861, so in order to send the display information to the LCD display controller, I would have to bit-bang a UART in C, but if I was going to go to that much work, why not bite the bullet and merge the LCD controller function into the ATTINY861. I had written a controller for the 2X16 LCD in assembler, and it was kind of messy, so I wasn't looking forward to doing it in C - at least not while I am still so new to C. That's when I remembered Peter Fleury's C libraries.
A couple of clicks took me to Peter's web site, http://homepage.hispeed.ch/peterfleury/, and another click took me to the page with his AVR software http://homepage.hispeed.ch/peterfleury/avr-software.html. Looking through the offerings - AVR-GCC Source Examples, AVR-GCC Libraries, an AVR Studio compatible Boot Loader, and a test program for his AVR Starter Kit. A couple of these look interesting to me, but it was the LCD library that I was after, so I downloaded the zip file containing the LCD library and had a look. The HTML documentation was very clear and direct - it seemed that I could make use of the libraries by merely placing the library and header files in the folder with the main program and then just calling the functions per the examples in the documentation. I tried it out, and you know what? It's just as simple as the documentation said it would be. The LCD Library and header files are included in the zip file, Even-Better_LCM.zip, which contains the complete built project. To get the complete LCD Library, including the documentation, please visit Mr. Fleury's site, http://homepage.hispeed.ch/peterfleury/.
The LCD library's default setup generates the code to drive displays using the Hitachi HD44780U controller based displays, but if you have a display that uses the Samsung KS0073 controller, there is a switch that causes code for that controller to be generated.
I had picked up an extra 2 line x 16 character controller from a small surplus shop in Bahnmo Plaza in Bangkok just a few days before starting this project, so I quickly built up a small circuit board with an ATTINY861 and the surplus 2x16 display, and since the power and ISP connections on the ATTINY861 are different from those on the ATTINY2313/AT90S2313 and the AT90S1200, I wired up a jumper socket with an ISP programming plug (Lazy ISP Socket Adapter). Pretty quickly, I had my name on the surplus LCD (250 Thai Baht or US$7.50 well spent). I ran some wires from the original "Pretty Good LC Meter" to the breadboard so I could use the oscillator already on the original meter, and I was ready to begin re-writing the ATTINY2313 C code for the ATTINY861.
The project centers on upgrading the original LC meter design to accommodate the ATTINY861 microcontroller, which offers a larger flash memory capacity of 8KB compared to the ATTINY2313. The ATTINY861's footprint is compact, making it suitable for integration into smaller devices. However, the absence of a built-in UART necessitated the development of a bit-banged UART in C for communication with the LCD display. To streamline this process, the LCD controller functionality was integrated into the ATTINY861.
The LCD display used in this project is compatible with the Hitachi HD44780U controller, which is a standard for many character LCDs. An additional feature of the LCD library allows for compatibility with displays using the Samsung KS0073 controller, enhancing versatility. The integration of Peter Fleury's LCD library simplifies the coding process, allowing for easy function calls to control the display.
The hardware setup involves a custom circuit board featuring the ATTINY861 and a surplus 2x16 character LCD display. Careful attention was given to the wiring of the power and ISP connections, as these differ from previous microcontroller models. A Lazy ISP Socket Adapter was utilized to facilitate programming the microcontroller. This upgraded LC meter design retains the essential functionality of measuring inductance and capacitance while enhancing programmability and display capabilities, thus offering a modernized approach to the original design.If this picture (above) looks a lot like the Pretty Good LC Meter also on this web site, that's because its the same meter, but with some significant improvements. At this point, its a good idea to read the Pretty Good LC Meter page because the rest of this page is based upon the Pretty Good LC Meter, and the Pretty Good LC Meter page explains how to build the meter.
I have left the Pretty Good LC Meter page intact because it is a complete project and if one wants to build an LC meter based on the ATTINY2313 or AT90S2313, this is a very good project for that. To do all these things, I need more flash memory for program space to perform computation. The flash in the ATTINY2313 of the original design was full with the basic LC meter program, so the first order of business was to get a controller with small footprint that has lots of flash - that turned out to be the ATTINY861 -8K in a 20 pin DIP. Oh, but look: there is no UART in the ATTINY861, so in order to send the display information to the LCD display controller, I would have to bit-bang a UART in C, but if I was going to go to that much work, why not bite the bullet and merge the LCD controller function into the ATTINY861.
I had written a controller for the 2X16 LCD in assembler, and it was kind of messy, so I wasn't looking forward to doing it in C -at least not while I am still so new to C. That's was when I remembered Peter Fleury's C libraries. A couple of clicks took me to Peter's web site, http://homepage.hispeed.ch/peterfleury/, and another click took me to the page with his AVR software http://homepage.hispeed.ch/peterfleury/avr-software.html.
Looking though the offerings - AVR-GCC Source Examples, AVR-GCC Libraries, an AVR Studio compatible Boot Loader, and a test program for his AVR Starter Kit. A couple of these look interesting to me, but it was the LCD library that I was after, so I downloaded the zip file containing the LCD library and had a look.
The HTML documentation was very clear and direct -it seemed that I could make use of the libraries by merely placing the library and header files in the folder with the main program and then just calling the functions per the examples in the documentation. I tried it out, and you know what? It's just as simple as the documentation said it would be. The LCD Library and header files are included in the zip file, Even-Better_LCM.zip, which contains the complete built project.
To get the complete LCD Library, including the documentation, please visit Mr. Fleury's site, http://homepage.hispeed.ch/peterfleury/. The LCD library's default setup generates the code to drive displays using the Hitachi HD44780U controller based displays, but if you have a display that uses the Samsung KS0073 controller, there is a switch that causes code for that controller to be generated. I had picked up an extra 2 line x 16 character controller from a small surplus shop in Bahnmo Plaza in Bangkok just a few days before starting this project, so I quickly built up a small circuit board with an ATTINY861 and the surplus 2x16 display, and since the power and ISP connections on the ATTINY861 are different from those on the ATTINY2313/AT90S2313 and the AT90S1200, I wired up a jumper socket with an ISP programming plug (Lazy ISP Socket Adapter).
Pretty quickly, I had my name on the surplus LCD (250 Thai Baht or US$7.50 well spent). . I ran some wires from the original "Pretty Good LC Meter" to the breadboard so I could use the osciallator already on the original meter, and I was ready to begin re-writing the ATTINY2313 C code for the ATTINY861.
Related Circuits
 A long-wave SWR meter
This document describes a simple SWR-meter suitable for long and medium waves bands (137 and 500kHz). The design is nothing new and very similar to common short wave meters, but it has been designed to work with low frequencies. The majority of amateur radio SWR-meters are specified for short waves...
 VU meter circuit
The circuit is placed parallel with the exit of power amplifier and us gives the level of signal ,from output. Changing resistance R1, in the input circuit, we adapt the indication of power, in the resistance of loudspeaker, that we use.
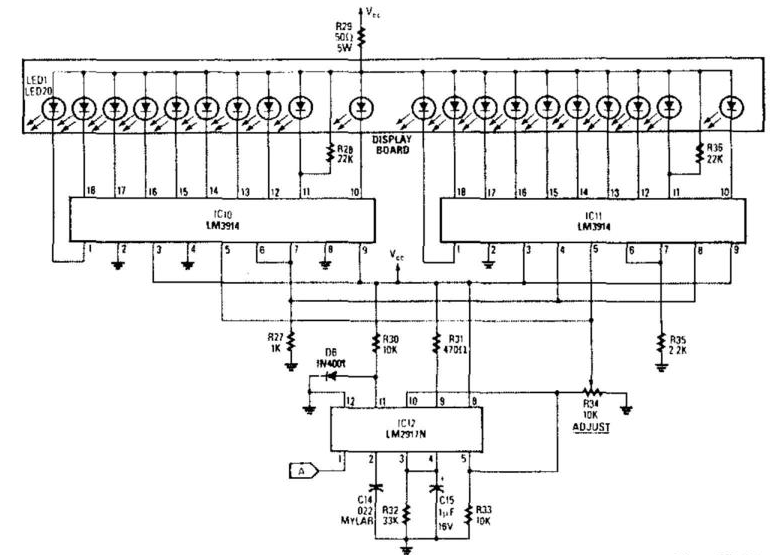 Analog Tachometer Readout
The analog display consists of a frequency/voltage converter (IC12) and bar-graph segment drivers IC10 and IC11. R34 is the calibration adjustment and is set so that an engine rpm of 5 000 to 7000 rpm lights the first LED (redline value)
 10 LED VU meter with LM3915
Supply voltage: 12 V. Supply current: 10 mA in stand-by, max. 80 mA. Input voltage: min. 20 mV rms. Indication range: 30 dB. LED currents: 7 mA. Ref. voltage of IC2: 5 V