
audio Using a microphone with an Arduino

To construct a VU meter using an Arduino, the following components and steps are necessary. The microphone, ideally an electret condenser type, should be paired with an operational amplifier (op-amp) to boost the audio signal to a suitable level for the Arduino's analog input. The op-amp circuit can be configured in a non-inverting mode to amplify the microphone's output, ensuring that the signal is within the 0-5V range that the Arduino can read.
The microphone should be connected to the op-amp input, and the output of the op-amp should be connected to the Arduino's analog pin A0. A resistor-capacitor (RC) low-pass filter may be included to smooth out the audio signal, allowing the Arduino to read a more stable value representative of the audio amplitude.
In the Arduino sketch, the analogRead() function will be employed to capture the voltage level from the A0 pin. This value can be processed to calculate the VU meter's output. The results can be displayed in the Serial Monitor, providing a real-time graphical representation of the audio level. The sketch may also include a mapping function to convert the raw analog values to a more meaningful scale for the VU meter display.
For optimal performance, it is crucial to calibrate the system, ensuring that the microphone and amplifier are correctly tuned to the expected audio levels. This calibration may involve adjusting gain settings on the op-amp and fine-tuning the software parameters in the Arduino code to achieve accurate VU meter readings.This requires expensive hardware (microphone & amplifier) and some sophisticated audio analyizig on the microcontroller. Even a complete microphone with amplyfier circuit does not provide the desired results (according to the comments on this product) I am entirely new to the Arduino (but I`m familiar with programming).
In order to built a VU meter, I want to put a microphone to the analog 0 pin of the Arduino and display the value via the serial connection. 🔗 External reference
Related Circuits
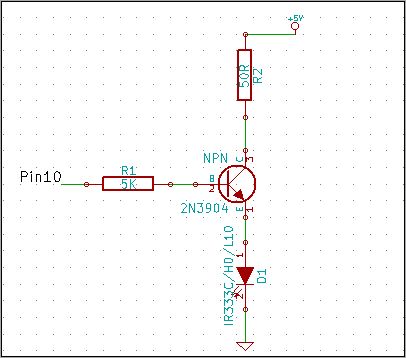
The 2N3904 is an NPN transistor. When observing the flat face of the transistor, the left lead is the Emitter (pin 1 in the schematic), the middle lead is the Base (pin 2 in the schematic), and the right...
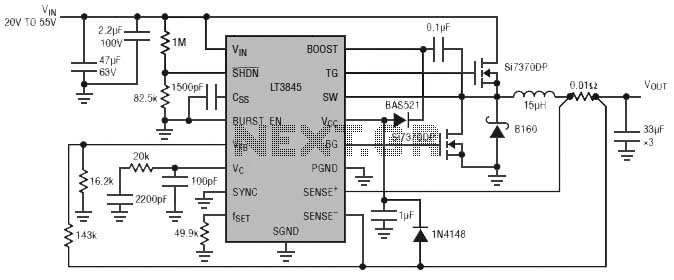
Burst Mode operation maintains high efficiency at light loads by reducing IC quiescent current to 120 µA. Light load efficiency is also improved with the reverse inductor current inhibit function, which supports discontinuous operation. Additional features include an adjustable...
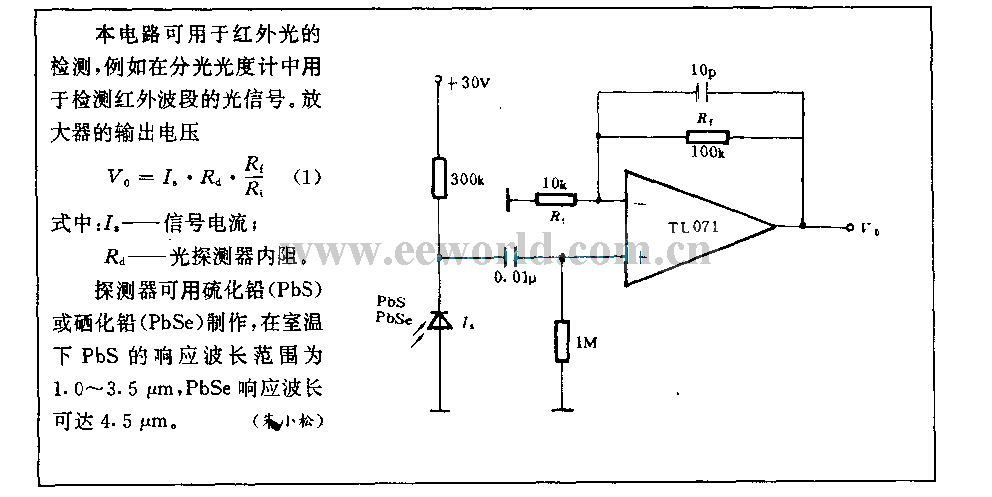
This circuit can be used for detecting infrared light; for example, it is utilized for detecting infrared band light signals in a spectrophotometer. The amplifier output voltage Vo is given by the formula Vo = Is·Rd·Rf/Ri, where Is is...
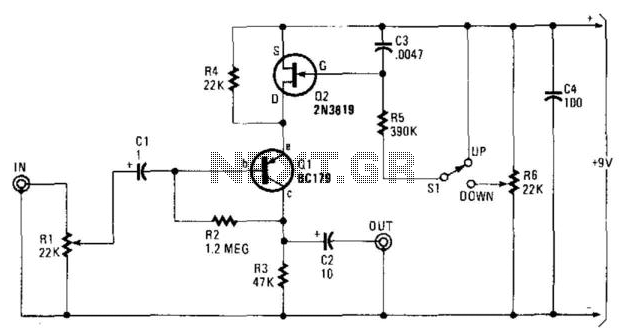
In this circuit, Q1 serves as a simple amplifier with gain control provided by a variable emitter resistance supplied by FET Q2. When switch SI is in the up position, capacitor C3 discharges through resistor R5, resulting in a...
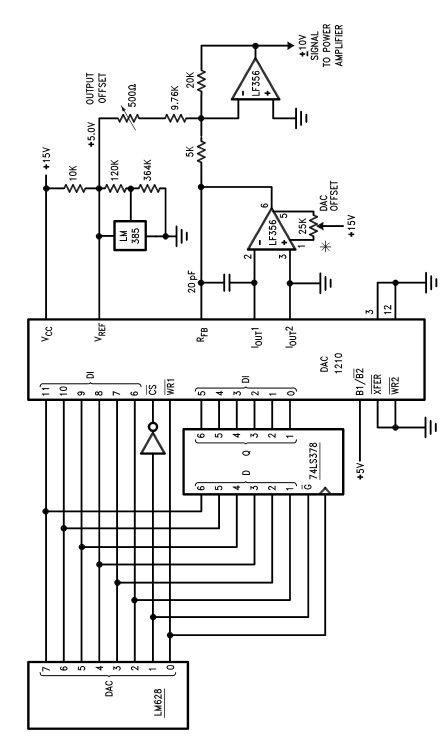
The LM628 and LM629 dedicated motion-control processors can be utilized to design various applications involving DC and brushless DC servo motors, as well as other servomechanisms. The power path of this electronic project, which functions as a motor driver,...
Power amplifier circuit diagram using the IC TLE2141C. The TLE2141C is a low-noise, high-voltage, high-slew-rate operational amplifier with a frequency response of 30 Hz. The TLE2141C operational amplifier is designed for applications requiring high precision and low noise, making it...