
avr microcontroller circuit
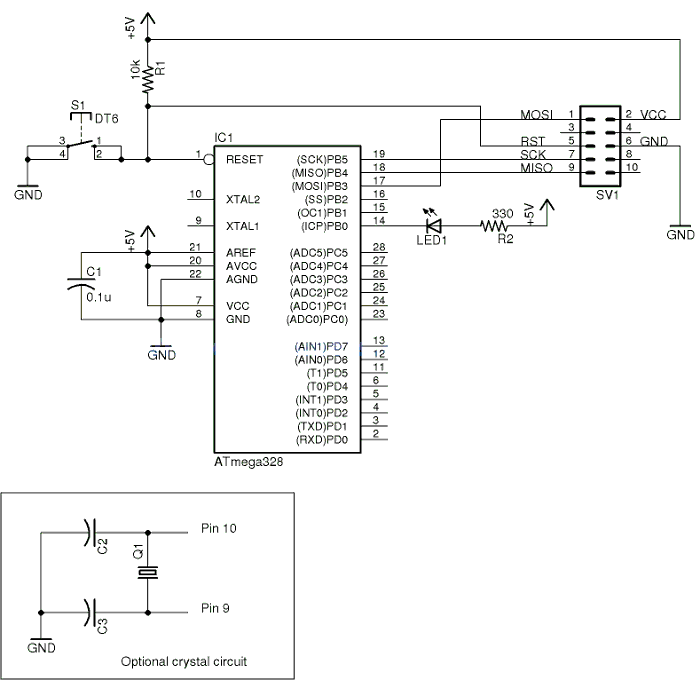
To successfully operate the ATMEGA328P-PU microcontroller outside of the Arduino environment, a minimal circuit is required. This circuit typically includes the microcontroller itself, a power supply (usually 5V), and a few passive components such as resistors and capacitors. The microcontroller needs a stable power source, which can be provided by a voltage regulator if using a higher voltage supply.
For programming, a programming interface such as an ISP (In-System Programmer) is essential. This allows for the microcontroller to be programmed via the SPI interface. The connections for the ISP typically involve several pins: MOSI, MISO, SCK, RESET, VCC, and GND. A common choice for an ISP is the USBasp, which connects to the microcontroller and facilitates programming.
In addition to the programming interface, a crystal oscillator or resonator is necessary for providing the clock signal to the microcontroller. The ATMEGA328P-PU can operate with an external crystal oscillator, typically rated at 16 MHz, connected to the XTAL1 and XTAL2 pins, along with two capacitors to ground (usually 22pF). If an external oscillator is not used, the microcontroller can be set to use the internal oscillator, but this may limit performance.
To ensure stability during operation, decoupling capacitors (typically 0.1µF) should be placed close to the power pins of the microcontroller. These capacitors help filter out noise from the power supply and provide a stable voltage.
The reset pin must also be properly managed to avoid unintended resets during operation. A pull-up resistor (commonly 10kΩ) is connected from the reset pin to VCC to keep the microcontroller in a running state. A push button can be added to ground the reset pin momentarily, allowing for manual resets when needed.
Lastly, for input and output operations, the microcontroller's GPIO pins can be connected to various components such as LEDs, sensors, or relays, depending on the application requirements. This flexibility allows for a wide range of projects to be developed as the user gains confidence and understanding of the microcontroller's capabilities.
By following these guidelines and utilizing resources such as application notes and datasheets, a beginner can effectively learn to work with microcontrollers and progressively build more complex electronic projects.Arduino Uno has a ATMEGA328P-PU microcontroller, and bunch of other stuff on the board. I`d like to program the chip without the Arduino software, and only the minimum of other components. I want to eventually create things without the cost of Arduino, and I want to learn about the other parts on the board and add them back as as needed. I`m comfortable with C and gcc, so I can probably figure out the software part. But what, if anything, besides these two products below, do I need to have in the breadboard with the microcontroller Maybe when I know more. The datasheet is 550 pages, I`m a beginner, and a skim revealed nothing to me. I do a lot of self-study, but I appreciate sites like this where I can get some answers from humans now and then.
:) Rob N Jan 11 `13 at 14:05 @capcom First google result for finds AVR Hardware Design Considerations. Not only does this application note have a minimal circuit to get the MCU to work, it goes in to great detail on how to connect a programming port, select oscillators, deal with ESD hazards, potential glitches on the reset line, connecting JTAG, PCB layout, and basically everything a beginner needs.
Finding this information is the most useful skill a beginner can have. Phil Frost Jan 15 `13 at 3:38 @PhilFrost While I agree with you that finding information is probably the most essential skill a beginner can have, especially with the plethora of information available thanks to the internet, opening a datasheet for the first time can be a little intimidating. Once someone more experienced answers their question and tells them where in the datasheet they found the answer, the beginner can re-analyze it themselves and start to gain some confidence.
Also, the link you gave is not a datasheet. You told him to read the "ATMEGA328P-PU datasheet", not conduct a Google search for an answer. capcom Jan 15 `13 at 13:05 🔗 External reference
Related Circuits
This circuit addresses the challenge of transmitting data over a cable that lacks available conductors. The data is modulated using On-Off Keying (OOK) and superimposed on a high-frequency carrier, allowing it to be transmitted over a low-voltage power supply...
This is a small electronic switch that connects a battery to the equipment for a certain amount of time when a push-button is momentarily pressed. The ambient light level has also been considered; when it is dark, the display...

The 2.25-MHz oscillator Q1 drives amplifier Q2 and XTAL1, an ultrasonic transducer. The transducer is a lead zirconate-titanate type. Taps on T1 and T2 provide low-impedance drive points. The circuit consists of a 2.25-MHz oscillator (Q1) that serves as the...
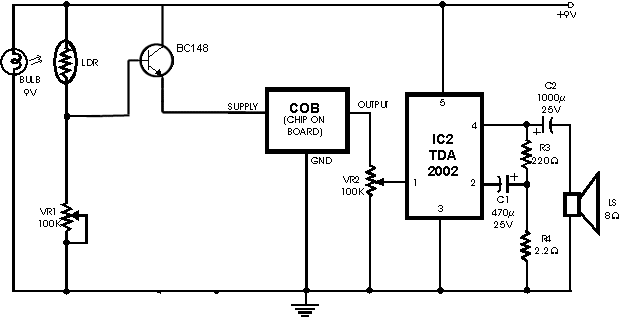
The circuit operates on the principle of detecting smoke produced during a fire, which passes between a light bulb and a light-dependent resistor (LDR). As smoke obscures the light, the amount of light reaching the LDR decreases, resulting in...
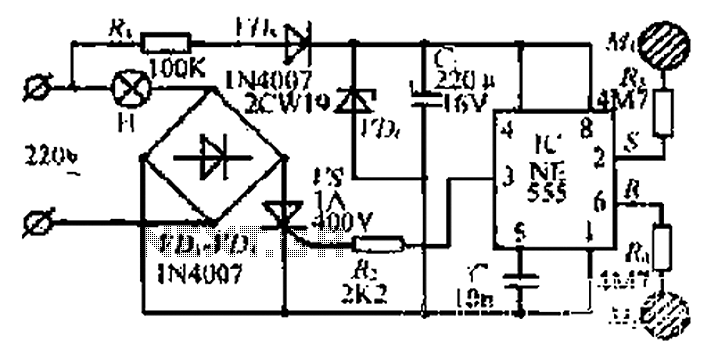
220V AC by Ri buck, Diao. C1 chain ferry flood ear, shouted for the regulator to 12V make C collapse. The film hand touch under ridicule the MT electrode films, clutter body. More: induction signal sent by See Cutting...
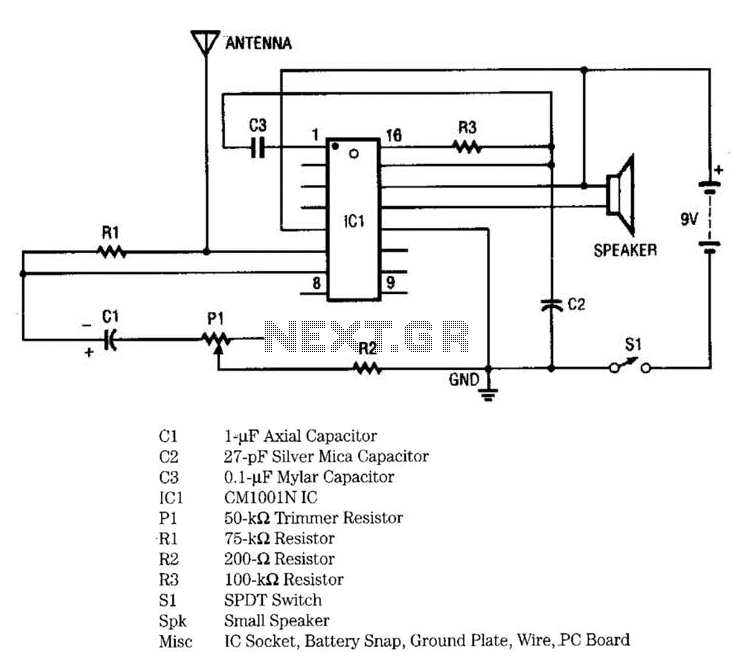
IC1 includes multiple oscillators and an amplifier. The low-frequency audio signal oscillator provides an input to the amplifier. This signal is the audio tone that is amplified and subsequently delivered to the speaker by the amplifier. The high-frequency oscillator...