
Control your Holiday Lights with a Magic Wand

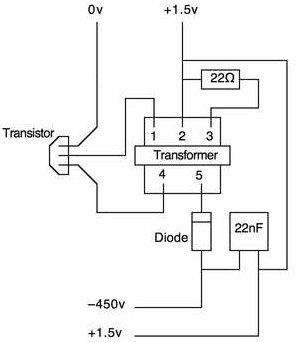
The circuit operates by utilizing a magnet as the primary triggering mechanism. When the magic wand, which is equipped with a magnet, is waved near the circuit, it induces a response in the electronic components. The main components of the circuit include a microcontroller, which processes the input signal from the magnet, and a driver circuit that controls the power to the holiday bulbs.
The microcontroller is programmed to recognize the presence of the magnetic field and activate the output in a predetermined sequence. This sequence can be customized to create various lighting effects, enhancing the festive atmosphere. The driver circuit typically consists of transistors or relays that can handle the current required to power the bulbs without exceeding their ratings.
Additionally, the circuit may incorporate a power supply unit to ensure stable voltage and current levels for reliable operation. Safety features, such as fuses or circuit breakers, can be included to protect against overloads. The overall design emphasizes simplicity and user-friendliness, making it an ideal project for hobbyists and those looking to add a touch of magic to their holiday decorations.This circuit allows you to turn on your holiday bulbs with a wave of the magic wand. The strings flash in sequence. At the heart of the idea is the magnet.. 🔗 External reference
Related Circuits

Carefully examine the following circuit diagram and attempt to construct the circuit on a breadboard first. If it functions correctly, proceed to create its PCB version. The circuit diagram serves as a blueprint for constructing an electronic circuit on a...

An infrared (IR) remote control circuit for managing home appliances can be constructed using a Decade Counter CD4017, a 555 Timer, and a TSOP1738 infrared receiver. This circuit allows users to control home devices with a standard remote control,...
This article outlines a straightforward and effective method for deterring intruders. While alternative methods exist, this approach is suitable for office pranks and general amusement. The project necessitates a basic understanding of electronics and circuitry, including the ability to...

R2 47Ω 1/4W Resistor, D1 LED (any dimension, shape, and color), Q1 Infrared Photo Transistor (any inexpensive type), Q2 BC327 45V 800mA PNP Transistor, SW1 SPST Toggle or Slide Switch (optional, see note), B1 3V Battery (2 x 1.5V...
General Diagram of Motor Controller Manual PDF Download. The motor controller is an essential component in various applications, including robotics, electric vehicles, and industrial machinery. It regulates the operation of electric motors by controlling parameters such as speed, direction, and...

The LED running light project can be easily implemented using microcontrollers, particularly the Microchip PIC microcontroller. This project utilizes the PIC16F877A microcontroller, which features a 40-pin IC configuration, with LEDs connected to port B. The LEDs twinkle in accordance...