
controlling your trains with an arduino

An Arduino Mega microcontroller has been acquired to control a model railway. This document will serve as the first installment in a series demonstrating how to utilize an Arduino for controlling various sections of a layout. The initial objective is to create a controller/throttle that incorporates basic acceleration and braking features, alongside a 12V DC pulse-width modulated (PWM) output. The design references schematics from pyroelectro.com, which, although based on a PIC microcontroller, effectively controls the L298 H-Bridge integrated circuit using PWM on its input rather than the enabling pin.
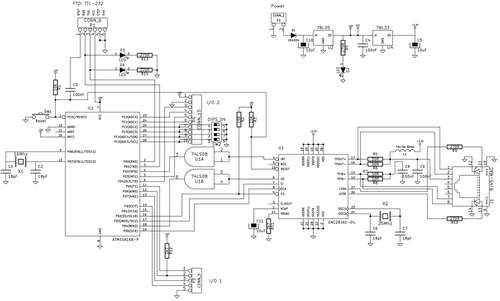
PWM pins on the Arduino board are labeled and, by default, output a PWM signal when an analogWrite(pin_number) command is issued. This generates a pulse that the H-Bridge responds to, with the frequency of the pulse determining the final output voltage to the tracks. For direction control, digitalWrite(HIGH) can be applied to PWM2 and digitalWrite(LOW) to PWM3, or the reverse for the opposite direction. Setting both pins to LOW will stop the output, while setting both to HIGH will create a short circuit. Switches S1 and S2 are incorporated to control direction; initially, the system moves forward, and pressing S2 changes the direction to backward. The code is designed to gradually decelerate and then accelerate in the opposite direction. Pressing S1 will return the direction to forward, triggering the reverse action.
A potentiometer serves as the throttle, with a large 250-ohm unit sourced from a local antique store. At maximum throttle (100), the analogRead function reports a value slightly above 1000. The throttle controls speed, and it is advisable to implement a brake lever since returning to zero speed results in a gradual stop. An emergency stop button is necessary to halt the train more quickly. A 12V DC power supply is required, capable of providing sufficient current, as small engines may draw up to 1A during startup. This power supply can also power the Arduino if it is not connected to a computer after programming; it is essential to connect all ground wires together. It is crucial to use a regulated and safe power supply, as different Arduino models can handle varying voltages. The Arduino Mega can accept a maximum input of 20V DC. Queries regarding the project are welcomed, as further details and clarifications can be provided as needed. Future enhancements to the controller will be explored as time permits.Arduino is an open-source electronics prototyping platform based on flexible, easy-to-use hardware and software. It`s intended for artists, designers, hobbyists, and anyone interested in creating interactive objects or environments.
Arduino can sense the environment by receiving input from a variety of sensors and can affect its surroundings by co ntrolling lights, motors, and other actuators. The microcontroller on the board is programmed using the Arduino programming language (based on Wiring ) and the Arduino development environment (based on Processing ). Arduino projects can be stand-alone or they can communicate with software on running on a computer (e.
g. Flash, Processing, MaxMSP). The boards can be built by hand or purchased preassembled; the software can be downloaded for free. The hardware reference designs (CAD files) are available under an open-source license, you are free to adapt them to your needs So, I recently purchased an Arduino Mega Microcontroller with the intent to control a Model Railway with it. This article will be the first in a series to show you how to use an Arduino to control different areas of a layout.
Our first goal will be to create a controller/throttle with very basic Acceleration/Braking and a 12v DC Pulse Width Modulated output. In the end I chose to use the schematics and information from the guys at pyroelectro. com which uses the L298 H-Bridge integrated circuit. My main reasoning was that, although they used a PIC microcontroller, they correctly controlled the L298 with PWM on it`s input rather than it`s enabling pin.
Either way, the PWM signal is still created. Right, what do you need to know. The PWM pins are labelled on your Arduino board. By default they output a PWM signal when you feed an analogWrite(pin_number) to them. This creates a pulse that the H-Bridge will respond to. The frequency of this pulse (wave) will then govern the final output voltage to the tracks. For direction control you either apply digitalWrite(HIGH) to PWM2 and digitalWrite(LOW) to PWM3 or vice versa for the opposite direction. Applying LOW to both pins will stop the output and HIGH to both will short circuit! I`ve added S1 and S2 to control my direction. It starts off going `forward`, but pressing S2 will set the direction to backwards. The code is written to gradually stop and then accelerate in the opposite direction. Pressing S1 will then set the direction forwards again and the reverse will occur. The potentiometer is the throttle. I found a huge one at an antique store down the road and love it. It`s rated at 250ohm (no idea what current) and when at `100` the analogRead reports just over 1000. The throttle is only for speed, I really should add a brake lever, as when you return to zero speed the train will only gradually stop.
You need to then hit the reverse (or emergency stop) button to stop the train faster. You`ll also require a 12v DC power supply. As your little engines may use up to 1A when starting, make sure this power supply is sufficient. Also, if you don`t intend to have the Arduino plugged in to a computer after programming, then this 12v can also supply it (connect all ground wires together!). Just make sure it`s a regulated and safe power supply. Note that different Arduinos can handle different voltages! Find your board listed here and then work out the power supply details, otherwise the Arduino Mega details are here (Input max 20v DC).
Please do ask any questions you have about this. I`ve probably skimmed over a lot and am more than happy to update this as necessary. I intend on getting on to more interesting things with this controller as I get the time. 🔗 External reference
Related Circuits
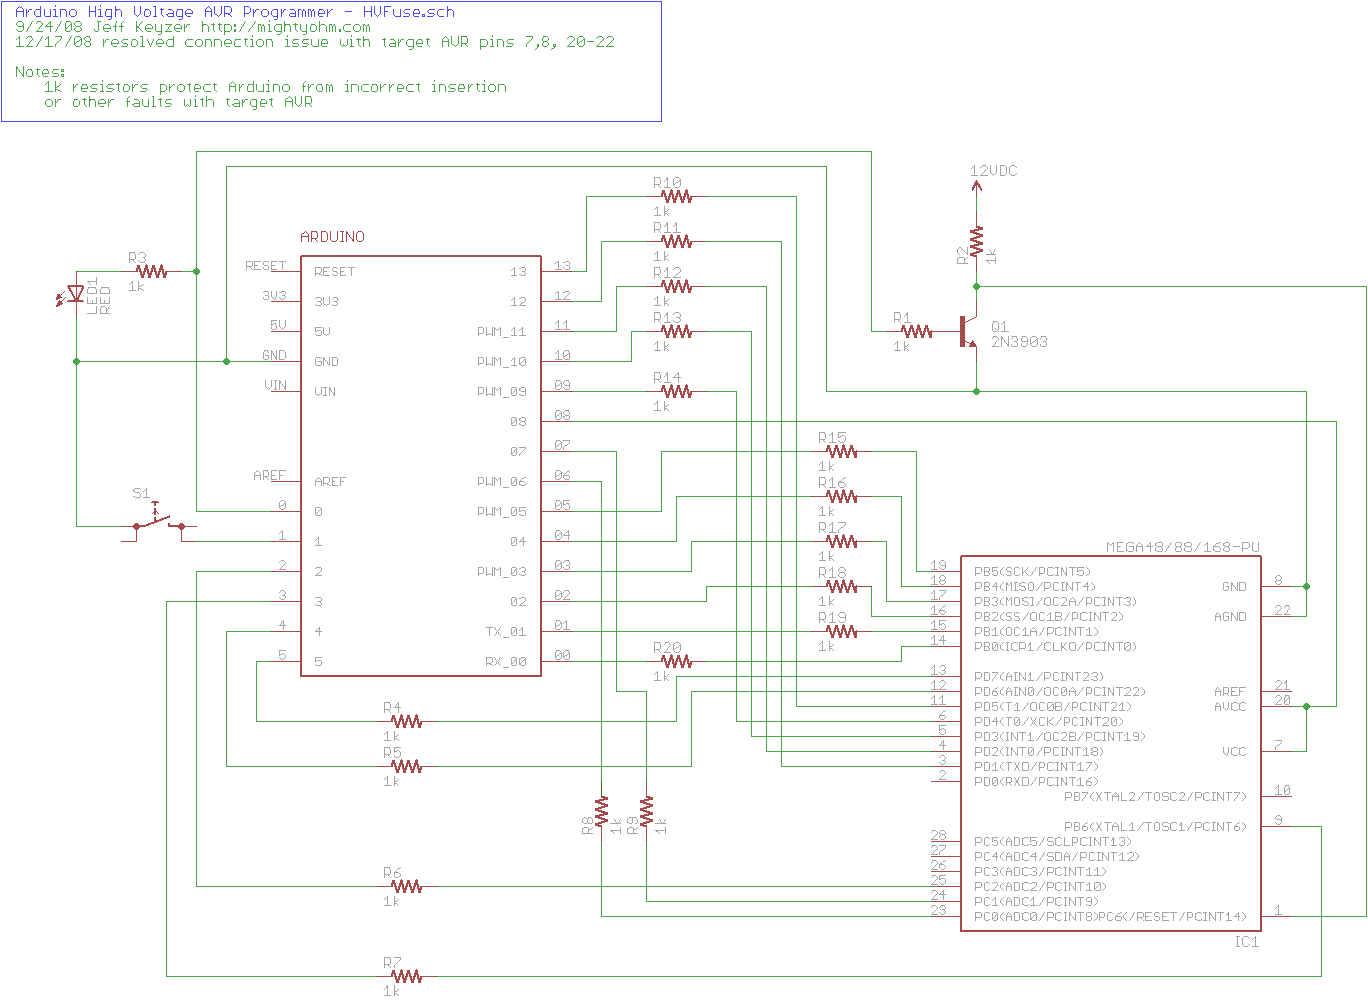
The project explains how to create a simple AVR High Voltage Programmer using Arduino. It can be utilized to fix or recover incorrectly fused AVR chips. The AVR High Voltage Programmer is designed to reprogram AVR microcontrollers that have been...
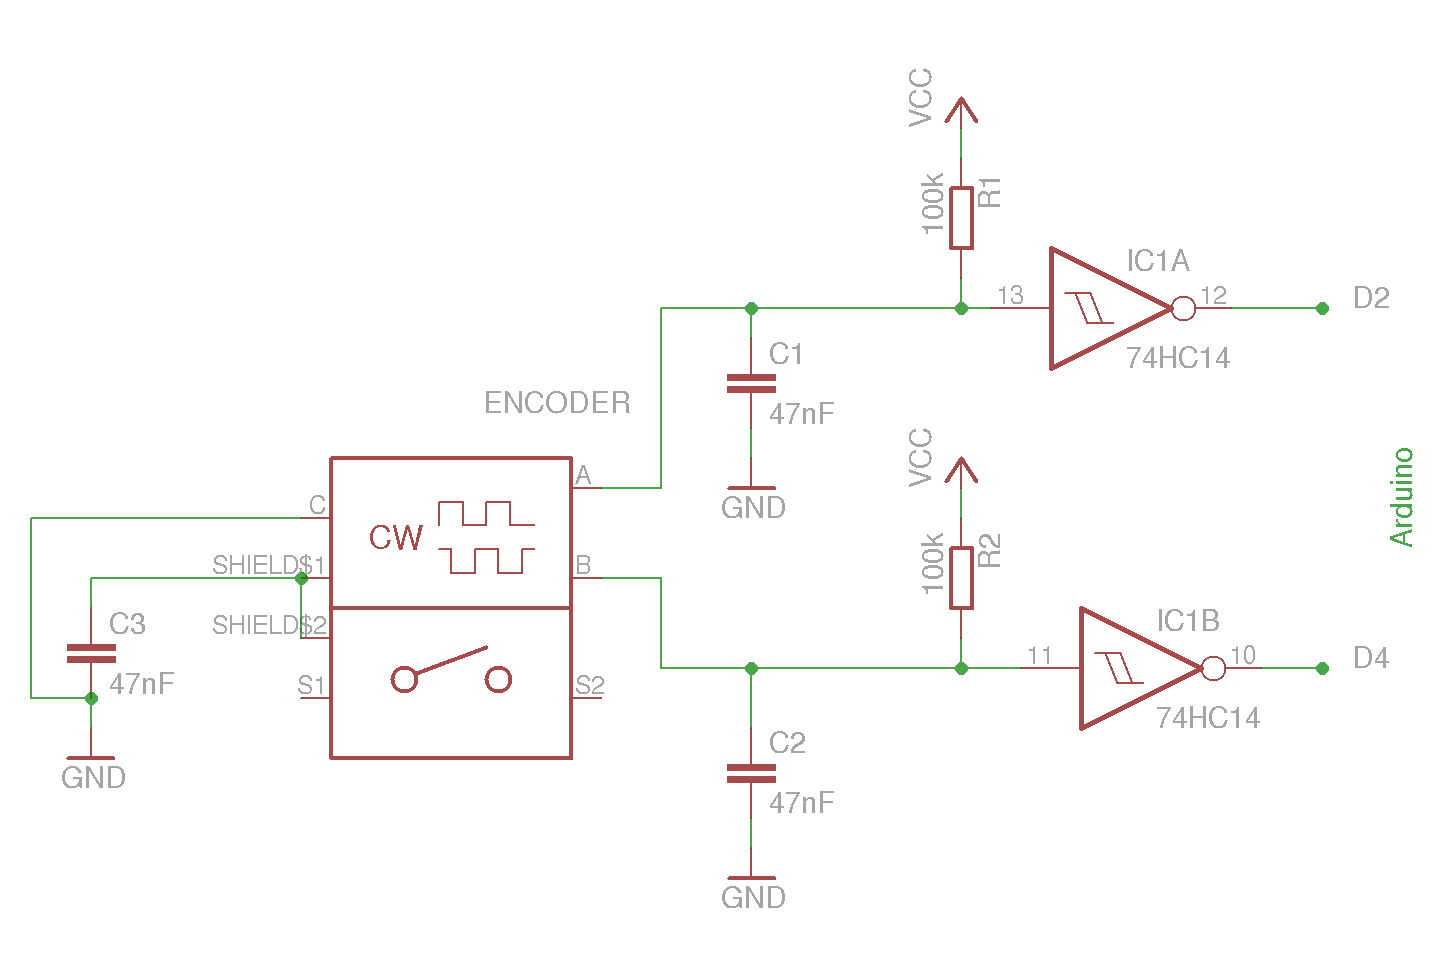
The example circuit and code should be sufficient to begin without delving into additional details. A rotary encoder is an electromechanical component with a shaft that records rotation and converts it into electrical pulses to indicate the direction of...
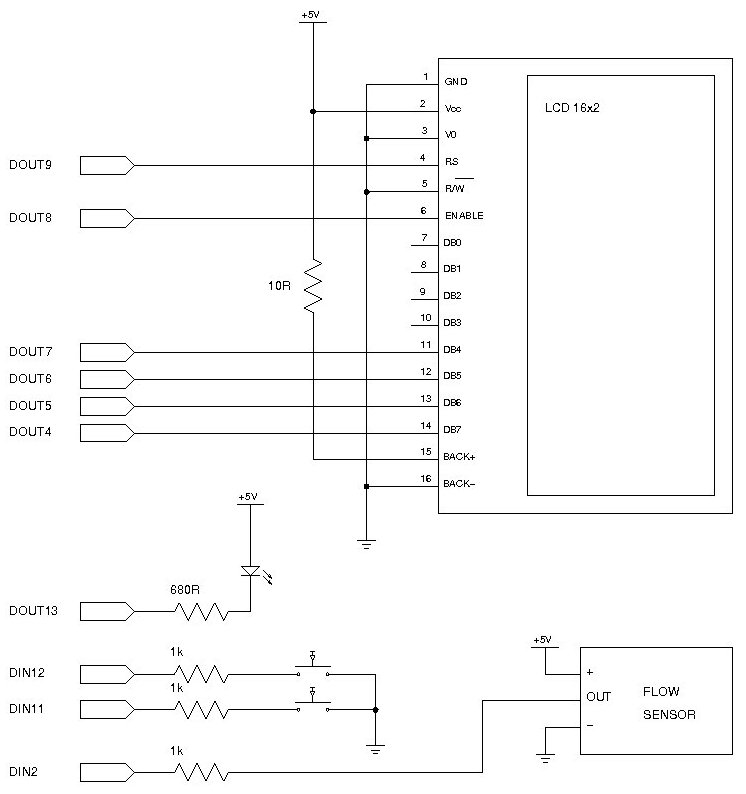
Measuring the consumption of a resource that has units by volume can be more challenging than it appears. Resources such as water, gas, and electricity are typically measured using gauges that determine either the instantaneous flow rate or the...
After completing the prototype and ensuring the sketch functions correctly, it is time to construct the circuit. The aim is not to provide a detailed explanation of how to create printed circuit boards, but rather to offer a general...
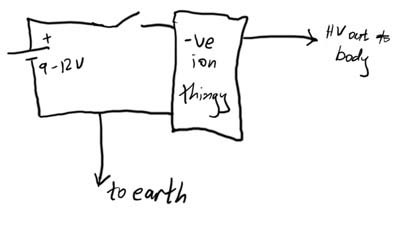
This article demonstrates how to create a simple yet effective static electricity generator. This device enables the user to carry a constant static charge on their body and discharge it onto anything grounded or of opposite polarity. The generated...
The Arduino is a user-friendly and versatile controller platform suitable for various projects. Recently, an Ethernet shield was purchased for the Arduino to enable remote control of projects, which proved to be highly effective. This led to the idea...