
How to Shock People with Your Fingertips circuit
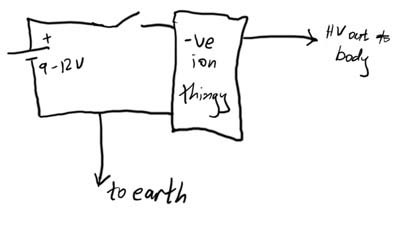
The static electricity generator operates on the principle of electrostatic induction, utilizing a negative ion generator to create a high voltage charge. The basic components of the circuit include the negative ion generator, a power supply, a discharge mechanism, and a collection system for the static charge.
The negative ion generator is responsible for producing negative ions, which accumulate on the surface of the device. This accumulation leads to a high voltage potential difference, typically in the range of 8-10 kV. The circuit design must ensure that the current remains low, as high currents can pose safety risks.
The discharge mechanism can be as simple as a metal probe or a conductive surface that allows the stored charge to be released when it comes into contact with a grounded object or a person of opposite polarity. The design should also incorporate safety features to prevent accidental discharge, which could lead to unintended shocks.
The collection system may consist of a series of capacitors or conductive plates that enhance the accumulation of static charge. The circuit layout should be carefully planned to minimize losses and ensure efficient charge transfer. Attention should be given to the insulation of components to prevent unintended discharges and to protect the user from high voltage.
Overall, building a static electricity generator requires a solid understanding of circuit design principles, careful selection of components, and adherence to safety protocols to ensure a functional and safe device.In this article, I`ll be showing you how to make a simple yet effective static electricity generator. Basically, this device allows you to carry a constant static charge on your body and discharge it on anything grounded or of opposite polarity.
The electricity generated is around 8-10 kV, at a very low current. The shock is enough to startle your friends, just like a static shock from a trampoline or carpeted room. You`ll need a little experience in soldering and circuit design to build the project. Materials and Tools Soldering iron Flux-core solder Wire Negative ion generator (These can.. 🔗 External reference
Related Circuits
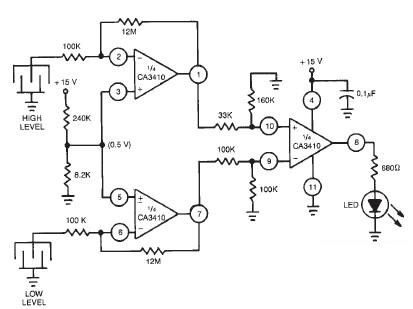
This liquid level sensor electronic circuit diagram utilizes a common CA3410 operational amplifier integrated circuit (IC). The sensor employs two plate sensors (or probes), one designated for detecting high liquid levels and the other for low liquid levels. If...
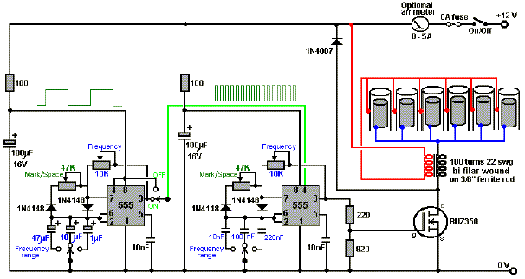
How to create a hydrogen generator using a 555 timer circuit with Pulse Width Modulation (PWM). This PWM circuit can generate hydrogen on demand. The hydrogen generator circuit utilizing a 555 timer operates by controlling the duty cycle of the...
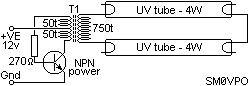
There is no PCB since there are no components to mount on one. The object was to create a source of ultraviolet light as fast as possible. The UV tubes I bought from a lighting shop for use with...
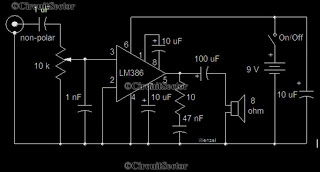
This is a simple low-power audio amplifier circuit capable of producing a power output of 1W. The mono amplifier circuit is built around the LM386 integrated circuit, which operates effectively at low voltages, even below 9V. This low-voltage amplifier...
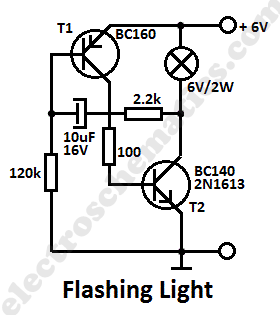
This simple flashing light circuit operates at 6 volts and 0.5A, exhibiting low current consumption when the light bulb is turned off. The frequency of the flashing is predetermined. The circuit consists of a power supply, typically a battery or...
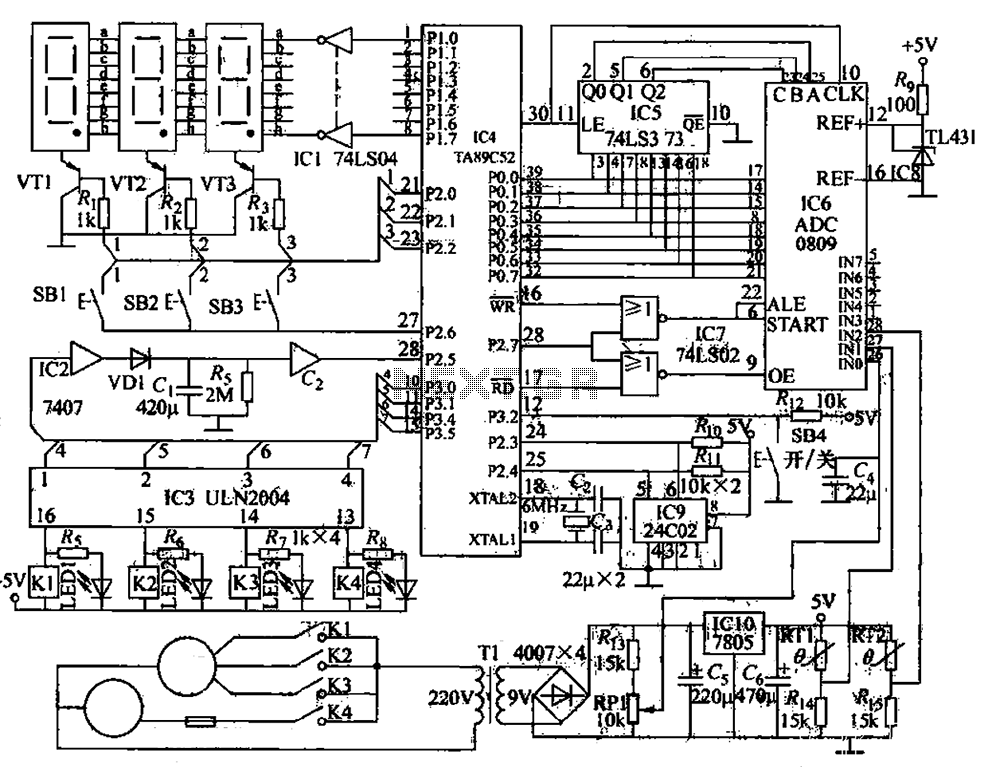
The circuit functions as a computer logo-conditioned temperature control system as depicted in Figure 1-58. The primary component is the AT89C52 microcontroller. When powered on, the 4C02 microcontroller first retrieves the last saved setpoint temperature and the operational state...