
diy ambient orb with arduino update <77> comment page 3

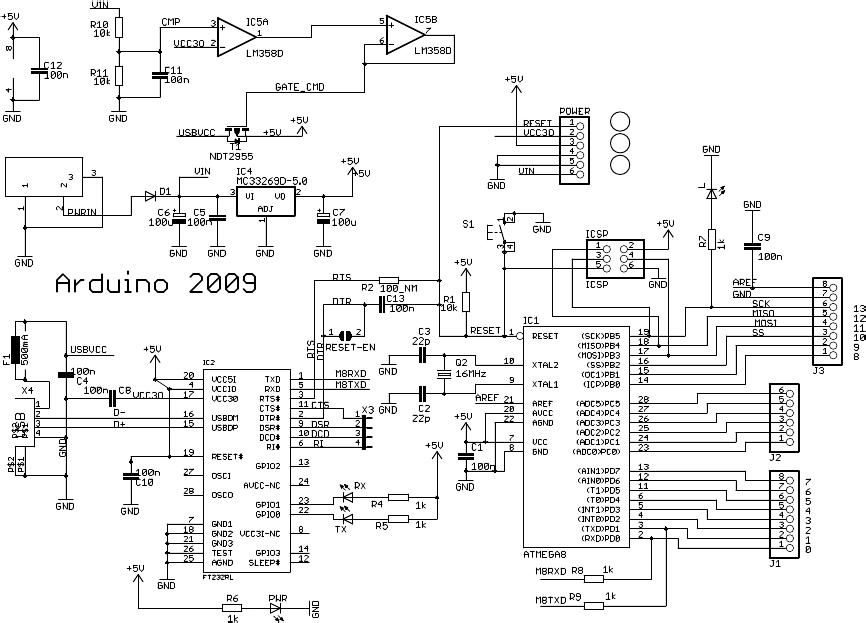
The described circuit involves an Arduino board functioning as the central controller, interfacing with three RGB LEDs to create a visual representation of color values received via a web page. The connection between the Arduino and the laptop is established through a USB interface, allowing for serial communication. The LEDs are directly mounted on the Arduino board using a prototyping shield, facilitating ease of assembly and modification.
The Arduino sketch is designed to interpret RGB color values formatted as #RRGGBB, which are common in web applications. This format allows for a wide range of colors to be represented, enabling the LEDs to display various hues. The Processing sketch serves as a bridge between the web server and the Arduino, fetching color data from a specified URL, parsing it, and transmitting it to the Arduino via the serial port. The synchronization between the background color of the Processing sketch and the LED colors on the Arduino is achieved through a deliberate frame rate setting, which creates a visual delay that enhances user perception of the color change.
The inclusion of PHP code to retrieve temperature data and convert it into RGB values expands the functionality of the project, allowing for dynamic color changes based on real-world data. The implementation of a pulsing feature to indicate precipitation chances adds an additional layer of interactivity, making the project more engaging. The challenges in refining the pulse variable for different rainfall levels indicate an opportunity for further development and experimentation.
Overall, the project showcases the integration of hardware and software, utilizing the Arduino platform, Processing environment, and web technologies to create a responsive and visually appealing system. The modular nature of the code allows for future enhancements, such as improved color mapping and additional environmental data integration, making it a valuable learning tool and a foundation for further exploration in interactive electronics.The hardware is just an Arduino board connected via USB to a laptop. The Arduino appears as a serial device to the computer. On the Arduino board, three LEDs (red, green, blue) are mounted directly to the Arduino board using a prototyping shield like this DIY one. The schematic is quite simple: The code sketch running on the Arduino board is a slightly modified version of
the one presented in the last Spooky Arduino class. Instead of parsing single color values over the serial port, it expects a full RGB color value in standard web format of #RRGGBB (white is #ffffff , blue is #0000ff , and so on). The sketch parses that seven character string into three bytes: one each for the brightness values of the red, green and blue LEDs.
To bridge between the Arduino and the Net, a small Processing sketch was created that uses the standard Java class to fetch a web page (really, a text file on a web server) containing a line with a color value in the format #RRGGBB . The sketch parses the color value, sends the value out to the Arduino orb using the Processing Serial library, and then sets its own background color to match.
Because I`ve set the framerate of the sketch to 1 fps, it takes a second for the background to match the orb. I did this on purpose so I could get a sense of the color as the orb reproduces it before seeing it as it truly is.
I was surprised how well the two tended to match! I have some PHP code that I wrote to display glanceable weather info on a Chumby. I`m trying to replicate the behavior of my Ambient Weather Beacon. Thought y`all might like to experiment with it in conjunction with this project. The code grabs today`s temp using Yahoo`s APIs and maps the temp to an RGB color. After 3pm, it should display tomorrow`s temp (you may need to localize it). I haven`t really implemented the pulse that Ambient`s devices do to show precipitation chances, but the beginning of the code is there if you want to experiment. The code`s a bit messy, I`m not great with PHP. The specific colors chosen for each temp could probably use a bit of work, too. But, hey it`s a start for you to work from if you`re interested. I`ve only partially-implemented the pulse by mapping some of Yahoo`s weather codes to it (chance of showers = 1).
I`m mucking up todbot`s code to include a pulse` variable so that my kludged orb can pulse when there`s precipitation forecast. A quick throb` for high rainfall, a slight pulse for light rain and a solid color for no rain. Anyone have thoughts on the best way to handle the pulsing I was thinking of writing a function that would write a pattern to BlinkM, then have my code adjust BlinkMs playback timeline and fade rate to offload that process to BlinkM.
In practice, this is looking to be a bit more work than I`d anticipated calculating a nice fade from and arbitrary color (I`m using RGB color space). Are the flash` in-built BlinkM flash` scripts using HSB and simply adjusting the B(rightness) You`ll want to change urlstr to a file on a server you control.
Then whenever you edit that file and change the color, the Arduino will follow suit. You might be able to use file:// URLs to access a local file, but I`ve not tried that. The useful bit of the error is buried in that mess, but what it`s saying is that the font file Futura-MediumItalic-48. vlw doesn`t exist. If you notice in the Processing sketch, there`s the line: To create this font file, go to the Tools menu and choose Create Font .
Pick whatever font you want (I picked 48-point italic Futura). Note the filename and click OK . Then go to that loadFont() line and change the filename to match your choice. Had some fun wit 🔗 External reference
Related Circuits

An interesting hobby circuit of a crank doorbell. The circuit is built around a 555 timer and a musical piezo buzzer. It operates using a 9-volt battery supply; a single 9-volt PP3/6F22 compact battery is sufficient to power the...

A 9 V DC battery initially powered the solenoid valve effectively. However, the solenoid did not generate sufficient force due to inadequate DC power. A modification was made to use a computer power supply as the power source. Providing...
Research has been conducted on a project aimed at enhancing understanding of electronics, networking, and programming. The project involves the construction of an online thermometer suitable for applications requiring temperature monitoring. The current work environment is a laboratory where...
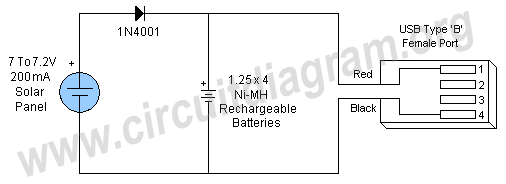
This schematic illustrates a simple DIY solar cell phone or USB charger circuit. It is designed to charge any device that can be powered from a computer USB port, such as MP3 players, cell phones, and iPhones. The circuit...
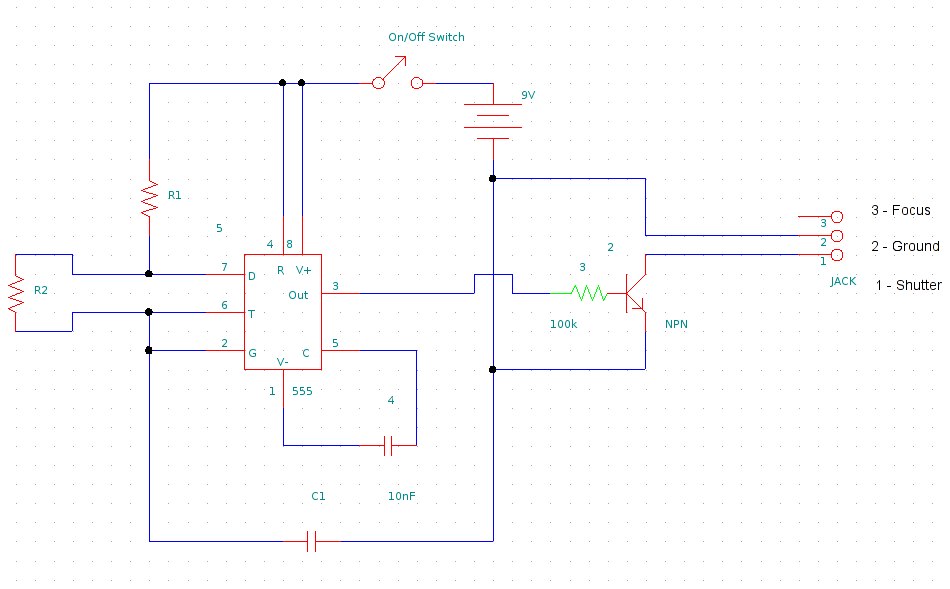
This document provides information on constructing a DIY time-lapse circuit that enables a camera to automatically capture images at specified time intervals. These images can then be compiled to create a time-lapse film. The circuit utilizes a 2.5 mm...

The code implementation discussed in the previous post has been initiated. To improve organization, the code has been modularized into functions, simplifying the overall structure. It is available along with the other code. Challenges were encountered in calculating averages...