
Final Project

The described project encompasses multiple electronic and mechanical components aimed at creating an interactive musical experience. The primary device, an octave control mechanism, incorporates a series of buttons activated by foot pedals, allowing users to play notes in an unconventional manner. The construction utilized standard materials such as 2x4 lumber, which provided a sturdy framework. The use of springs and buttons facilitated user interaction, while the Arduino microcontroller served as the central processing unit, interpreting button presses and generating corresponding audio signals.
The design process involved careful planning of the button placement, ensuring that the levers created by the drilled holes functioned effectively. The suggestion to improve soldering techniques indicates an understanding of the importance of electrical connections in ensuring reliability. The idea to incorporate force meters suggests a desire to enhance user experience by allowing for variable pressure sensitivity, which could lead to a more dynamic performance.
In addition to the octave device, the clap light project demonstrates an application of sound detection technology. The integration of a microphone sensor with a relay and Arduino showcases the ability to control high-power devices, such as lamps, using low-power signals. This project highlights the practical use of sound as a trigger for lighting, which can be further expanded for interactive installations.
The NewOldSchool Drum Machine represents an innovative approach to music production, utilizing photosensors to detect physical modifications in vinyl records. This method of reading signals as the records spin provides a unique interface for triggering sounds. The use of solenoids to produce percussion sounds illustrates a creative method of sound generation, where traditional drum sounds are emulated through electronic means. The implementation of Field Effect Transistors (FETs) allows for efficient control of the solenoids, ensuring that the system operates smoothly and reliably.
Overall, these projects reflect a comprehensive understanding of electronics, mechanics, and user interaction design. The combination of visual and auditory elements, along with the integration of various sensors and actuators, presents a multifaceted approach to creating engaging musical experiences. Future enhancements could focus on refining the design, exploring new materials, and expanding the range of sounds and interactions available to users.The purpose was to create an octave and have the ability to play it when a crocodile paddle was pressed. I made this device because I like music and I thought the ability to control the sound with your feet would be cool.
This project is to preform the function of entertaining people while acting as a giant piano. It will entertain because it will be unconventional on how it is played and the sounds that will be produced. I built this project out of cut 2 X 4 ²s, springs, buttons, 5/8 inch drill bit, drill, screws, screwdriver, wires, 8 5/8 inch X 7 inch bolts, nuts, and an arduino. Next I drilled 5/8 wholes in pairs of the 6 inch boards. I did this by mesuring 2 inches from the top and 2 from the sides to place the hole at one end of the board to make a lever.
The project was mostly a success. I was proud of how well the buttons worked, but I would of soldered the joints better to the buttons and shortened the length of the 6 inch 2X4 ²s to maybe 4 inches to flatten out the design. I would also paint the project to make the 2X4 ²s look nicer. Other then the sizing and design the mechanics of the project couldn`t of worked better. If I was to do this project again I would definitely look more into force meters so I could make a totally flat platform to stand on.
Another thing I would change is the use of a partner because the work load was fairly heavy for one person to handle. There was not only the building of 8 switch/steps to make but I also had to code for each one to work.
And to expand on this project I would try to use clear materials I could light up with leds in coordination with the buttons being pressed. This would trigger music and a visual show. I would also like to find different sounds and incorporate a melody function to allow for multiple notes to be played simultaneously.
Other then the diffuculty of the code the project came together well and formed a nice visual and idea. For my final project I decided to make a clap light. I`ve always been interested in them so i thought it would be cool to make one myself. I used a microphone sensor, relay, fet, 9 volt battery, arduino, and a lamp. The microphone sensor detects a value over 500 the lamp will turn on and then it will turn off again once the senosor detects another value of 500.
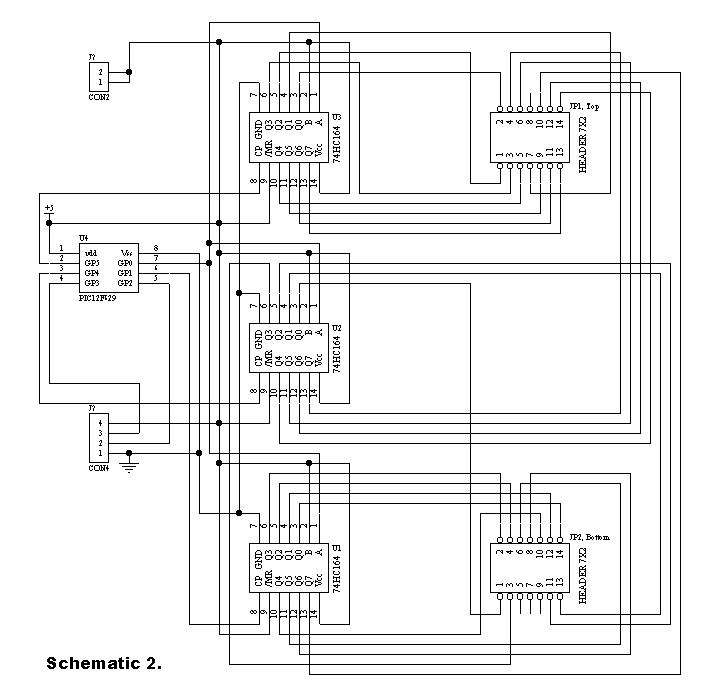
As stated above I made a clap light. In orderfor the lamp to have enough power for it to turn on Iused a relay and a 9 volt battery. The 9 volt battery powered my project. The relay acted as a switch and when the microphone sensor received a value of over 500 it switched the state of the relay to on or off. Therefore turning the lamp on or off. The NewOldSchool Drum Machine uses photosensors to read digital` holes drilled in old vinyl records as they spin on a turntable.
Initially, The main Arduino sends a signal to the Motor Arduino and the Light Arduino, beginning their loops or essentially turning them on. The Motor Arduino is responsible for modulating the speed of the Turntable (approximately 6rpm) and the speed of the disco ball.
The Light Arduino is responsible for looping the accompanying light show. After this initialization, the Main Arduino begins its loop, searching for signal (in) from the photosensors and, in turn signaling (out) to operate four solenoids. This operation is sent through two banks of Field Effect Transistors (FETs) each one responsible for firing two solenoids by receiving the 5v signal from the Arduino and sending 19 volts to the solenoids.
THE RECORDS were drilled to play a variety of beats, a funk beat, a reggae beat, and a techno beat. There are three shells` that correspond to three different percussion instruments. The shells are spaced in equal ½ inch increments from the outer edge toward the center. The outer shell is the code for triggering the high hat. Since these beats happen quickly, the code reads this one line of information and sends it to two alternating solenoids. The second shell is the code for triggering the snare drum. The third shell is the code for triggering the kick drum. The holes were layed out in CATIA, then cut by a foamcutting CNC machine into 12 discs. These discs were used as guides to cut the vinyl and are also useful as tactile displays for demonstration purposes.
THE PHOTOCELLS are mounted on prototyping board with the same ½ inch spacing of the holes in the records. They are fed +5v power from the Arduino and return their signals to pins A0, A1, and A2 on the Arduino.
THE CODE takes this input and sends signal to the instruments though pins 13 (hat 2), pin 12 (hat 1), pin 11 (snare), and pin 10 (kick). This signal is high for an amount of time (measured in milliseconds) defined as solenoidOnTime after which time it returns low and waits for another signal.
Pin 9 is used to send a high signal to the Motor Arduino causing it to begin spinning the turntable and disco ball. And pin 8 is used to send a high signal to the Light Arduino causing it to commence the light show. The Motor Arduino code sends a pulse width modulated voltage to the dc motor driving the turn table. A value of 200 was found to give the desired turntable speed for this project. THE DRUMS are made from coffee cans. The hat is made by cutting the bottom out of a coffee can, laying it on top of the coffee can and striking it with a stick.
A piece of electrical tape is used to keep the cymbal from being knocked off and the tape also dampens the tone of the cymbal in a desirable way. The snare drum is made in a similar way to the hat, the bottom cut out, laying on top, but the plastic lid is snapped on top giving a deeper and more resonant sound to the snare.
The kick is made by putting only the lid on top of the can. THE SOLENOIDS are triggered by +19v. An onTime of 50 milliseconds is found to be long enough to give consistent results and also insures that the solenoid is released in time to be reactivated quickly. 5/8 dowel rods are used as strikers. They are mounted in such a way that when the solenoid retracts, the striker is levered forward toward the drum head.
Some attention should be paid to the temperature of the solenoids as they will heat up after extended use. I built this by cutting up a plastic bottle and placing the motr inside using tape to secure it. I later desingned a plat form for the the toothpicks to be attached so that it can they could then be attached to the motor inside the platic bottle.
The motor rises and falls which determines if the toothpicks are stored inside the bottle or displayed to be used. My project works mechanically w move. 🔗 External reference
Related Circuits
Before World War II the FM radio band was just below 50 Mc. Read all about it. If you have such a radio, you might want to build this converter. It will let your old set receive the modern...
Communication with the MCP3028 ADC chip is achieved through a straightforward serial interface that adheres to the SPI protocol. The PIC16F84 or PIC16F628 does not possess a hardware SPI peripheral. However, a software-implemented SPI protocol can facilitate communication with...
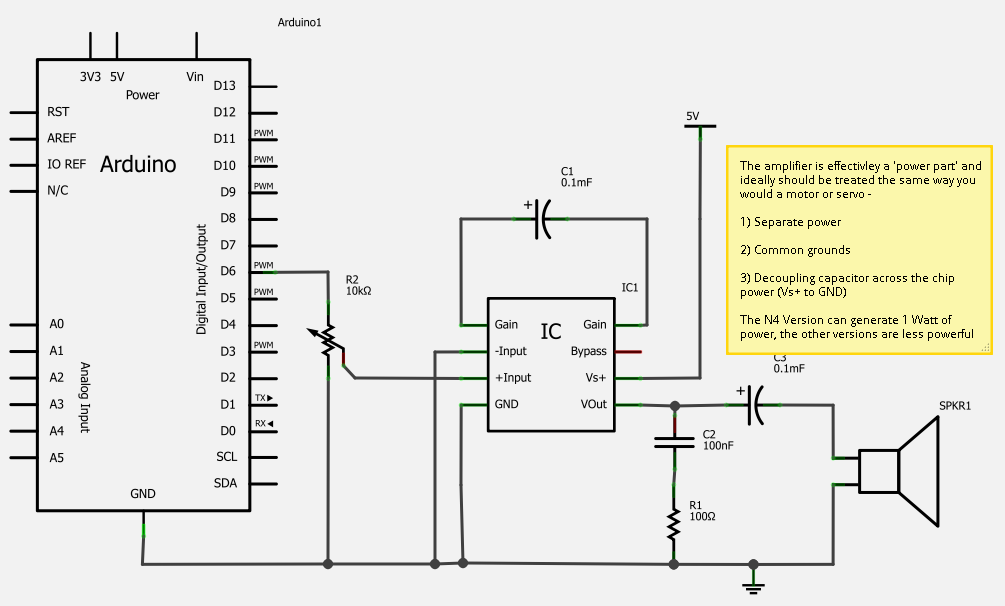
A simple solution for enhancing sound output from a microcontroller is the LM386 series of amplifier chips, which provide high-quality audio for under one dollar. These chips can be used to create a functional MP3 docking station and serve...

An adjustable laboratory power supply capable of providing an output voltage range from 0 to 60 volts can be constructed using the provided circuit diagram. This power supply can utilize the LM723 chip for lower voltage applications or, for...
A large mirror is installed on the left wall, enhancing the brightness of the room. However, when watching movies, a dark environment is preferred, as reflections of the film appear in the mirror, which can be distracting. To address...
This circuit automates the control of street or porch lights. It utilizes a 7806 voltage regulator IC to manage the operation of street lights, tube lights, or other household lighting systems. The 7806 IC provides a stable output voltage...