
Programming the AVR Microcontroller with GCC
The AT90S4433 microcontroller is a versatile component suitable for various applications, particularly in embedded systems. The integration of EEPROM allows for non-volatile storage of data, while the RAM provides temporary data storage during program execution. The onboard analog-to-digital converter facilitates the reading of analog signals, making it ideal for sensor interfacing.
The digital input and output lines enable interaction with other components, allowing for the control of devices such as LEDs, motors, and switches. Timers within the microcontroller can be utilized for precise timing operations, making it suitable for applications requiring time-sensitive tasks.
The UART interface for RS-232 communication allows the microcontroller to communicate with other devices, such as computers or other microcontrollers, enabling data exchange and control commands. This feature is particularly useful in applications requiring serial communication.
The programming environment provided under Linux simplifies the development process, allowing developers to write code in C and utilize the GCC compiler for building applications. The installation of the binutils package ensures that all necessary tools for compiling and linking are readily available, facilitating the development workflow.
The testing circuit designed to blink an LED serves as an introductory project, allowing users to familiarize themselves with the programming environment and the functionality of the microcontroller. As users gain confidence, they can expand their projects to include more complex features, such as LCD displays and user input through push buttons.
In conclusion, the AT90S4433 microcontroller, combined with a robust programming environment and a variety of peripheral components, creates a powerful platform for developing embedded systems. The flexibility to use common and inexpensive parts further enhances its appeal for hobbyists and professionals alike, making it an excellent choice for a wide range of electronic projects.It`s a single integrated circuit with EEPROM, Ram, Analog to Digital converter, a lot of digital input and output lines, timers, UART for RS 232 communication and many other things. The best is however that a complete programming environment is available under Linux: Yo u can program this Microcontroller in C using GCC. In this article I will explain how to install and use GCC. I will as well explain how to load the software into the Microcontroller. All you need for this are an AT90S4433 Microcontroller, a 4Mhz crystal, some cable and a few other very cheap parts. This article shall be only an introduction. In a later article we will build a LCD display with a few push buttons, analog and digital inputs, hardware watchdog and LEDs.
The idea is that this will be a general purpose control panel for a Linux Server but first we will learn how to setup the programming environment and that is what this article is about. We will install all the programs to /usr/local/atmel. This is to keep the program separate from your normal Linux C compiler. Create this directory with the command: The binutils package provides all the low-level utilities needed for building object files.
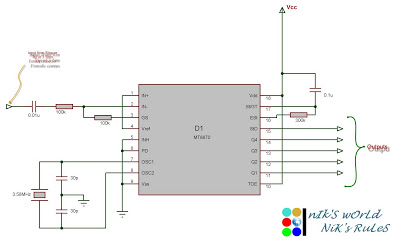
It includes an AVR assembler (avr-as), linker (avr-ld), library handling tools (avr-ranlib, avr-ar), programs to generate object files loadable to the Microcontroller`s EEPROM (avr-objcopy), disassembler (avr-objdump) and utilities such as avr-strip and avr-size. We will start with a small test circuit. The purpose of this circuit is just to test our development environment. We can use it to compile, download and test a simple program. The program will just cause a LED to blink. I suggest to make a small printed circuit board for the Microcontroller. You can later on extent this circuit to do your own experiments. A good idea is to use a breadboard for this. You should however not try to put the AVR with it`s 4Mhz crystal directly onto the breadboard. It is better to use a few short wires to connect input and output lines with the breadboard since such breadboards are not made for fast digital circuits.
The 4Mhz crystal and the capacitors should be physically very close to the Microcontroller. The resistors on the connector for the programmer are actually not needed in our case. You need them only if you plan to use the port-B input/output lines for other purposes. You need the parts listed in the table below. All of them are very common and cheap. Only the Microcontroller is a bit more expensive, about 7. 50 Euro. Although it is a very common Microcontroller it might not be available in every local radio shop but bigger distributors for electronic components like ( (germany), (germany), (france), etc. , probably there are similar sites in your country) have them all in stock. A breadboard. We don`t use it here but it is very useful if you want to do further experiments with the AVR. I suggest you leave the Microcontroller together with the crystal and the capacitors on the matrix board and connect the input/output lines via short cables to the breadboard.
That is: you can do not need to remove the Microcontroller form the board to program it. You will see that you can buy ready made programmer hardware for 50-150 Euro. You do not need to invest that much in a programmer. With Linux, the uisp software and a free parallel port you can build a very good and simple AVR programmer. It`s a simple cable. The wiring for the programmer cable must be as follows: The AT90S4433 can be programmed in plain C with the help of gcc.
To know some AVR assembler can be useful but it is not needed. The AVR libc comes with an avr-libc-reference which documents most of the functions. Harald Leitner has written a document with a lot of useful examples on how to use the AVR and GCC ( haraleit. pdf, 286Kb, originally from ). From Atmel`s website, ( 🔗 External reference
Related Circuits
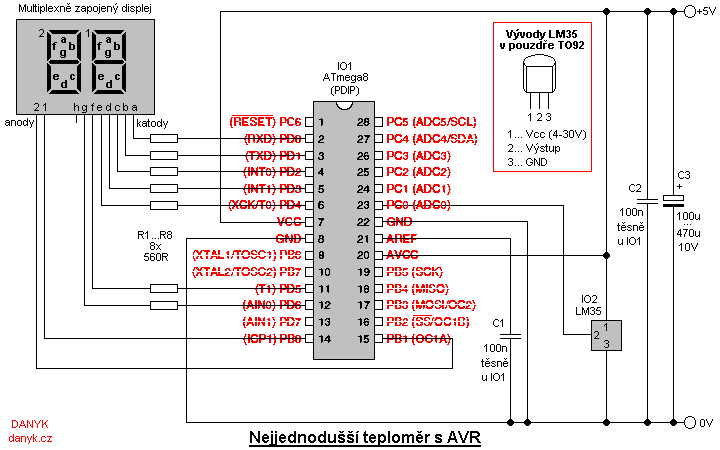
This is a simple digital thermometer utilizing an Atmel AVR microprocessor, capable of measuring temperatures in the range of 2 to 99 °C with a resolution of 1 °C. The circuit is managed by an Atmel AVR ATmega8, ATmega8L,...
Microcontrollers (MCUs) are versatile integrated circuits that enhance the functionality of electronics, robotics, and other projects. However, they... Microcontrollers (MCUs) serve as the central processing unit in a variety of electronic applications, offering programmable control that allows for complex functionalities...
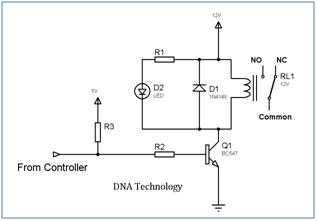
Relays are devices which allow low power circuits to switch a relatively high Current/Voltage ON/OFF. For a relay to operate a suitable pull-in & holding current should be passed through its coil. Generally relay coils are designed to operate...
Connect the serial cable to the serial port. If using a USB to TTL, RS232, or serial converter, plug it into the USB port. Next, short the Tx pin to the Rx pin or the TxD pin to the...
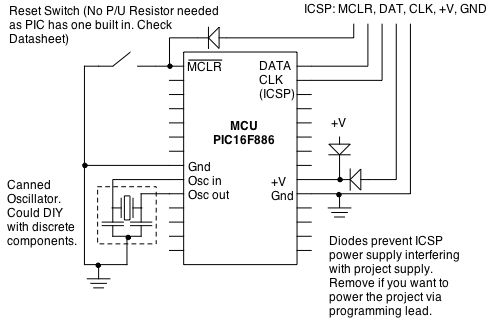
A buzzer circuit utilizes a PIC microcontroller to drive a piezo buzzer. The microcontroller is a low-power processor that is ideal for portable and compact devices where battery conservation is essential. The buzzer circuit employs a PIC microcontroller, which serves...
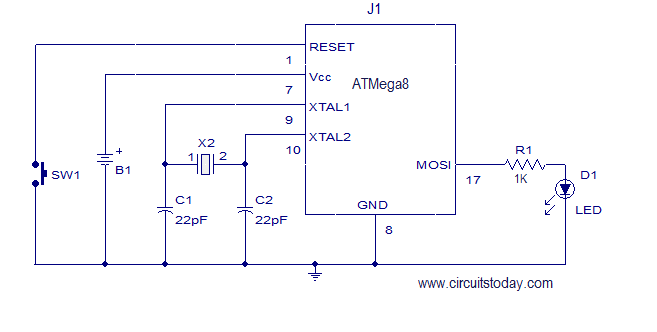
This article explains how to add a 32K external crystal/clock source to the Atmel AVR microcontroller Atmega8, including a circuit diagram and a C program. The Atmel AVR microcontroller Atmega8 is a popular choice for various embedded applications, often requiring...