
RFID security access project using Arduino Uno
The software version used for programming is Arduino version 1.0.5, which is a variant of C++ and is available for free on the official Arduino website. For those new to the Arduino Uno board, a comprehensive tutorial is accessible. The setup begins with a USB cable that provides power and serial data transmission to the Arduino. The appropriate serial port must be selected in the Arduino IDE, along with a baud rate of 19200 bps. The code is written in the editor, verified for errors, and uploaded to the Arduino board.
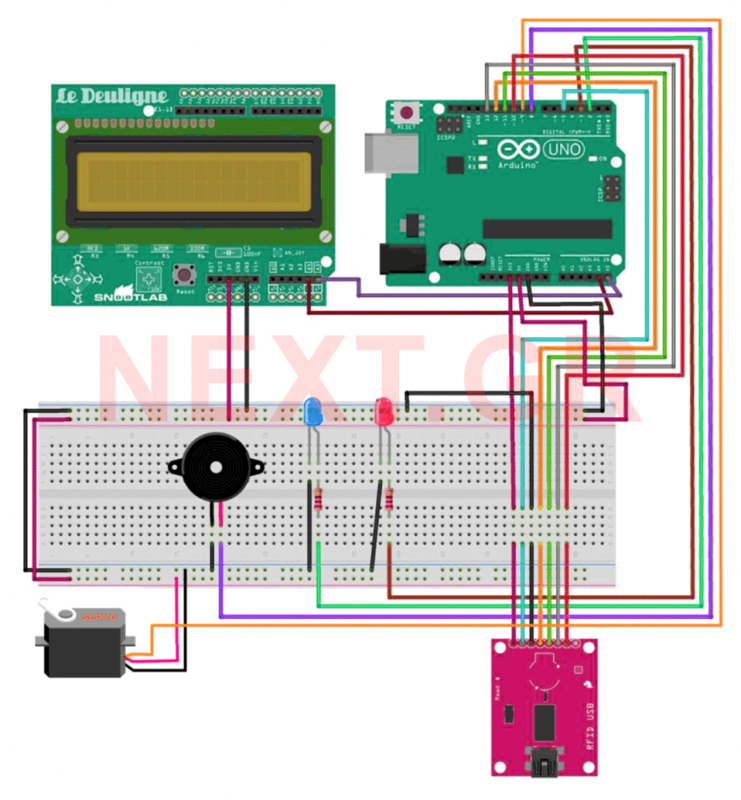
The source code is executed by switching the Arduino jumper, facilitating memory loading or program execution. The Serial Monitor serves as the primary interface for monitoring the execution process. The circuit diagram, created using Fritzing software, depicts the Arduino Uno board at the system's core. It includes a USB port for power, DC power input, input and output ports for component connections, an RFID reader for card scanning, a 16x2 LCD screen for displaying messages, a servomotor for door access control, a buzzer for sound notifications, and two LEDs with resistors for access indication.
The EM4102 card is read using a UART frame that contains the card ID, which is crucial for identifying and processing the data. The card's ID is transmitted via electromagnetic waves to the circuit, allowing the system to decode the information and match it to user data in the program. The program code facilitates communication between the computer and hardware, employing the Wiring language, a variant of C/C++. It includes libraries for initializing the buzzer, servomotor, and RFID reader functions. The code supports multiple users, allowing for easy modification of user access.
Future enhancements may include developing software for computer communication with the microcontroller to maintain an access log on a memory card or hard disk, providing insights into access statistics. Adding another RFID reader could enable tracking of entry and exit times for authorized users. Additionally, integrating near-field communication (NFC) technology could expand the system's capabilities for access control and electronic transactions, catering to modern connectivity needs.This project is influenced by the effort to achieve a security system that can be used in the business, or even very simply at the door of your home. This security system uses the microcontroller of the Arduino Uno system in combination with RFID (radio frequency identification) technology.
It gives you the possibility of a wireless identification of users. So registered users who included in the system will only be able to get permission to access them. This ensures identification and security at the point where you choose to install this particular arduino security system. The main interest is not only in the application of RFID technology, but also in the great capabilities provided by direct user intervention in the programming environment of the Arduino hardware itself.
Hardware and software configuration
The version of the software to write and run the program, is the Arduino version 1.0.5. The program is a variant of the well known C++ that is distributed free of charge through Official website www.arduino.com.
In case you are new to Arduino Uno board, there is a very informative tutorial to reed here.
First you take a usb cable, which transmits its data serially and feeds Arduino with current, you set through the program on the tools -> serial port menu the corresponding port that you connected Arduino to the computer, as you also set the transmission speed of Data rate (baud rate) you choose to be at 19200bps. To move the program to Arduino's memory, write the code on the editor, press the "Verify" button to check for any spelling mistakes that you may have in the code, and the final pass to Arduino is done by pressing the upload button.
Connection program configuration
The source code is written in the software, and by switching over to the Arduino jumper, you achieve either the memory loading or the execution of the program.
The displaying is done through the Serial Monitor, which is the main screen of your program, where through it the entire execution process is visible.
System Implementation
The Circuit diagram shows the actual circuit which was drawed with the help of Fritzing, (the program is distributed free of charge). In the drawing you can see the heart of the system which is the Arduino Uno board. There is the usb port that provides the power to your system as well as the DC power port. There are also the input and output ports, where the connections between the other components with Arduino are achieved.
There is also the RFID reader for reading your cards, the 16x2 LCD screen that shows you the messages (you have reported at the software) in every analog case. There is also the servomotor that receives a signal from your microcontroller by allowing access to opening the door somehow, the Buzzer that gives you the appropriate sound when you allow access and when not and the two LEDs together with their resistors also light up depending on whether you allow access or not.
Automatically read the EM4102 card
The card consists of a UART frame that is the card ID.
This frame determines how your card will be read to pass and identify the data by entering it on the computer. This frame becomes apparent at the following table.
| Header | Reserved | Length | Command | Data | CSUM |
| 1 Byte | 1 Byte | 1 Byte | 1 Byte | N Byte | 1 Byte |
Passing the card from the Rfid machine is propagated by electromagnetic waves and the card ID with the circuit is the above frame.
So every time you pass the card above the circuit, the data is sent in the frame above. Having this data you incorporate it into the code so that it can communicate with the computer. Finally, by passing the card, you decode the above frame that the card transfers you to, and match it to machine language through the code. So you get the 5 blocks of Byte Data in the hexadecimal system and you are shown the unique card code of each user.
Program Code
The insertion of the code in the system bridges the communication between the computer system (through the software, where Arduino version 1.0.5 is used in this dissertation), and the hardware that consists of its development board Arduino Uno and its peripherals.
All types of variables used in the program are supported by the above version. The language in which the security system was programmed is the Wiring language, a variant of C, C++.
The program uses some libraries - functions that are needed to initialize the code that as output will have the correct tone function in the buzzer and also the correct operation of the screen of the servomotor and the RFID reader. The tone function of the buzzer is shown in the Pitches.h file, which includes all the initializations for the notes supported by the wiring language.
This header file is integrated into the main program and runs inside it.
There are already nine users stated in the code, 7 active and 2 inactive (James, Robert, Michael, William, David, Richard, Charles and Joseph). Change names, add/remove, activate/deactivate users at your needs.
Some expansion Ideas
A future development of the system could be to create an appropriate software on the computer that will communicate with the microcontroller and keep an entry record of people who have requested access to a memory card or a hard disk.
Also, the input file (database) can keep statistics and give you full control over the people who have accessed the system (Time, Day, Month).
Also, with the addition of another RFID reader, output control can also be achieved to know the time and date of entry and exit of the authorized persons. This way you fully cover the entry and exit of those who have access to your system.
A near-field communication (NFC), which is a novel technology of connectivity, is spreading and evolving rapidly with the main purpose of solving several problems, both modern and future.
Its function is based on contact or approach, at a distance of 4 or 5 centimeters of the device that contains the NFC chip. This technology combines older wireless technologies such as Bluetooth and RFID, which are harmonized to provide services to users in access control, electronic transactions, exchange and collection of information, legality, payments, money transfers, Certifications, etc.
Related Circuits
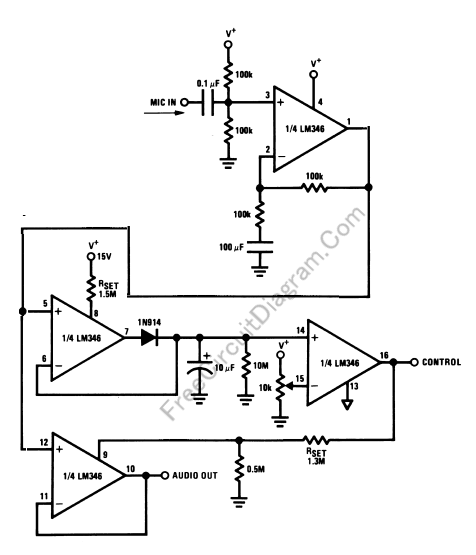
Feedback in a public address amplifier should be avoided. The ideal solution is to adjust the positions of the microphone and speaker; however, this is not always feasible in many situations. A frequency shifter that alters the output frequency...

Some still remember the serial RS232 port, also referred to as a COM PORT, as its functionality has largely been replaced by USB ports. However, for electronics engineering students and technicians learning about computer interfaces, the RS232 port remains...
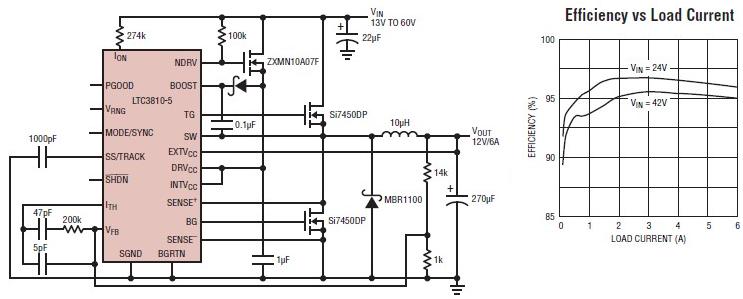
The LTC3810-5 synchronous step-down switching regulator controller allows for the design of a straightforward 12-volt switching power supply electronic project with minimal external components. This controller can directly reduce voltages from up to 60V, making it suitable for telecommunications...
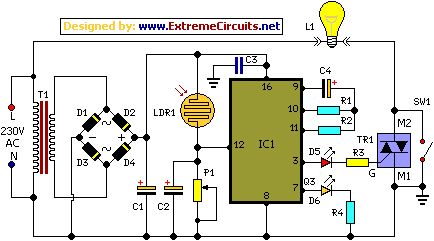
Most thefts occur after midnight when individuals enter the second phase of sleep known as paradoxical sleep. An energy-saving circuit has been designed to deter theft attempts by illuminating potential entry points, such as the kitchen or backyard, around...
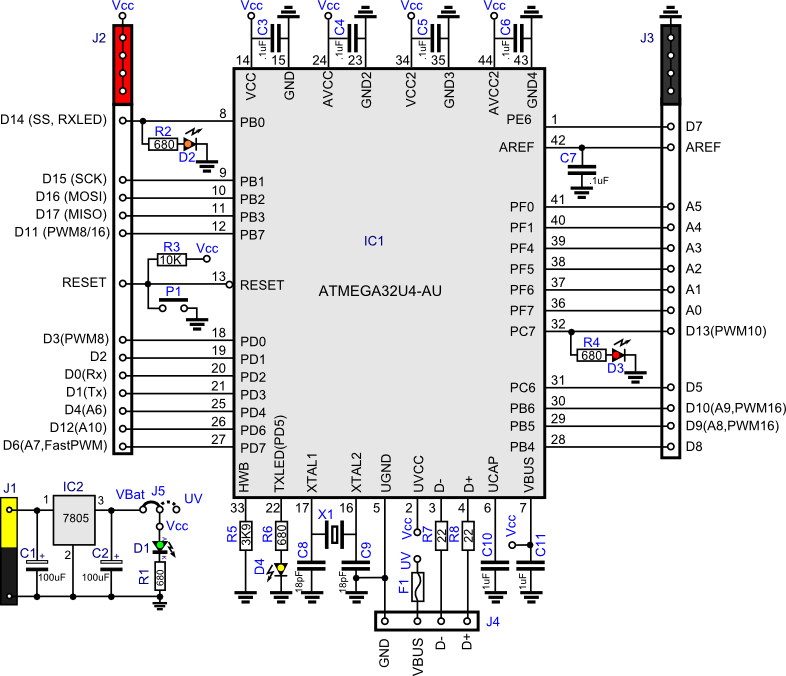
This project involves creating a clone of the Arduino Leonardo in a simplified manner. Consequently, the pin distribution does not conform to the standard Arduino layout. The Arduino Leonardo clone project focuses on replicating the functionality of the original Leonardo...
A simple circuit for monitoring the fuel level in vehicles. It provides an audiovisual indication when the fuel level drops alarmingly below the reserve level, assisting in fuel management. The fuel level monitoring circuit typically consists of a fuel level...