
serial LCD interface for PIC

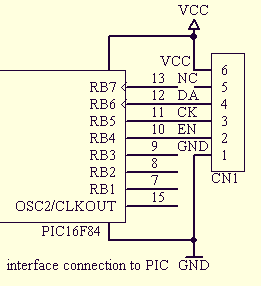
The circuit described utilizes a PIC microcontroller (MCU) to interface with a Hitachi HD44780 compatible LCD module, specifically configured to operate in 4-bit mode. This configuration is advantageous for applications where the number of available I/O pins is limited, as it reduces the pin count required for communication with the LCD.
In this setup, the PIC MCU connects to the LCD through three designated pins: RB4, RB5, and RB6. The RB4 pin serves as the Enable (EN) signal for the LCD, which is necessary for the execution of commands and data writes. The RB5 pin acts as the Clock (CK) signal, synchronizing the data transmission between the MCU and the LCD. The RB6 pin is designated for Data (DA), which carries the actual data to be displayed on the LCD.
The choice of these specific pins, RB4, RB5, and RB6, is made to optimize the PCB layout for 18-pin PIC devices, ensuring a simpler and more efficient routing of connections on the printed circuit board. It is imperative for the application code running on the PIC MCU to properly configure the TRIS register for these pins. The TRIS register determines the direction of the pins, setting them as either inputs or outputs. For this application, the TRIS bits corresponding to RB4, RB5, and RB6 must be set to output mode to enable correct operation of the LCD.
The 4-bit mode of the HD44780 allows for the transmission of data in smaller chunks, which is particularly useful in microcontroller applications where memory and processing power may be constrained. This mode requires only four data pins, as opposed to eight in full parallel mode, thus conserving valuable I/O resources.
In summary, this circuit provides a streamlined method for interfacing with an LCD in a resource-constrained environment, making it suitable for various embedded applications where debugging output is necessary but I/O availability is limited. Proper initialization and configuration of the MCU's TRIS register are crucial for ensuring the reliable operation of the LCD display.If you are developing applications for the PIC mcu, and miss debugging tools, or don't have enough I/O pins for a parallel LCD interface in your design, this serial interface can help printing debug messages and/or reduce the pin count. This version uses a Hitachi HD44780 compatible LCD module in 4-bit mode. My default PIC pins for the interface connection are RB4 (EN), RB5 (CK), RB6 (DA). I choose these pins due to PCB layout simplicity on the 18 pin devices. It is the task of your application to correctly initialize the TRIS bits of the used port pins! 🔗 External reference
Related Circuits
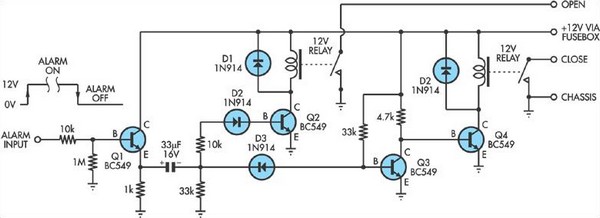
Some inexpensive car alarms lack a connection for the central locking system. However, in most cases, it should be possible to identify a point within the alarm circuit. Many budget-friendly car alarm systems are designed with basic functionalities, often omitting...
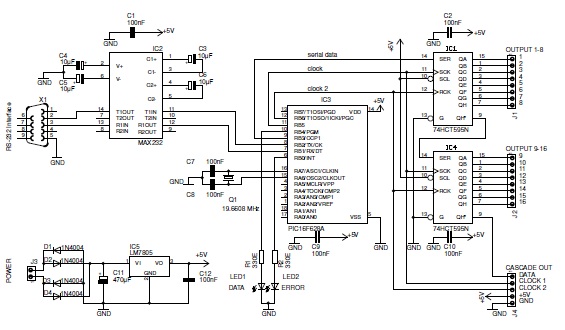
This basic PIC-based RS-232 serial interface can control up to 120 digital TTL outputs. The described circuit utilizes a PIC microcontroller to facilitate communication via the RS-232 protocol, which is a standard for serial communication. The interface primarily serves to...
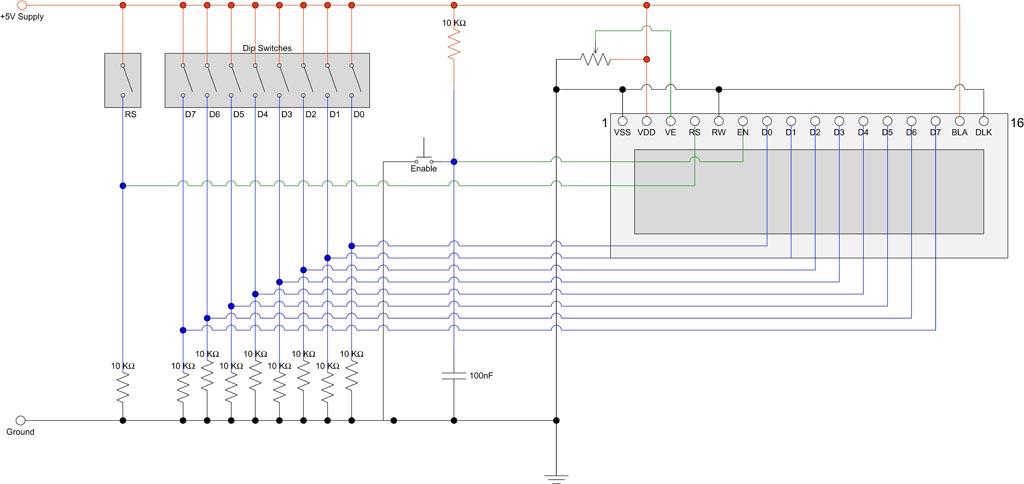
Interfacing with an HD44780 compatible display using DIP switches and a few other components. The module utilized is a 16 character x 2 line display that is in stock. It employs an ST7065C controller, which is compatible with the...
Over the weekend, an attempt was made to perform mechanical work by machining acrylic material to create a joint using a stepper motor. The effort was unsuccessful, particularly when trying to score and snap the acrylic, as cutting lengths...
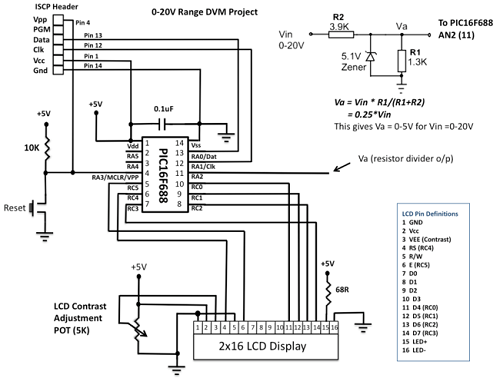
This project details the construction of a digital voltmeter utilizing a PIC microcontroller. A character-based HD44780 LCD display is employed to visualize voltage measurements. The microcontroller selected for this project is the PIC16F688, which features 12 I/O pins, with...

A simple program that will blink an LED. All that is required is a basic JDM programmer, and the setup is ready to go. The circuit requires a power supply, and while a good power generator is recommended, a...