
Simplest Intercom
The intercom circuit utilizing the LM380 IC is designed for straightforward assembly and functionality, making it suitable for educational purposes. The LM380 is a power amplifier capable of delivering up to 14 watts of output power, making it ideal for audio applications such as intercoms.
The circuit typically consists of a microphone, the LM380 IC, a speaker, and supporting passive components like resistors and capacitors. The microphone captures audio signals, which are then fed into the LM380. The IC amplifies these signals, which are subsequently output through a speaker, allowing for clear audio communication.
Key components include:
1. **Microphone**: Converts sound waves into electrical signals.
2. **LM380 IC**: Acts as the main amplifier; it requires a power supply, typically between 14V to 35V, to function effectively.
3. **Speaker**: Converts the amplified electrical signals back into sound.
4. **Resistors and Capacitors**: These components are used for biasing, gain control, and filtering to ensure optimal performance of the circuit.
The circuit design should also include proper power supply decoupling to minimize noise and ensure stable operation. Additionally, it is advisable to incorporate a volume control mechanism, which can be achieved using a potentiometer connected to the input of the LM380.
Overall, this intercom circuit is an excellent educational project, demonstrating basic principles of audio amplification and circuit design. It provides a practical application for students to learn about electronics while creating a functional communication device.This circuit was requested by an school teacher. It is a simple intercom that anyone can put together and get to work. It is based on the LM380 IC chip. T.. 🔗 External reference
Related Circuits

This circuit for an intercom is a stand-alone electronic communications system designed for limited or private dialogue. The schematic illustrates the application circuit of the LM390 in the intercom configuration. Gain control can be achieved by capacitively coupling a...
This is an intercom circuit that utilizes the LM380 as the audio amplifier and two transistors for the microphone preamplifier. The sound quality is sufficiently good while maintaining a low construction cost. The circuit comprises two identical intercom units,...
A high-quality and straightforward intercom circuit utilizing only three transistors. By pressing switch S2, the circuit generates ringing signals. To create a two-way intercom, two identical circuits can be constructed and combined as illustrated in diagram 2. The circuit's...
The Atmega 128 is similar to other AVR microcontrollers. It is in-system programmable (ISP). An earlier article discussed the AVR ISP programmer, which utilizes a 74HC244 buffer for safety when programming the AVR. However, if a programmer for the...
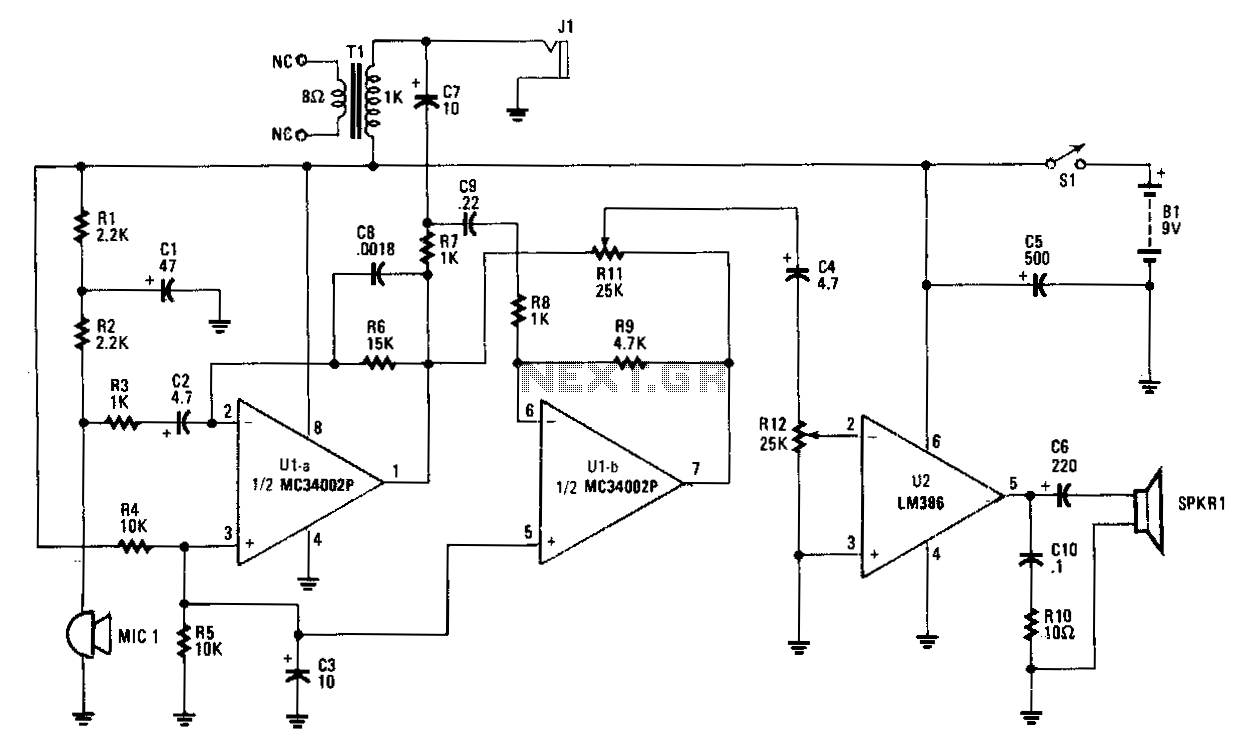
Amplifier A increases the microphone's output to a usable level. The output signal is fed to op amp B, which inverts the signal by 180 degrees. A balance-control potentiometer connects across the outputs of amplifiers A and B. If...
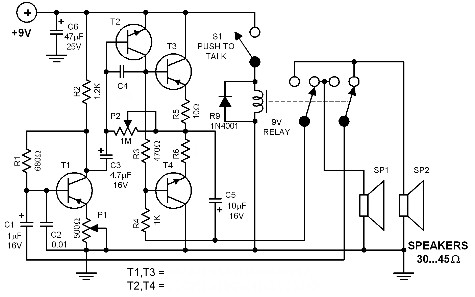
This intercom utilizes a standard speaker to operate as its microphone. When the button is pressed, the relay switches, allowing the speakers to exchange their roles. One speaker functions as a regular speaker while the other serves as the...
Warning: include(partials/cookie-banner.php): Failed to open stream: Permission denied in /var/www/html/nextgr/view-circuit.php on line 713
Warning: include(): Failed opening 'partials/cookie-banner.php' for inclusion (include_path='.:/usr/share/php') in /var/www/html/nextgr/view-circuit.php on line 713