
spooky arduino projects 4 and musical arduino

The described project integrates components and techniques that are essential for creating an interactive MIDI drum kit or a sound-triggering device. The Arduino board serves as the central processing unit, handling inputs from piezo sensors and buttons, and generating MIDI signals for sound output. The piezo sensors are strategically placed to detect physical impacts, which are translated into digital signals by the Arduino. The inclusion of a 1M resistor is critical for protecting the Arduino from high voltage spikes generated by the piezo sensors, ensuring the longevity and reliability of the circuit.
The 5.1V zener diode acts as a safeguard against voltage surges, allowing only safe levels of voltage to pass through to the Arduino's input pins. This protective measure is vital in preventing damage to the microcontroller from unexpected high voltage conditions.
The software aspect of the project leverages the Arduino's built-in serial communication capabilities to establish a MIDI interface. By configuring the serial communication at 31,250 bps, the Arduino can effectively send MIDI messages to compatible devices, enabling a wide range of sound generation possibilities. The use of three Serial.print(val, BYTE) commands allows for the transmission of complete MIDI note-on messages, which are essential for triggering sounds in response to sensor inputs.
Furthermore, the internal pull-up resistors in the Arduino's AVR chip simplify the wiring process by eliminating the need for external resistors. This design choice not only streamlines the circuit but also enhances its modularity, allowing for easy expansion by adding more buttons or sensors without significant alterations to the existing setup.
The force measurement technique described offers a method for quantifying the intensity of impacts detected by the piezo sensors. By monitoring the analog signal and measuring the time it takes for the signal to cross a defined threshold, the system can provide feedback on the strength of the interaction. This capability can be further refined by employing operational amplifiers for analog signal processing, which would enhance the accuracy of force measurements and improve the overall responsiveness of the system.
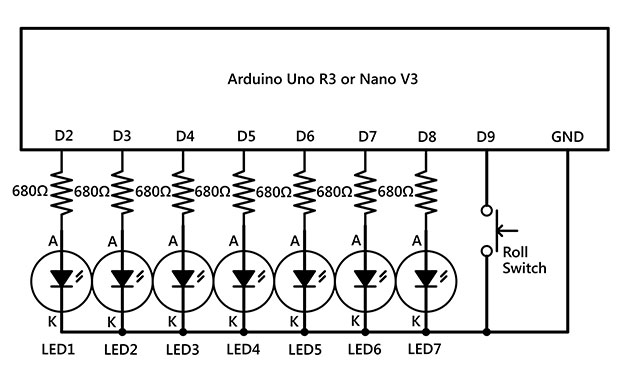
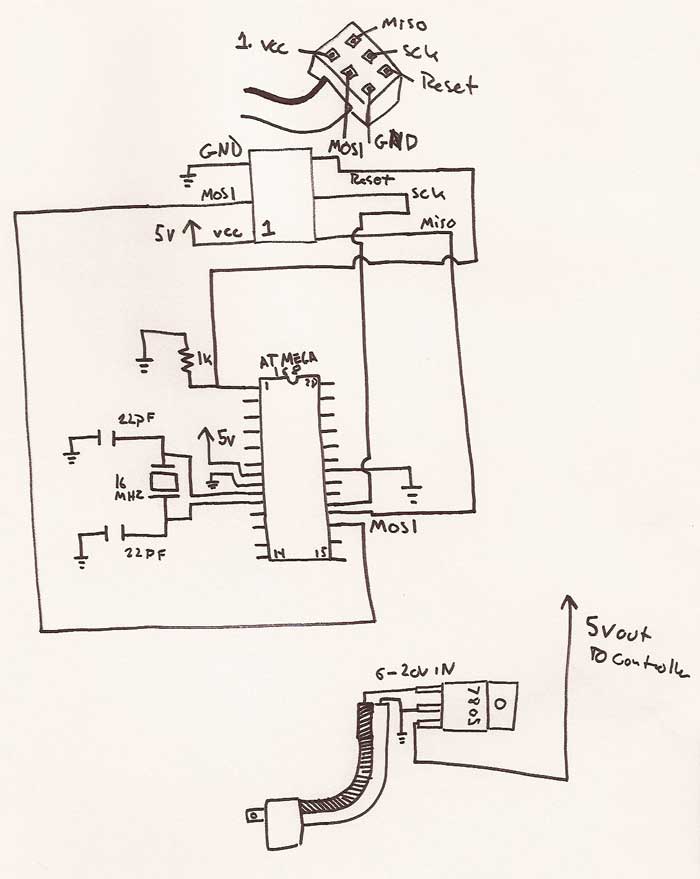
In conclusion, this project exemplifies the integration of hardware and software to create an engaging and interactive electronic experience, suitable for applications such as entertainment during events like Halloween parties. The combination of Arduino programming, sensor technology, and sound generation through MIDI opens up numerous possibilities for creative electronic projects.The notes for the fourth and final class are up on the Spooky Arduino class page. At the end of the class, Mark of Machine Project bestowed upon each of the students a merit badge. It was great. Click above for a larger view of the badge. Here`s a quick project using techniques from this week`s class that turns an Arduino board and a few buttons a nd piezos into a MIDI drum kit or scary sound trigger. Hide piezo sensors around the house during your Halloween party to trigger scary sounds when people walk around! For the piezo input, the 1M resistor is to bleed off the voltage generated by the piezo when it is struck.
The 5. 1v zener diode is there to insure any large voltages don`t make it into the Arduino and blow it out. The code has a few tricks that may not be immediately obvious. First is that to implement a MIDI interface, all you really need is the ability to send serial data at 31, 250 bps. This is easily done with Serial. begin(31250). Once that is done, a complete three-byte MIDI note-on message can be sent with three Serial. print(val, BYTE) commands. The next tricky bit is that the switches in the above schematic don`t need pull-up resistors. This is because the internal pull-ups in Arduino`s AVR chip are turned on with a digitalWrite(pin, HIGH).
This may seem counter-intuitive, doing a digitalWrite() on an input pin, but it`s how the AVR works. The benefit is that you no longer need a resistor to +5V and the effort to wire up each additional button is much lower. By measuring the time it takes for that first big jolt to cross a threshold, you can get an idea as how big the force was.
In the code this is represented by reading the analog value and if it`s over the threshold, wait until it drops down again, counting all the while. When I`ve done this before, I used an input opamp to convert the analog signal to digital (thus doing thresholding in the analog domain) and then used interrupts to get very accurate force measurements.
🔗 External reference
Related Circuits
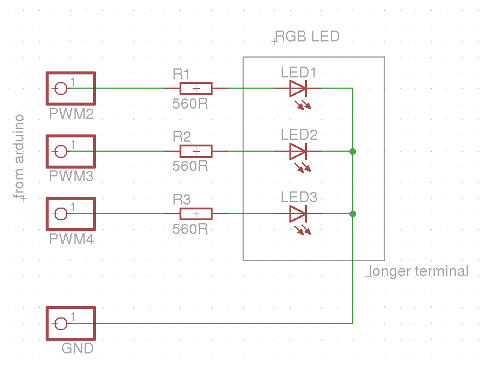
This evening, after returning home from a paragliding appointment, there was a realization that the RGB LED driver code written the previous day needed improvement. The code was refined and annotated extensively for educational purposes. Although the current skill...
A 5V power supply is used to function as a switch controlled by an Arduino. Direct control from the Arduino pin is not feasible because most general-purpose relays require a minimum of 150mW to activate, which translates to over...
The Raspberry Pi single-board computer (SBC) has garnered significant attention for being a complete system priced under $50. However, it is not the most affordable computing device available. For only $13.50, a mini computer that connects to a PC's...
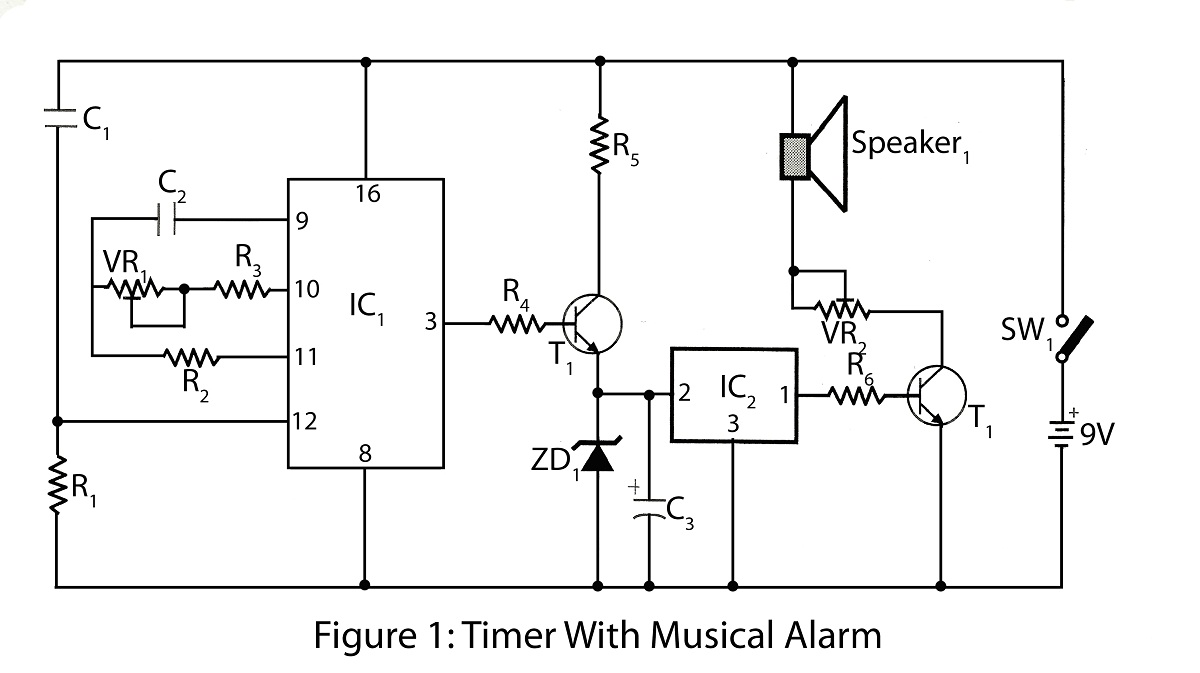
The timer with a musical alarm is an electronic timer project utilizing the CD4060 integrated circuit. It provides a delay ranging from 1 minute to 2 hours. The circuit diagram for the timer with a musical alarm is part...

Used for digital control of musical instruments, this transmitter converts digital data signals into equivalent optical signals for a fiber optic cable interface. Optocoupler IC1 provides isolation, driving IC2-a and -b, and T1, ultimately providing a cable driver LED...
The Arduino library can be utilized with other Integrated Development Environments (IDEs) to enhance code organization, particularly for extensive projects. This approach facilitates the integration of code not specifically designed for Arduino and serves as a pathway to more...