
The QRM900 Tesla coil

The power factor correction capacitor was purchased from Jaycar, and although coilers recommend motor run capacitors, the selected large motor start capacitor (10 cm x 5 cm) has not shown signs of overheating. The baseboard and most structural elements are made from laminated chipboard, salvaged from skips, with all wood hand-sawed due to the absence of power tools, which was labor-intensive. Edges were finished with iron-on laminate to conceal the chipboard. The darker wood stands were also salvaged and varnished. The secondary coil is constructed from a 6-inch PVC pipe, sanded and sealed with polyurethane. Winding the coil was a challenging task, accomplished using a homemade winding jig made from more salvaged chipboard, curtain rods, and a turntable motor from an old microwave. The rig allowed the former to rotate at 5 RPM, enabling the wire to be guided and compacted over approximately 6-8 hours, resulting in a secondary coil with 1160 turns of 25 AWG wire, yielding an inductance of around 47 mH and a total wire length of approximately 700 m (2500 ft), with a total weight of about 1.1 kg (2 lbs).
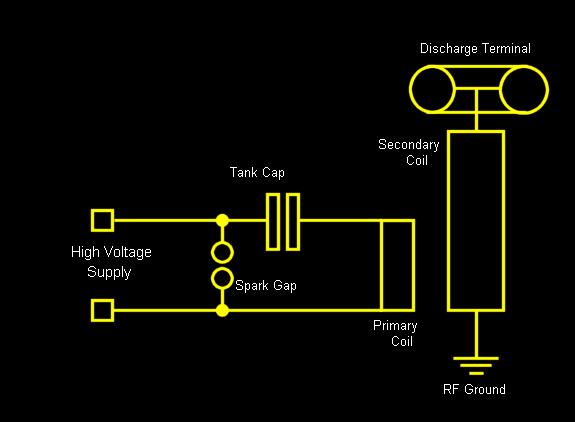
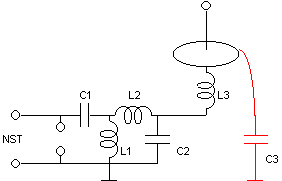
The optimal topload configuration consists of stainless steel mixing bowls, arranged with one inverted atop the other, connected to the secondary via a blank PCB contact. The coil’s top features a PVC end cap, which is glued to a circular piece of blank circuit board where the wire is soldered, allowing the topload to rest on this board. An alternative topload was created using air conditioning ducting wrapped in aluminum flashing and foil, although it did not perform as well, likely due to excessive capacitance. The primary coil was constructed from 5 mm refrigeration tubing, comprising 10.5 turns spaced 5 mm apart, dictated by the supplied length of 10 m. Acrylic tubing was cut along its axis, with notches made for the tubing to rest in, secured with epoxy. The inner connection utilizes a bullet-type socket soldered into the tubing, with a matching plug on the wire. The outer connection features a fuse holder clip on a flying lead for variable tapping. A strike ring is positioned a few inches above the primary coil.
At the center of the primary is a PVC end cap equipped with a spade connector, facilitating portability as the secondary coil can be easily inserted into the end cap, with the spade connector connecting to a corresponding one at the base of the coil. This connection links to the strike ring pipe, with a single spade connector serving as the common earth connection. The base features dowel holes and chipboard sockets for vertical supports, elevating the assembly. Most components are mounted on chipboard, utilizing a dowel and socket arrangement to prevent sliding while allowing easy removal for adjustments or disassembly.
The assembly includes a spark gap constructed from seven 2 cm copper pipes, complemented by a microwave oven fan for quenching. The pipe ends are chamfered to prevent sparks from igniting the chipboard laminate. Long bolts secure the pipes, allowing for adjustable gaps using a screwdriver. The protection unit consists of three parts: a safety gap with three brass drawer handles to protect the NST from voltage spikes, with connections to the NST and an earth point. Blue capacitors rated at 1000 pF are included to shunt high frequencies to ground, although they exhibit flashover at 10 kV despite a supposed rating of 20 kV. Three capacitors are connected in series for each tap, as individual units have failed quickly.
RF chokes are constructed by winding on a wooden dowel former, with grooves created by cutting around the dowel and finishing with a Dremel tool. The tank capacitors are six ceramic doorknob capacitors, each rated at 4 nF and 20 kV, linked by brass strips. The voltage rating is somewhat tight, prompting operation with a slightly smaller gap than optimal to reduce stress. Future plans include building an MMC or acquiring 40 kV doorknob capacitors. After a few minutes of operation, the capacitors become slightly warm. The NST, filter, and spark gap are interconnected using high-voltage wire salvaged from old PC monitors, suitable for the 60 mA transformer current. Tank connections utilize heavier 12 AWG cable, which is low voltage rated but carefully routed to avoid flashover, necessary due to the peak currents reaching hundreds of amps.
Base corner blocks facilitate the insertion of support posts, with bolts attached to the feet that can be rotated to adjust height for uneven surfaces. Upon initial operation, the coil produced around 10-inch sparks before failing due to problematic filter capacitors. After replacing these and adjusting the strike rail’s distance from the primary, the coil operated effectively, generating 12-15 inch sparks with the 60 mA NST and a single steel bowl topload. Subsequent tuning of the spark gap and addition of the second NST resulted in 80 cm (35 inch) sparks. Plans for future enhancements include the development of a sucker gap to potentially increase spark length further. The coil has been successfully demonstrated at home and at the Waverly Amateur Radio Society.My major project over the last few months has been the construction of a small Tesla coil, having wanted to make one for many years now. My first experience was at a demo day at UNSW over a decade ago, and since then I`ve always had a bit of a fascination for them.
Since moving back to Sydney from Holland, I`ve had plenty of spare time, so what be tter to do that to finally build the coil So finally I started researching coils and began planning. I gradually obtained all the parts I needed, thanks mostly to eBay, the local hardware stores, and much scrounging around local rubbish skips (these proved to be the most valuable!). Throughout April, I spent a massive amount of time working on the coil, and it became a near fulltime project.
I wanted to make the coil portable, modular and scalable. The mechanical design I came up with allows the device to be (dis)assembled without tools and in about 3 minutes. Individual parts (eg NST, filter block, spark gap) can be removed in seconds thanks to spade connectors and dowel/hole supports.
What came out of it all was a 6 inch coil, powered by a 900 watt NST and occasionally boosted to 1400 watts with a second smaller NST. Maximum spark length so far is 80cm (about 30 inches), which I anticipate can be doubled with further optimisation.
Following is a detailed description of the coil. Power factor correction capacitor, bought from Jaycar (large motor start cap. Coilers have said that motor run caps are better, but these are big (10cmx5cm) and haven`t gotten warm yet. ) The baseboard and majority of the structure is made from laminated chipboard, conveniently scrounged from a couple of skips.
All the wood was hand sawed, not having a power saw. This took a huge amount of time and energy! Edges were finished with iron-on laminate, so the chipboard itself is not visible. The darker wood stands are just from a piece of wood from a skip, varnished. The secondary is a length of 6" PVC pipe from a local plumbing supply. It was sanded and given some coats of polyurethane to seal it. The winding was quite an ordeal, but a proper job was done with the help of a home made winding jig. This consisted of a frame made from more skip-sourced chipboard, curtain rods, and the turntable motor from the same old microwave. The pipe was supported by PVC end caps. This rig rotated the former at 5rpm, so all I had to do was guide the wire with one hand and compact it to the existing turns with the other.
This took quite a long time though, about 6-8 hours all up! But the result is a secondary that can be used for higher and higher power levels. A few coats of polyeurethane later, and it was done. The actual coil is around 1160 turns on 25AWG wire, giving an inductance of around 47mH. There is around 700m (2500ft) of wire, total weight about 1. 1 kilos (~2 lbs). The best topload I`ve found consists of stainless steel mixing bowls, one upside down ontop of the other. They connect to the secondary by way of a blank PCB contact. The top of the coil has a PVC endcap attached, and glued to that is a circular bit of blank circuit board.
The wire is soldered to that, and the topload just sits on this board. The other topload I made is a length of aircon ducting, wrapped in aluminium flashing and then foil. But the performance isn`t as good with this, probably due to the capacitance being too high. The primary is made from 5mm refrigeration tubing, and is 10. 5 turns spaced 5mm apart. The number of turns is because the length supplied (10m) would give that many. Acrylic tubing was cut down the axis and notches cut in it to sit the tubing in. Epoxy holds the tubing. The inner connection is a bullet-type socket soldered into the tubing and a matching plug on the wire. For the outer connection, a fuse holder clip on a flying lead allows for a variable tap. A strike ring sits a couple of inches above the primary. In the middle of the primary sits a PVC end cap and a spade connector. This allows for portability, as the secondary just drops into the end cap, and the spade connector goes into a matching one at the bottom of the coil.
This connects under the board to the strike ring pipe, and then a single spade connector forms the common earth connection. Under the corners are dowel holes and chipboard sockets for the vertical supports to sit it above the guts.
The rest of the guts sit below the coils. Mounted on chipboard, most of the parts attach with a dowel and socket arrangement, which stops them from sliding, but allows them to be simply lifted off the baseboard for adjustment or disassembly. The two pictures below show my layout plan and a photo of the actual layout. The plan was drawn before any of the wood was cut, a good decision as it turns out. At the top sits the spark gap. This consists of 7 x 2cm copper pipes, with a microwave oven fan to quench it. The ends of the pipes are chamfered slightly to prevent the sparks from appearing at the very ends, which would burn the chipboard laminate.
Long bolts are used to tighten the pipes in place, but not too tight - I can still use a screwdriver to adjust the gap as needed. The wires on the left connect to the fan, and the end pipes have braid soldered to them, which then connect to brass strips with spade connectors for hooking up wires.
The protection unit (below) has three parts. The safety gap, which protects the NST from voltage spikes, consists of 3 brass drawer handles. The middle green connection is earth and the left side red connections go to the NST. The blue capacitors (1000pf) are to shunt high frequencies to ground. They`re a bit funny in that each is supposedly rated at 20kv, but flashover on the terminals occurs at 10kv! Perhaps they`re meant to be potted. Anyway, I used 3 in series for each tap, after finding single caps shorted very quickly too. The RF chokes are pi-wound on a wooden dowel former. Not having a lathe, the grooves were made by cutting around the dowel with a small hacksaw, then chipping away the wood and finishing off with a dremel.
A coat of varnish finished the job. The tank capacitors consist of six ceramic doorknob caps, each are 4nF, rated at 20kv. Brass strips link them together. The voltage rating is a little tight, so I`m purposely running the coil with a slightly smaller gap than optimal to reduce stress. My next plan will be to build an MMC or get 40kv doorknob caps. After running for a few minutes they do get slightly warm. The NST, filter and spark gap are all linked together using high voltage wire scrounged from old PC monitors.
This is relatively low current wire (about 22 AWG) and suitable for the 60mA transformer current. The tank connections are a bit heavier, and consists of 12AWG cable, unfortunately low voltage rated, but I have carefully routed them to avoid flashover. Such heavy wire is a necessity as the peak currents in this coil are in the hundreds of amps. The blocks at the corners of the base are for slotting in the support posts, and the bolts are attached to the feet - rotating the feet elevates or lowers them so I can accommodate uneven ground.
At first light, the coil lit up straight away, with around 10 inch sparks. It ran for a few seconds before dying, thanks to the problem filter capacitors (see above). After replacing these and moving the strike rail further from the primary, it lit up and began running very well. With the 60mA NST and a single steel bowl as a topload, I was getting around 12-15 inch sparks (accompanied by a deafening roar).
Later I tuned the spark gap and added the 2nd NST to give 80cm (35 inch) sparks leaping from it. Eventually I hope to make a sucker gap, which in theory could make even bigger sparks. As well as running the coil at home (attracting various neighbours in the process), I also demonstrated the coil at the Waverly Amateur Radio Society on April 18. See pictures on the WARS web site. 🔗 External reference
Related Circuits
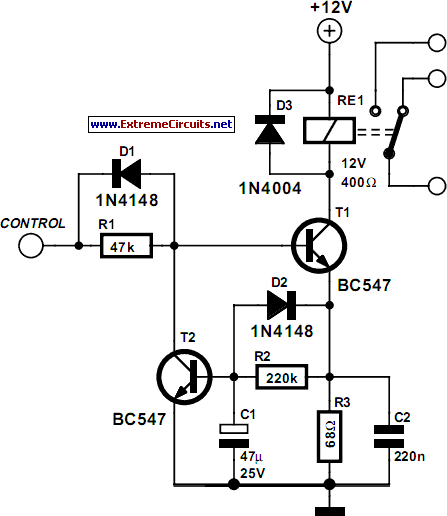
Some relays will become warm if they remain energized for some time. The circuit shown here will actuate the relay as before but then reduce the hold current through the relay coil by about 50%, thus considerably reducing the...
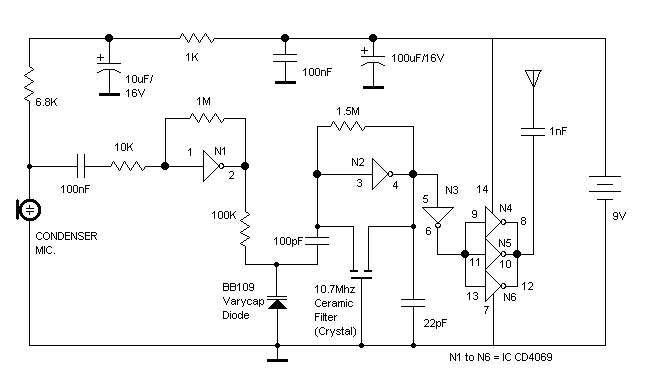
The RF oscillator utilizes inverter N2 and a 10.7 MHz ceramic filter to drive the parallel combination of inverters N4 to N6 through inverter N3. Since these inverters are connected in parallel, the output impedance is low, allowing direct...

Tesla constructed the world's most powerful radio transmitter. Surrounding the base of a 200-foot mast, he installed an air-core transformer that measured 75 feet in diameter. The primary winding consisted of only a few turns of wire, while the...
It is a beneficial approach to utilize the chip's internal reference along with some resistors to achieve the appropriate biasing for audio applications, as this method can significantly decrease the component count. The implementation of an internal reference within an...
Due to the high voltages present in the Charge and Primary sections, it is logical to seek cables with high voltage ratings, such as neon sign cables, medical X-ray equipment cables, and car engine spark plug leads. The first...
Continuing the studies on directly coupled multiple resonance networks operated as Tesla coil-like devices, a 6th-order system was constructed that is equivalent to a "Tesla magnifier," but without a transformer. The schematic diagram is provided. This circuit has several...