
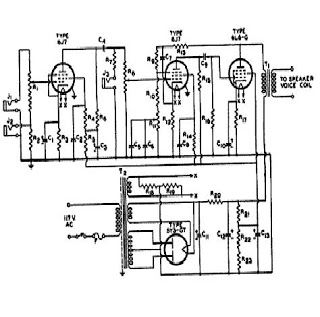
12v Fluorescent Inverter by TIP3055

The circuit for this low-cost fluorescent tube project typically includes a power supply, a ballast, and the fluorescent tube itself. The power supply converts the mains voltage to the appropriate level required for the fluorescent tubes. For a 40-watt configuration, the circuit must deliver a stable voltage and current that matches the tube specifications, ensuring optimal performance and longevity.
The ballast plays a crucial role in regulating the current flowing through the fluorescent tubes. It prevents the tubes from drawing excessive current, which could lead to overheating and failure. In this design, an electromagnetic or electronic ballast can be used, with the electronic ballast being more efficient and compact. The selection of the ballast should be compatible with the wattage of the fluorescent tubes being utilized.
When assembling the circuit, attention must be paid to the connections and the orientation of the components. Proper insulation and secure connections are essential to prevent short circuits and ensure safety during operation. The circuit layout can be arranged on a breadboard or a custom-built enclosure, allowing for easy modifications and testing.
For the two 20-watt tubes in series configuration, the circuit must ensure that both tubes receive equal voltage and current. This can be achieved by connecting the tubes in series while maintaining proper isolation from the mains supply. The overall design should also incorporate safety features such as fuses or circuit breakers to protect against overloads and short circuits.
In conclusion, this project offers a practical approach to utilizing fluorescent tubes in a cost-effective manner, leveraging readily available components and simple assembly techniques. The emphasis on efficiency and ease of construction makes it an attractive option for DIY enthusiasts and those looking to reduce lighting costs.This is a low-cost project for 20 or 40 watt fluorescent tubes. However the most efficient is to use a 40 watt tube (or two 20 watt tubes in series). It`s a circuit you can put together from junk box components or build from a kit. It`s very simple to build and requires no printed circuit board. 🔗 External reference
Related Circuits
The signal from a microphone is too weak for a standard line input. This low-noise DC-coupled microphone amplifier provides a solution for anyone who wants to connect a microphone to a high-fidelity installation. As shown in the schematic diagram,...
The inverter converts the 12 Volt DC battery voltage into a square wave voltage with a frequency of 50 Hz and a duty cycle of 25%. This voltage is then transformed by transformer Tr1 to 230 Volt RMS. The...
Here is the schematic diagram for a 20 Watt driver. I developed this circuit in 1985, and used it to build a lamp that found much use both as camping light and as emergency light during the then-frequent power...
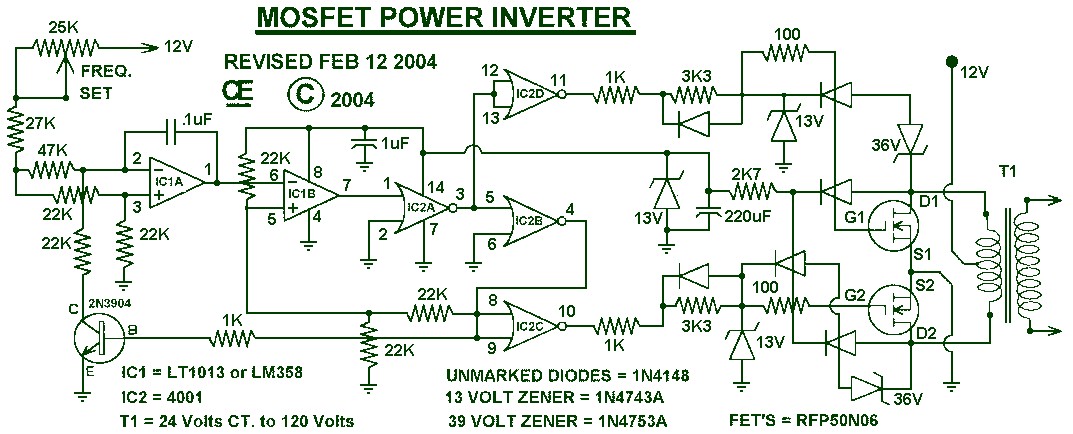
1000W Power Inverter circuit diagram: This is a power inverter circuit based on the MOSFET RFP50N06. The inverter is capable of handling loads up to 1000W, depending on the specifications of the transformer used. The RFP50N06 MOSFETs are rated...
Integrated circuits (ICs) have largely replaced traditional circuits like this one; however, this circuit is still utilized where the flexibility of a discrete device design is desirable. The components are readily available, and the issue of IC obsolescence is...
The following circuit illustrates a 12V PC Adapter Circuit Diagram. Features include a current limiting circuit connected in series with the 12V supply. The 12V PC Adapter Circuit is designed to convert AC mains voltage to a stable 12V DC...