
avr programmer how to make

The AVR Programmer is designed for versatility and ease of use, making it suitable for both hobbyists and professionals. The in-circuit programming capability eliminates the need for desoldering components, which can be a time-consuming and error-prone process. The use of common components not only reduces costs but also facilitates repairs and modifications. The PCB layout should be carefully designed to minimize noise and interference, which can affect programming reliability. Proper decoupling of the crystal resonator with capacitors is essential to ensure stable operation.
The PonyProg software interface is user-friendly, providing clear instructions for setup and operation. It is advisable to keep the software updated to ensure compatibility with the latest operating systems and to take advantage of any improvements or bug fixes. The programmer’s performance can be enhanced by ensuring that the connections are secure and that the power supply is stable, as fluctuations can lead to programming errors.
In summary, the AVR Programmer is an efficient tool for programming AVR microcontrollers, combining affordability, reliability, and ease of use. Its design allows for quick assembly and the flexibility to program various AVR devices, making it an essential resource in embedded system development.This simple AVR Programmer will allow you to transfer hex programs to most ATMEL AVR microcontrollers without sacrificing your budget and time. It is more reliable than most other simple AVR programmers available out there and can be built in very short amount of time.
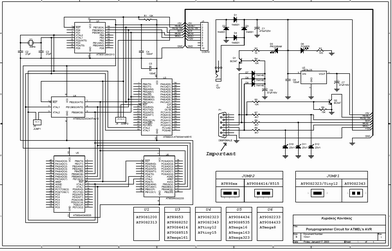
AVR programmer consists of in-circuit serial programmer (dongle) and small pcb with a DIP socket that you can fit your microcontroller and program it quickly. You may also use this programmer as a stand alone in-circuit serial programmer that can be used to conveniently program AVR microcontrollers without removing them from the target circuit. Entire AVR programmer has been build with using common parts and fits in the case of the serial connector.
The socket pcb has been created to fit a 28-DIP AVR ATmega8 microcontroller, but you can build a socket pcb for any other AVR microcontroller out there. This AVR programmer is compatible with a popular PonyProg software that shows you a status bar of the programming progress.
Socket PCB consists of the PCB, 28-DIP socket, 4MHz crystal resonator, or crystal with two 22pF decoupling capacitors, and two header connectors. Two-PIN connector supplies +5V voltage to the AVR microcontroller, and 6-PIN ICSP connects to AVR Programmer dongle.
Supplying microcontroller with external +5V voltage as opposed to taking it directly from computer`s serial connection port ensures that the chip is receiving exactly +5V voltage and provides very reliable error free programming. To be able to send hex file from your computer to AVR microcontroller you will need to download and install PonyProg2000.
After the installation, the first thing you will need to do is configure PonyProg to work with our AVR Programmer. To do this go to "Setup" menu and select "Interface Setup". The following window will be shown and highlighted areas show you exactly which options should be selected.
At this point PonyProg configuration is complete and we can open hex program with which AVR microcontroller will be flashed. Go to "File" menu, select "Open Program (FLASH) File. ", and point to the hex file to open it up. You should see hex numbers as shown on the screen below. If you haven`t connected AVR Programmer dongle to your computer`s serial port yet, then now is the time.
Make sure that AVR Programmer is physically connected to your AVR microcontroller through Socket PCB or through ICSP 6-PIN connector. Finally click on the highlighted icon "Write Program Memory (FLASH)", or go to "Command" menu and select "Write Program (FLASH)".
Now sit tight, relax and watch the programming progress on the status bar. PonyProg will program AVR microcontroller and verify if the hex file was transferred without any errors. For your information this process shouldn`t really take more than 10 to 30 seconds. This depends on the size of the program that you`re trying to flash. After programming is completed "Write successful" window will be shown letting you know that AVR microcontroller has been programmed, and is now ready to be used.
🔗 External reference
Related Circuits
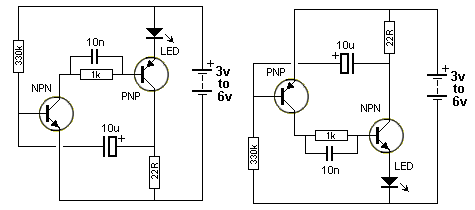
The circuit involves powering an LED using a 3V CR2032 battery, with the intention of extending battery life by making the LED blink rather than remain continuously on. A 555 timer is considered, utilizing large value resistors in the...
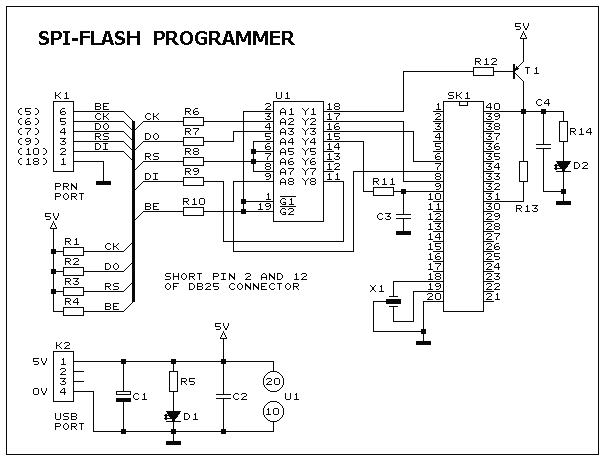
This ISP Programmer can be utilized for in-system programming or as a standalone SPI programmer for Atmel ISP programmable devices. The programming interface is compatible with STK200 ISP programmer hardware, allowing users of STK200 to also employ the software...
H-Bridge circuit utilizing transistors for the bidirectional control of a DC motor. Integrated circuits (ICs) containing H-Bridges are employed to simplify the drive circuit. The L293D is a dual H-Bridge motor driver, allowing for the control of two DC...
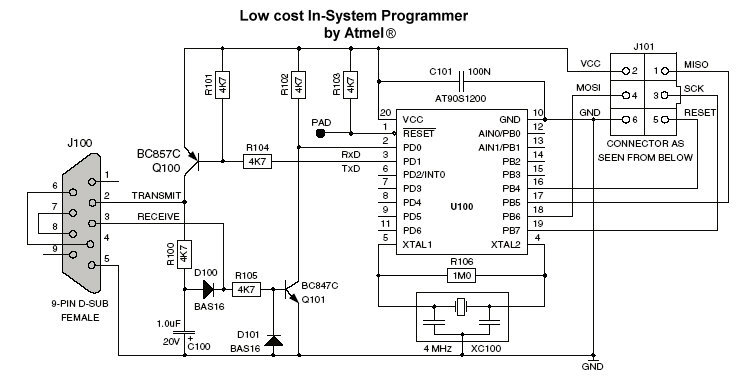
A programmer is available in the "AVR Software and Technical Library - April 2003" CD-ROM and has been published due to its stability and compatibility with AVR Studio 4. It has been tested with the AT90S2313 microcontroller and functioned...
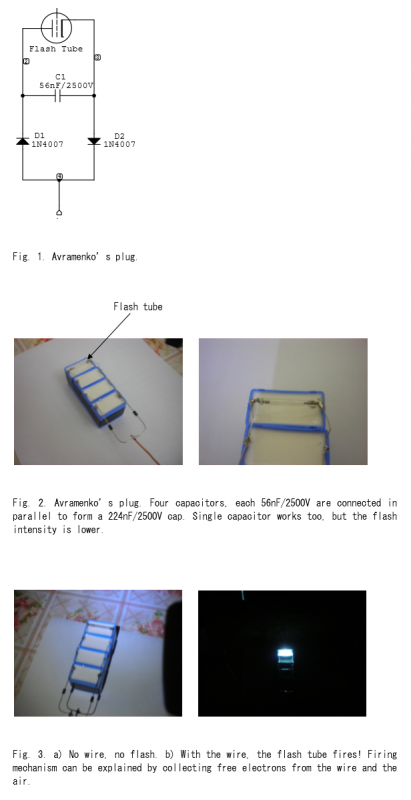
Avramenko is a Russian scientist who invented a plug designed to transmit electrical energy over a single wire. This simple circuit comprises two diodes, one capacitor, and a flash tube. The high-voltage (HV) terminal connects to the HV output...
The ATMEL AVR programmer operates with the Windows program "Ponyprog," which is compatible with Windows 95, 98, and XP. The ATMEL AVR programmer is a device designed for programming AVR microcontrollers. It interfaces with the microcontroller through the ISP (In-System...