
car cam

The described video recording system integrates a portable Mustek PVR-A1 recorder and a CCD bullet camera, facilitating the capture of high-definition footage for automotive track days. The Mustek PVR-A1 acts as the central recording unit, equipped with capabilities to play multimedia files and record video in MPEG 4 format at a resolution of 320x240, which is sufficient for basic recording needs. The inclusion of a flash card is essential for extended recording, as the internal memory is limited.
The CCD bullet camera, with a resolution of 380 lines, provides a compact and effective solution for capturing video from the vehicle. Its small size allows for versatile mounting options, such as the proposed installation on the CD storage box, ensuring a stable and unobtrusive setup.
The power supply design is crucial for reliable operation, especially when considering the potential for battery failure during use. The implementation of a low dropout voltage regulator ensures that the camera receives a consistent 12V supply, while the 5V regulator caters to the PVR, thus maintaining the integrity and performance of the recording system. The use of heatsinks on the voltage regulators is a prudent safety measure, as it mitigates the risk of overheating during prolonged use.
The integration of a cigarette lighter plug with a fuse enhances the safety of the entire setup, protecting both the vehicle's electrical system and the recording equipment. The connection process is straightforward: the camera and microphone are linked to the PVR via an adapter cable, ensuring that audio is synchronized with the video recording.
By following the outlined steps, users can efficiently set up their video recording system, allowing for a seamless experience during track days or other automotive activities. The system's design is accessible to individuals with basic electronic assembly skills, making it an appealing choice for enthusiasts looking to document their experiences on the track.There is now no need for a separate camera and recorder - for less money you can buy an integrated dash camera that will record in HD. Try the Techmoan blog for some reviews. Summary - this is a description of how to install a fairly cheap video recording system for use on track days etc, using a portable MPE
G 4 recorder and a CCD `bullet` camera. A power supply design is also included, aimed at people with experience of building electronic circuits. The recording device is a Mustek PVR-A1. This is a gadget about the size of a Nintendo Gameboy which can play MP3s, display photos and videos and, most importantly, record video.
It accepts a composite video and stereo audio input and encodes video in MPEG 4 format at a resolution of 320x240. The built-in memory is very small so you`ll need to buy a flash card (SD or MMC format) if you want to record a useful amount of video.
The camera is a miniature CCD `bullet camera` with 380 lines of resolution. You can buy it from RF Concepts in a pack that includes all the cables and mounting hardware you`ll need. I chose to mount it on top of the CD storage box in the middle of the car. It is possible to run both the camera and PVR from batteries, but to avoid the problem of batteries suddenly running out I built a simple power supply to run everything from the the car`s lighter socket.
This consists of a low dropout 12V regulator to provide a stable supply to the camera, and a 5V regulator for the PVR. Most of the parts are available from your local Maplin, except the L4940V12 which you can get from Farnell (order code 413-197.
) The circuit can be built easily on a small piece of stripboard. You may need to experiment to get the right size power connectors for the camera and PVR. Note I used clip-on heatsinks on both of the voltage regulators just in case they get hot. I also used a cigarette lighter plug with a built-in fuse for extra safety. Connect the camera and microphone to the PVR using the supplied adaptor cable. Plug the 5V output from the regulator into the DC socket on the PVR and connect the 12V output to the camera power cable. Plug the regulator into the lighter socket, turn on the PVR and go to the video recording mode. Now you should see the camera`s view on the screen and can adjust the camera angle to get a level picture.
Press record and you`re off! Here`s a couple of sample images from recordings I`ve made: 🔗 External reference
Related Circuits
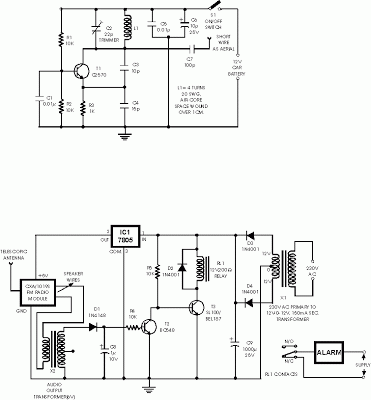
This is an anti-theft alarm with wireless connectivity, referred to as the Anti-Theft Car Wireless Alarm. The FM radio-controlled anti-theft alarm can be utilized with any vehicle that operates on a 6 to 12-volt DC supply system. The mini...
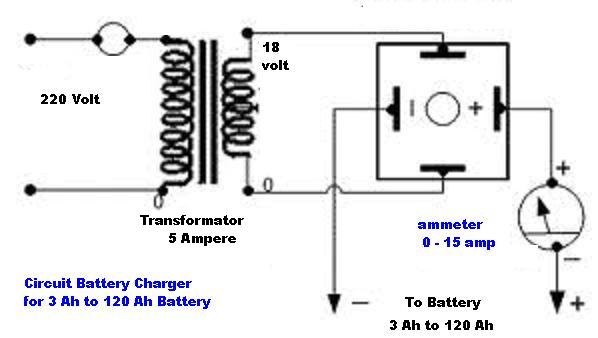
The circuit diagram of a simple and straightforward 12 V battery charger is presented here. This circuit can be utilized to charge various types of 12V rechargeable batteries, including car batteries and motorcycle batteries. The 12 V battery charger circuit...
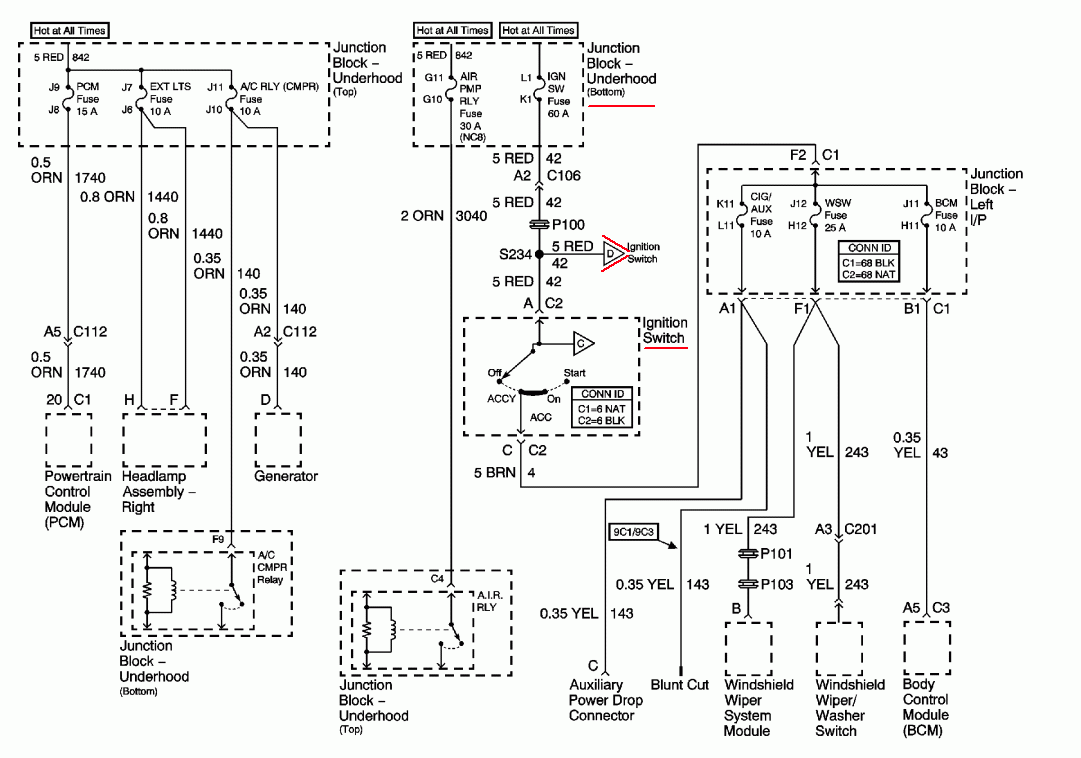
A 2001 Monte Carlo is experiencing electrical issues where only the lights are functioning. The radio, wipers, turn signals, and dash lights do not operate when the ignition key is turned. It has been suggested that the computer system...

This circuit is designed for monitoring automotive lighting. Two specialized integrated circuits (ICs) from Telefunken are used to measure the current through a light bulb. Detecting whether current flows through a bulb is an effective method to determine its...
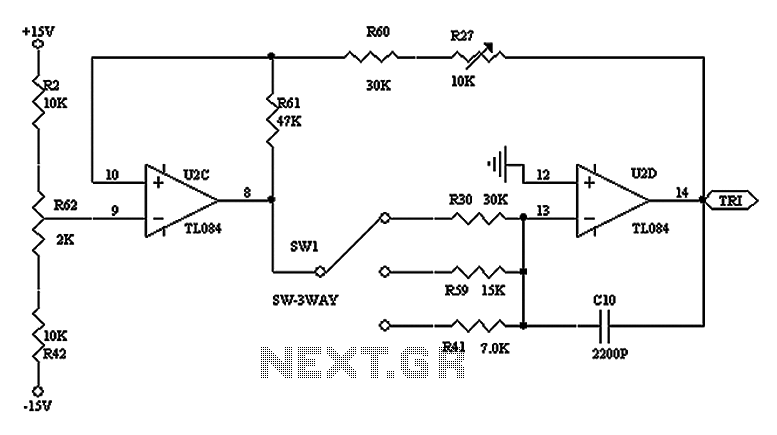
The triangular wave circuit consists of two operational amplifiers (OPs). R62 serves as the offset adjustment, while R27 is utilized for peak adjustment. A switch is included to select different resistances, allowing for the generation of triangular waves at...

This simple circuit drives six LEDs in a "Knightrider scanner mode." Power consumption primarily depends on the type of LEDs used, particularly when employing a 7555 (555 CMOS version). The circuit operates by sequentially illuminating the LEDs to create a...