
ELECTROLYTIC RUST REMOVAL

The electrolysis process for rust removal involves a few critical components and steps. The setup typically includes a non-conductive container filled with a solution of water and washing soda, which acts as an electrolyte. The steel plates, serving as electrodes, are submerged in the solution, with one plate connected to the positive terminal (anode) and the other to the negative terminal (cathode) of the power supply. The rusted item, in this case, the horseshoe, is connected to the cathode. When the current flows through the solution, it initiates a chemical reaction that converts rust (iron oxide) back into iron, allowing the rust to be released from the surface of the metal.
The choice of a current-limited power supply is crucial as it prevents excessive current flow that could damage the item being restored. The optimal current density for rust removal is typically around 1-2 amps per square foot of the surface area of the item being treated. This ensures that the electrolysis process is effective without causing harm to the underlying metal.
Monitoring the process is essential, as the duration of electrolysis can vary depending on the extent of rust and the size of the item. It may take several hours to a couple of days of continuous operation to achieve satisfactory results. Regular inspection is necessary to remove any loose rust that accumulates during the process, which can be done with a soft brush or cloth.
After completing the electrolysis, the item should be carefully rinsed with clean water to remove any residual electrolyte and loose rust particles. A final inspection will reveal the condition of the metal beneath the rust, which can then be treated with a protective coating to prevent future corrosion.
In conclusion, while the electrolytic rust removal process requires careful setup and monitoring, the potential for restoring valuable artifacts makes it a worthwhile endeavor for collectors and historians alike.Experiments in rust electrolysis. The idea of using electricity to convert rust back into iron is not a new one, and electrolysis has been used for metal restoration by collectors and archaeologists for decades and the results can be very impressive, with shiny metal being visible after proper treatment. The exact requirements, though, are sometimes poorly understood and the equipment often crude in design, although a simple setup constructed using household items is quite adequate as long as attention is paid to certain details. The equipment commonly suggested consists of simply a plastic container, some washing soda, steel plates and a battery charger, although some refinement to this equipment, in particular substituting an appropriate current limited power supply for the battery charger, will pay dividends in improved results, so more details on this later.
Rust removal using sand blasting or other abrasives certainly cleans the metal, but this is unsuitable for very old or valuable artifacts as it is destructive, removing good metal along with the rust. Rust can also be dissolved using strong acids, but the acid also attacks the good metal. (Weak acids such as vinegar just don`t do the job on heavily rusted items. ) I required a way of removing just the rust and no more, with the hope of possibly even trying to salvage some of the rusted metal, and electrolytic rust removal seemed to be the best way to proceed.
Don`t make the mistake of thinking that rust electrolysis is some magical, or quick and easy way of removing rust. Setting up the apparatus and conditions for electrolysis needs space and is time consuming, and removing the loose converted rust once treatment has been completed also takes time and is quite messy.
However, if you are prepared to put in the effort, I believe the results are worth the trouble. Please note that electrolytic cleaning doesn`t work for non-ferrous metals such as copper, bronze, brass, pewter, tin or aluminium. The corrosion products found on these metals are rarely formed by electrolytic action and therefore the process cannot be reversed electrolytically.
In the case of copper and tin alloys the treatment would be harmless, although I understand that aluminium could be adversely affected by the alkaline solution and so should not be subjected to this treatment. I feel it would be useful at this point to give an example of the kind of results that can be obtained using the electrolytic process and to describe the conditions under which they were achieved.
After much searching for a suitable subject, I finally decided on an old horseshoe I`d found some months earlier. This horseshoe was probably well over a hundred years old and in a particularly badly corroded condition, having spent much of its time buried in the ground where it had developed a thick layer of flaky rust which had obliterated any surface features.
To the left is a photograph of the shoe, and it is obviously in a very advanced state of corrosion and much damage will doubtlessly have occurred to the underlying metal. Note that even in the high resolution version of the image no surface detail can be distinguished, with no nails or their holes visible.
Attempting to clean this would represent an extreme test of the electrolytic process, but I decided to give it a try anyway just to see what could be salvaged. The shoe was initially prepared 🔗 External reference
Related Circuits

A quick search did not yield much information regarding the wiring diagram for cruise control systems in vehicles, specifically for models from 1994 and onward. The cruise control system in vehicles typically consists of several key components, including the...

Sometimes electrolytic capacitors that are stored for a period may exhibit high leakage currents. Before utilizing these capacitors, it may be necessary to reform them. This power supply can be employed for the reforming process. Adjust resistor R4 according...
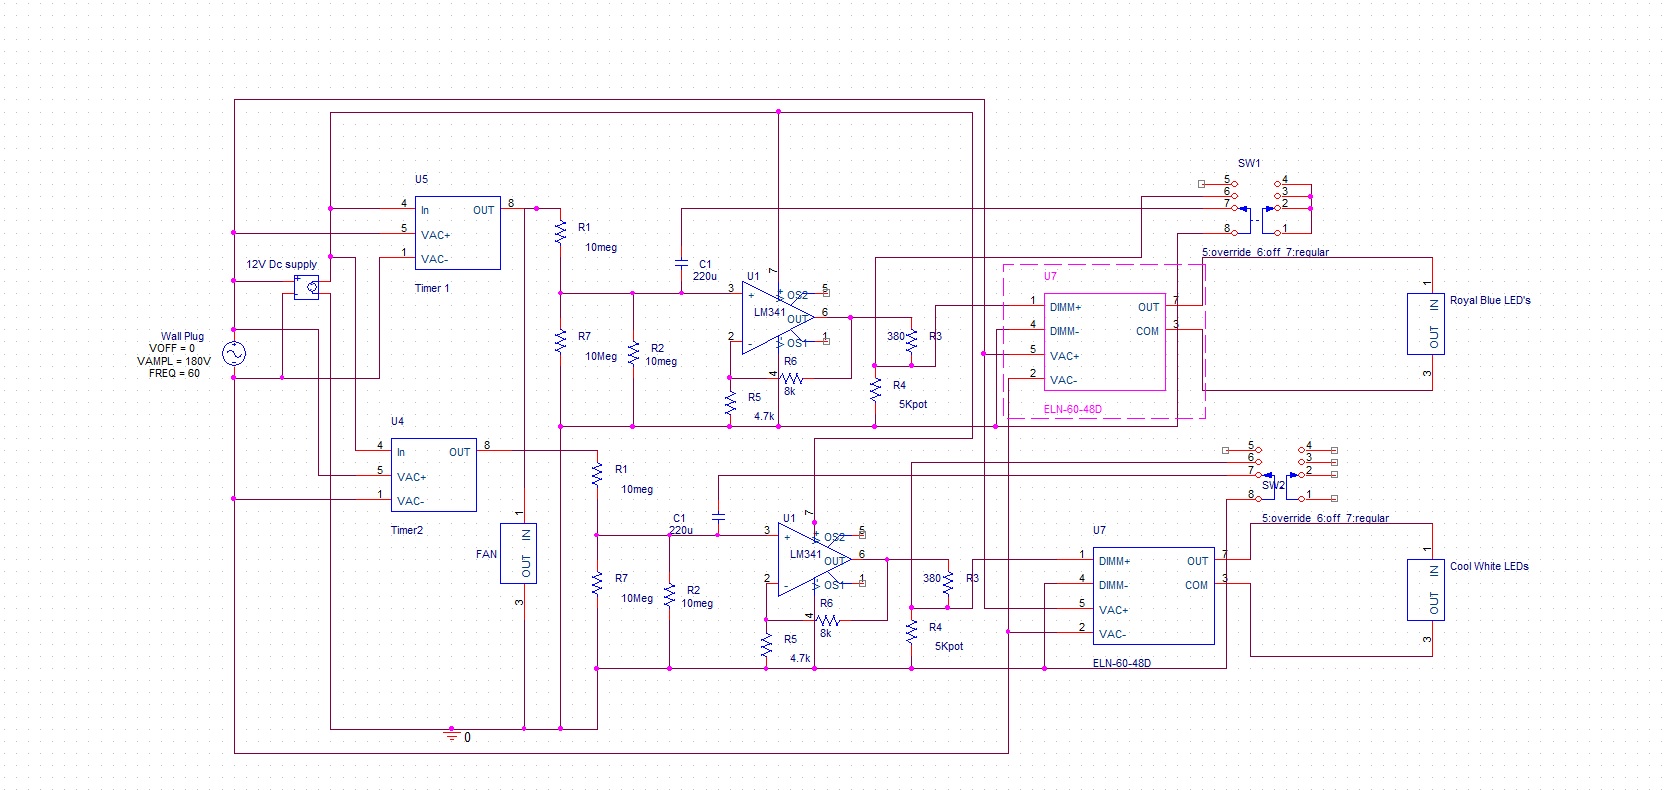
The drivers can operate fourteen LEDs, but only twelve are currently used. This allows for the addition of twelve LEDs to the existing setup without requiring additional drivers. The device is powered by a 120VAC plug, supplying power to...

There are various methods for rust removal; however, these approaches are unsuitable for very old or valuable artifacts as they can be destructive, often removing some of the base metal along with the rust. Dissolving rust with acids like...
This web page presents details regarding the design of a strain gauge-based load cell that can be used in conjunction with an electronic data acquisition (DAQ) system for static thrust measurement of a rocket motor. The load cell described...
Firstly, we will describe the add-on version for the 5x7 Display as this is the cheapest version and, quite frankly, it only deserves a few dollars as a piece of test equipment. It's all the rage to have an...