
The Cylonduino Arduino Experiement

The proposed circuit for the Cylon or Knight Rider-style LED scanner utilizes an Arduino Uno as the primary microcontroller. The design will involve a series of LEDs arranged linearly to create the scanning effect. Each LED will be connected to a digital output pin on the Arduino, allowing for individual control. The circuit will require a resistor for each LED to limit the current and prevent damage, typically calculated using Ohm's law based on the forward voltage of the LED and the supply voltage.
The basic schematic will include the Arduino Uno connected to a power source, which can be supplied via USB or an external power adapter. The digital pins used for the LEDs will be configured in the Arduino code, which will dictate the sequence in which the LEDs are turned on and off. The pattern will be programmed to create a left-to-right scanning effect followed by a right-to-left return, simulating the iconic visual from the original Knight Rider series.
In addition to the LEDs, a breadboard may be employed for prototyping, allowing for easy adjustments and modifications to the circuit layout. Jumper wires will connect the LEDs to the appropriate pins on the Arduino, with ground connections made to the common ground on the breadboard. The Arduino IDE will be utilized to write and upload the code to the microcontroller, which will handle the timing and sequencing of the LED activation.
This project serves as an excellent introduction to microcontroller programming and circuit design, demonstrating fundamental concepts such as digital output control, timing functions, and the importance of current-limiting resistors in LED circuits. The simplicity of the Arduino platform combined with the creative potential of this project makes it an ideal choice for both beginners and those looking to rekindle their interest in electronics.I`ve been putting in a lot of extra hours at work the last week in anticipation of an editing deadline. Despite this, I thought it was about time that I attempt a little hardware hacking. Even before computers, I was facinated by electronics. I read book after book, but had little success in applying any of that knowledge beyond kits bought from R
adio Shack. Given my recently revived interest in Ham Radio, it was only a matter of time before I`d turn my attention back to this, my oldest of hobbies. Microcontrollers have recently become surprisingly affordable. It used to be that a microcontrollers, or "BASIC Stamps" as one early product line called itself, that you needed expensive programmer boards and in some cases, knowledge of assembly.
Today`s microcontrollers are much, much simplier. Beyond a computer and a USB cable, you really don`t need much to start experimenting. When I first looked into buying one, two brands immediately came to mind, the Parallax Quickstart andthe Arduino. I`ve heard of the Parallax before. That esoteric little board is based on a "barrel processor", with 8 independant cores and one shared bus.
It`s interesting approach certainly captured my interest, but the complexity kept me from investing. Programming the Parallax board requires some finesse, and is probably not the best idea if you haven`t any previous hands-on microcontroller experience. The Arduino, on the other hand, is a lot more straightforward. The Arduino Uno a single core system running at 16Mhz with 32K of on board memory. You can purchase it online from a variety of vendors (although I`m fond of female-led Adafruit), or your local Radio Shack.
Yes, Radio Shack. Apparently they got the idea that people still like buying parts and kits. While no Fry`s Electronics, Radio Shack has a respectable little section of toys, including the Arduino. The Arduino is agressively open source - both the hardware and the IDE are open source. The latter even is available on multiple platforms, Linux included (yay!). Working with the Arduino platform is a joy. The code is simple, and has plentiful examples. If you`re familiar with C, C+, Java, PHP, or languages with similar syntax, you`ll be right at home. The code isn`t a "real" programming language, but closer to a script. The IDE transforms your code into C prior to compiling and uploading to your microcontroller. Uploading is also joyously simple: Connect USB, install a driver, and you`re good. Once set up for the first time, you only need to connect and hit "Upload" on the IDE. One of the first things I wanted to do was build a Cylon, or Knightrider-esque LED scanner. The lights blink on in sequence from one side to the other, and then back again. The circuit is pretty simple and is based on a modification of the Bargraph Example. 🔗 External reference
Related Circuits
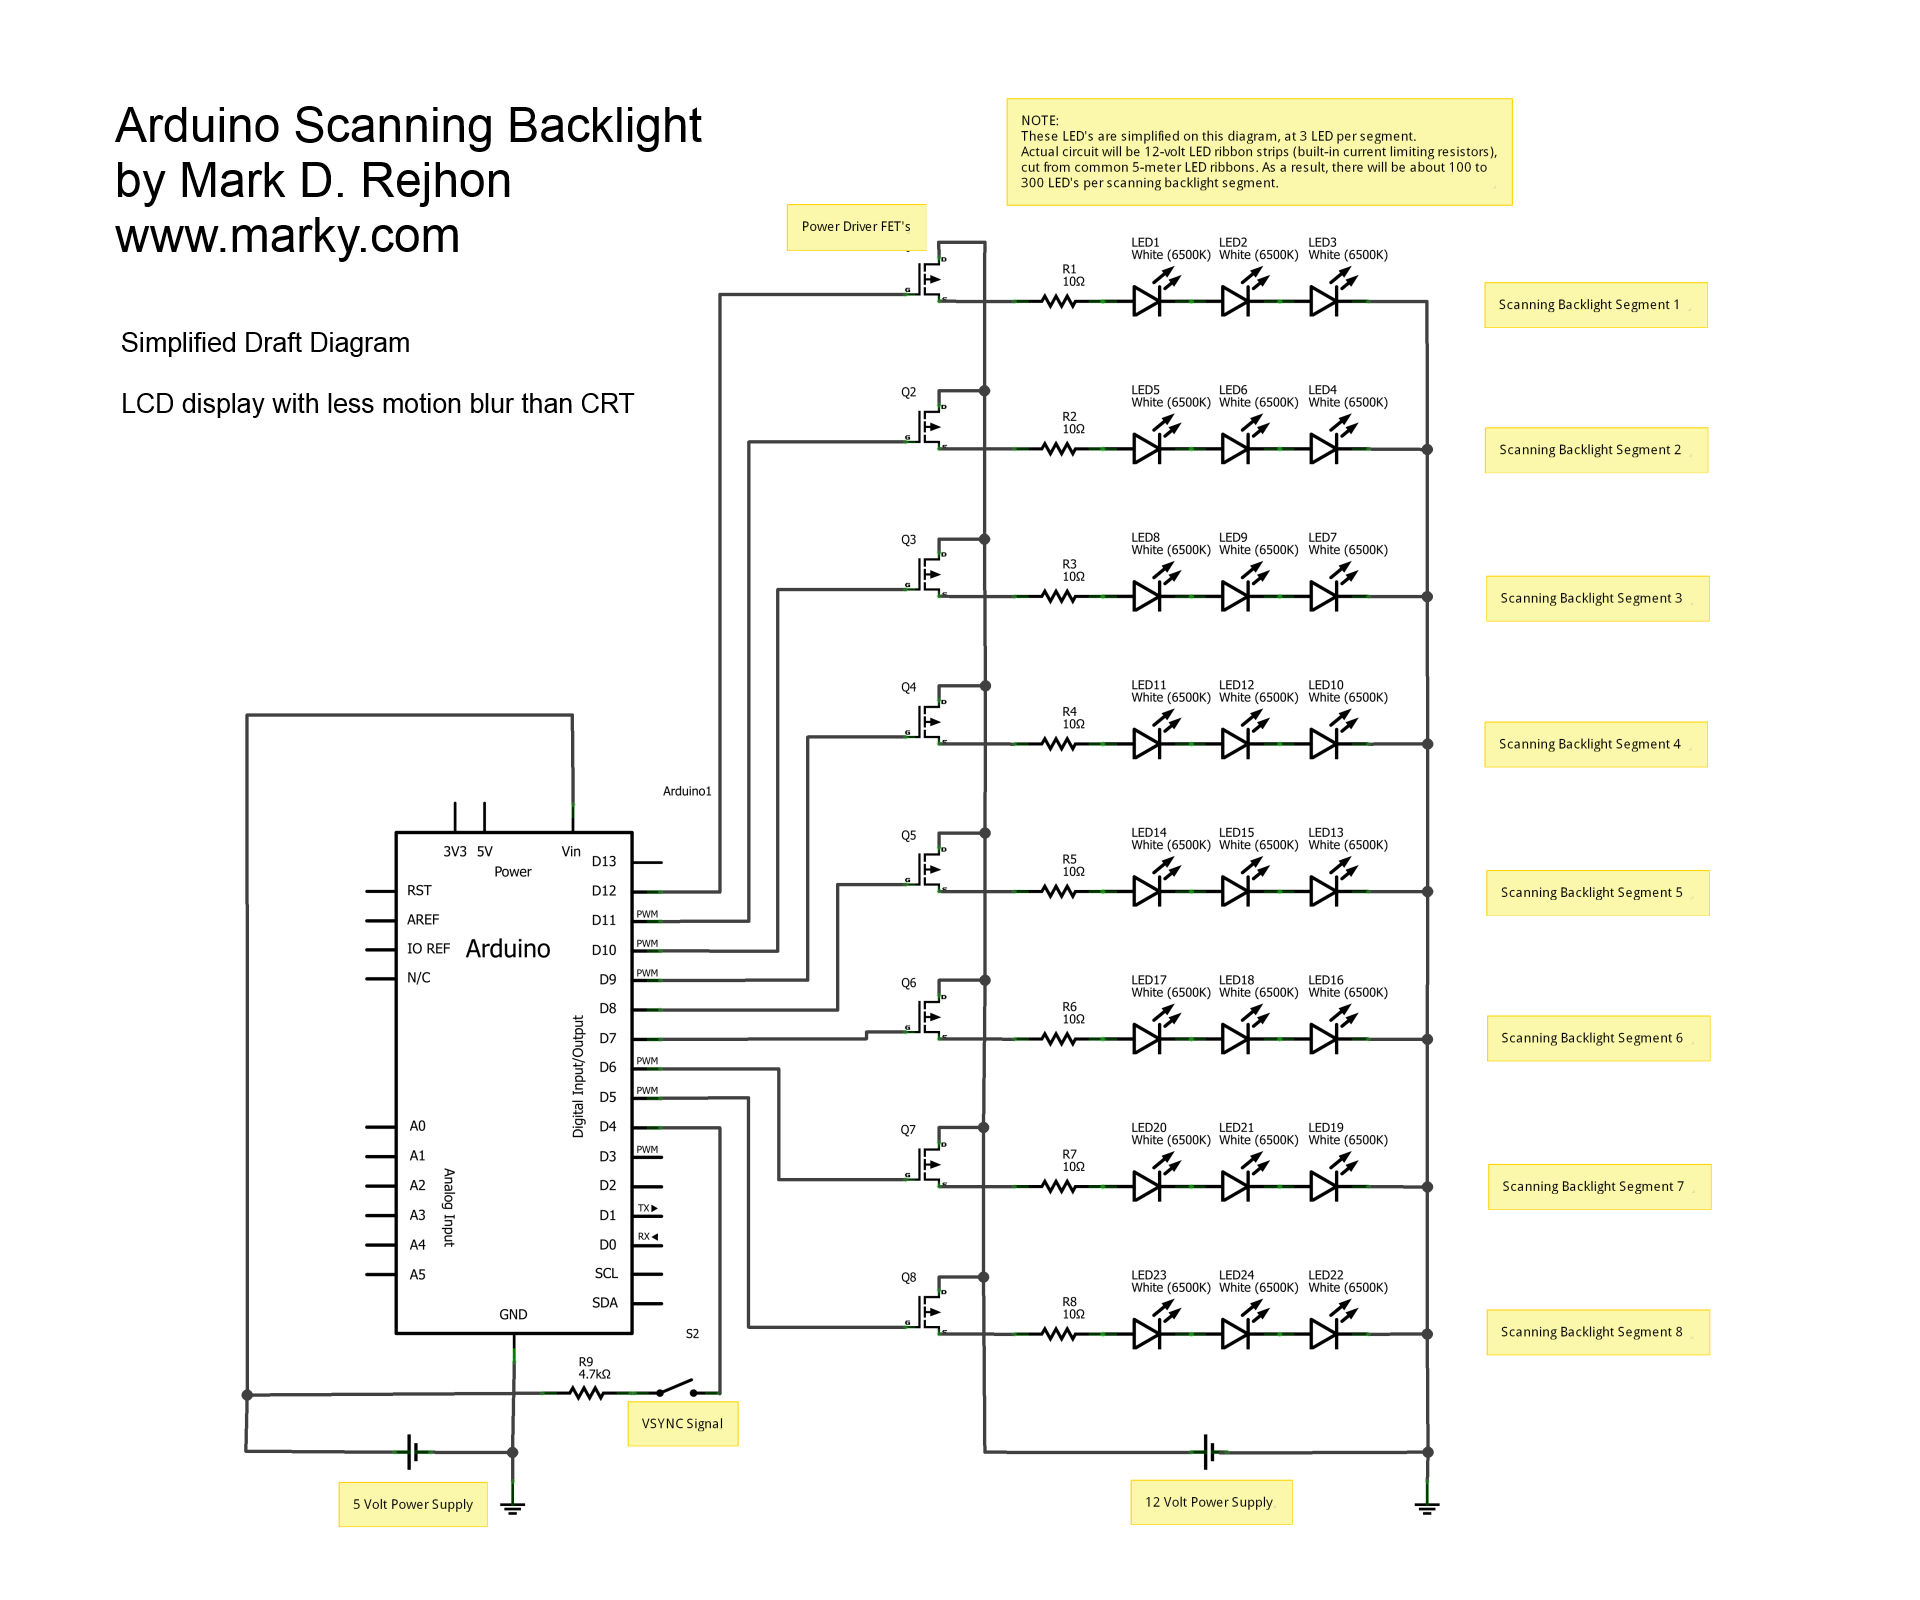
This is a simplified schematic diagram for a homemade scanning backlight driven by an Arduino, an open-source electronics prototyping platform. The Arduino monitors the VSYNC signal (input-lag compensated) and executes a backlight scanning sequence, using ultra-short strobes of super...
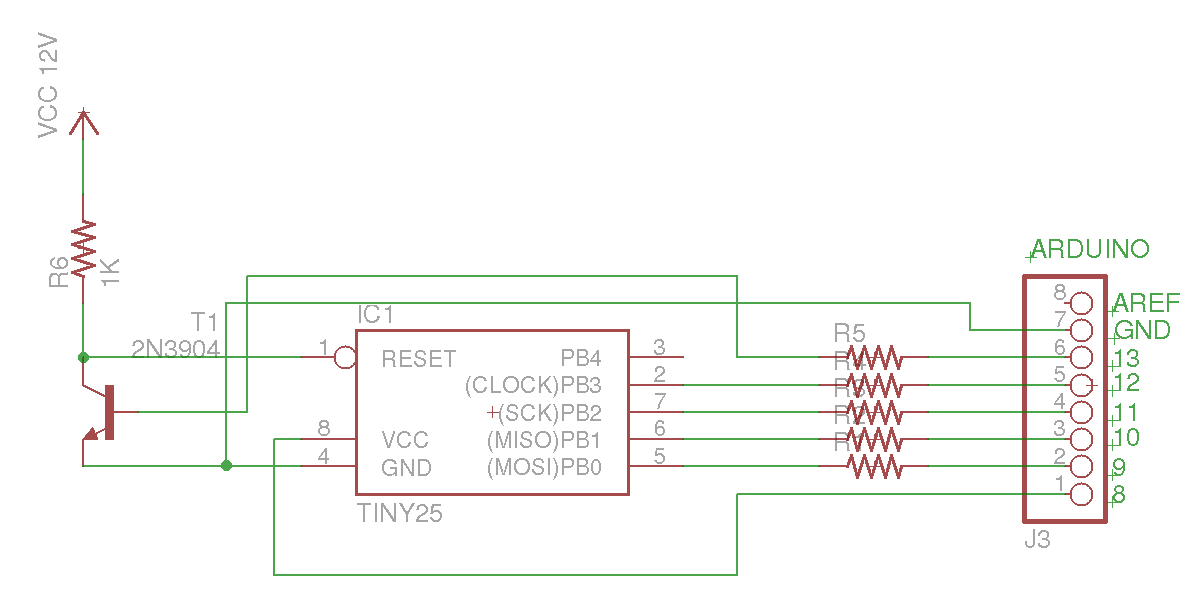
This Arduino sketch is designed to recover ATtiny microcontrollers that have become non-functional due to incorrect fuse settings. It achieves this by placing the affected ATtiny into high-voltage serial programming mode and rewriting the fuses to safe values. The...
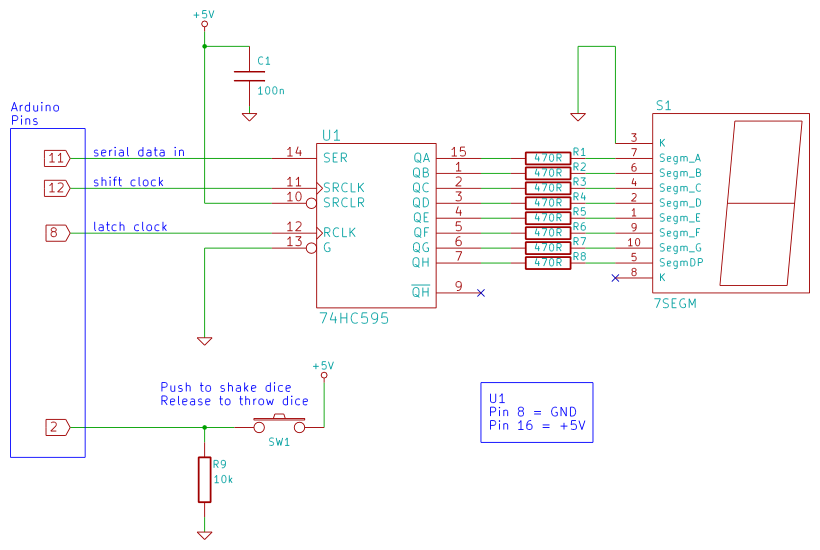
Arduino 7-segment display dice circuit and tutorial with Arduino sketch. Build a dice that is shaken by holding a button in and thrown by releasing the button. The shake, throw, and number thrown are animated and displayed on a...

One of the most interesting shields that can be mounted on the Arduino platform is the Ethernet shield, as it enables numerous networking applications such as remote control of systems and users, web access, data publication, and more. The...
Charge a simple servo that only has + and - pins. Typically, the - pin is connected to ground, while the + pin is connected to a digital output from an Arduino. This setup works, but the servo operates...

The project involves teaching an Arduino to generate DTMF (Dual-Tone Multi-Frequency) tones using the HT9000A DTMF chip. These tones are the familiar "touch tones" used in telephone systems. The output volume from the chip is low, suggesting the need...