
connecting lego sensor pic

To control a LEGO light sensor with a standard PIC microcontroller, several key components and steps must be considered. The PIC microcontroller will serve as the central processing unit, interfacing with the light sensor to read its output and execute corresponding actions based on the sensor's readings.
1. **Component Selection**: Choose an appropriate PIC microcontroller based on the number of I/O pins required and the processing speed. Common choices include the PIC16F series or PIC18F series, depending on the complexity of the project.
2. **Wiring the Circuit**: Connect the LEGO light sensor to an analog or digital input pin on the PIC microcontroller. If the sensor outputs an analog signal, an Analog-to-Digital Converter (ADC) pin on the PIC will be necessary. For digital sensors, a standard GPIO pin can be used.
3. **Power Supply**: Ensure that the PIC microcontroller and the LEGO light sensor are powered correctly. Use the appropriate voltage levels (typically 5V for both components) and ensure a common ground connection between the microcontroller and the sensor.
4. **Programming the Microcontroller**: Utilize a programming environment such as MPLAB X IDE to write the firmware for the PIC microcontroller. The code should include the initialization of the ADC (if applicable), reading the sensor data, and implementing logic to control outputs based on the sensor readings. For example, if the light level exceeds a certain threshold, the microcontroller can trigger an output to turn on an LED or activate a motor.
5. **Testing and Calibration**: After programming, test the system to ensure that the light sensor readings are accurate and that the microcontroller responds as expected. Calibration may be necessary to adjust the threshold values based on the specific environment and requirements of the application.
6. **Debugging**: If issues arise, utilize debugging tools available within the IDE, such as breakpoints and variable watch, to analyze the behavior of the program and make necessary adjustments.
By following these steps, a functional control system can be established, allowing for effective management of the LEGO light sensor using a PIC microcontroller.i need to control it with a ordinary pic. could someone please explain me how do i do it. im using it to control lego light sensor 🔗 External reference
Related Circuits
The oxygen sensor simulator is constructed on a protoboard. It utilizes a cigarette lighter plug as the power source. An adjustment knob is located on the left side, while a switch is positioned on the right. A red indicator...
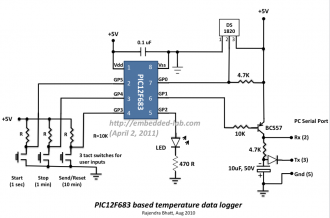
This project involves a straightforward data logger utilizing the PIC12F683 microcontroller. The microcontroller periodically reads temperature values from a temperature sensor and stores these readings in its internal EEPROM memory. The circuit design for this data logger project incorporates several...

The following circuit illustrates the LM2940CT sensor connection circuit diagram. Features include internal power dissipation and a storage temperature range. The LM2940CT is a low dropout linear voltage regulator designed to provide a stable output voltage with a maximum dropout...
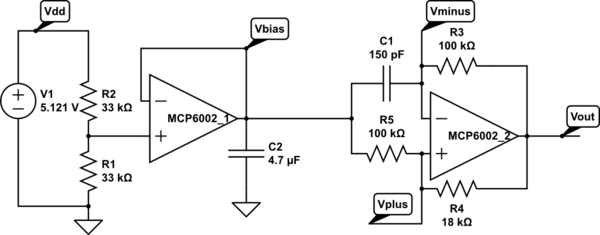
A touch sensor relaxation oscillator is utilized in the hysteresis lab. In this schematic, the variable capacitor is represented by a person's finger and a touch plate made from aluminum foil and packing tape. Code was developed for the...
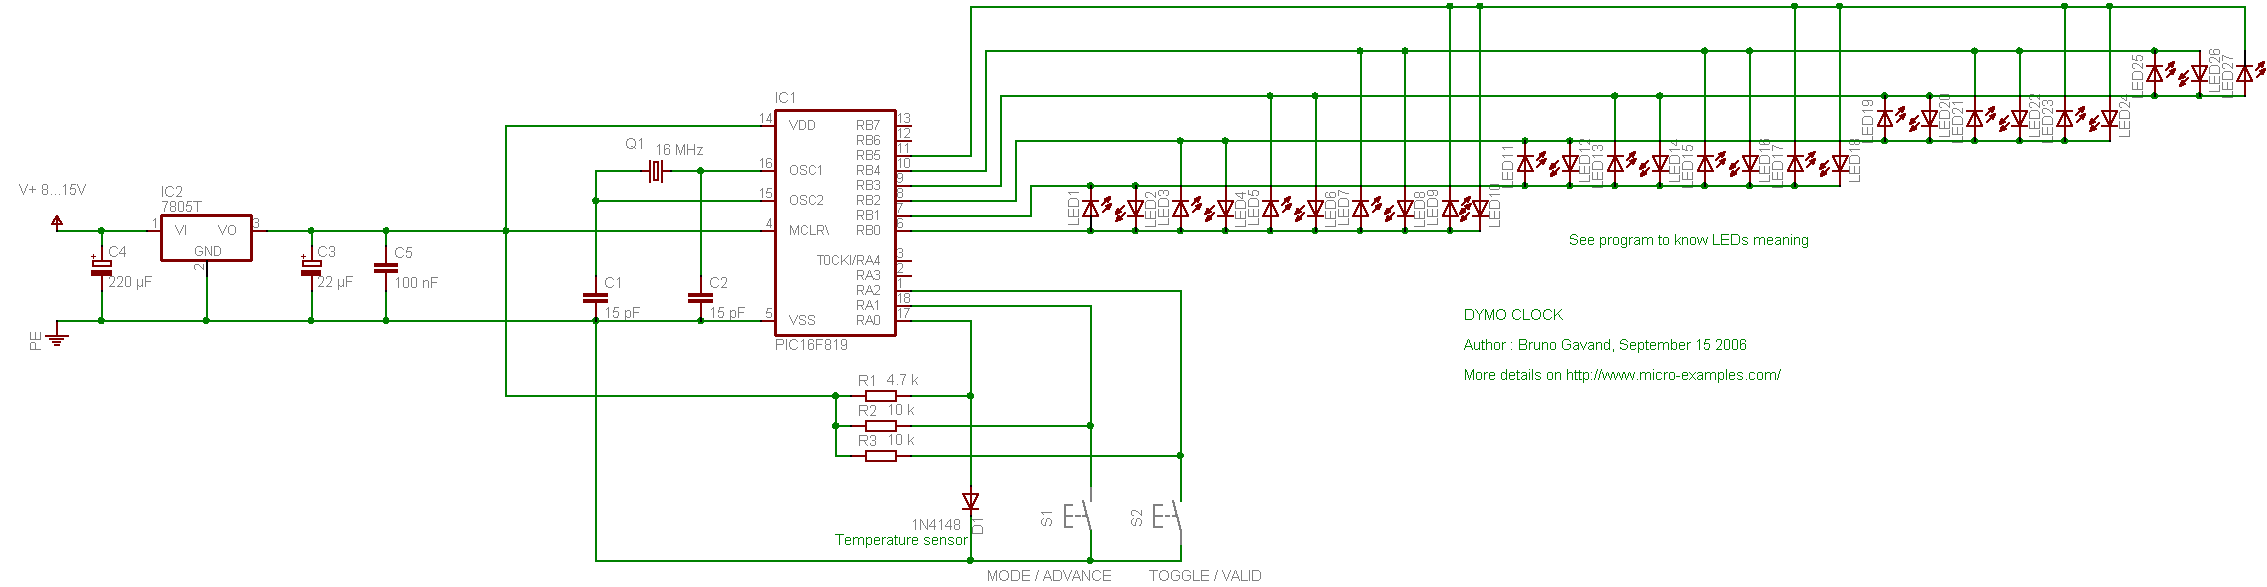
The following circuit illustrates the PIC16F819 Dymoclock Sensor Circuit Diagram. Features include an economical temperature sensor, the use of only LEDs, and the absence of a decoder. The PIC16F819 Dymoclock Sensor Circuit utilizes a PIC16F819 microcontroller, which is a versatile...

The first schematic page contains the primary content of the design, while the second page features simulation support circuitry. The primary design controls the accessory relays and indicators. It also drives the control loop and adjusts the throttle control...