
controlling a dc motor with an arduino uno

The circuit utilizes an H-bridge configuration to control the direction of a small DC motor. The H-bridge is composed of four transistors (or MOSFETs) that allow for the application of voltage across the motor terminals in either direction, enabling forward and reverse rotation. The Arduino Uno serves as the control unit, interfacing with the H-bridge through digital output pins.
In this setup, four output pins from the Arduino are designated for controlling the H-bridge: resistor1, resistor2, resistor3, and resistor4. The Arduino is programmed to listen for serial input, which corresponds to keyboard commands. The ASCII values for the keyboard inputs are utilized to determine the direction of the motor. Specifically, the left arrow key corresponds to the value 37, the up arrow to 38, the right arrow to 39, and the down arrow to 40.
The setup function initializes the serial communication at a baud rate of 9600 and configures the output pins accordingly. The loop function continuously checks for available serial input. When a key is pressed, the Arduino reads the incoming byte and compares it to the predefined ASCII values. If the left arrow key is pressed (ASCII value 37), the program sets the output pins to HIGH to activate the H-bridge, allowing the motor to rotate in one direction.
To enhance the functionality, additional conditions can be implemented for the right arrow key (ASCII value 39) to reverse the motor's direction. Furthermore, it is advisable to include error handling to manage unexpected inputs and ensure the system operates smoothly. The code may also be expanded to include features such as speed control through PWM signals, allowing for variable motor speeds based on additional keyboard inputs.Control a small DC motor through this H-bridge with an Arduino Uno, but I have never programmed one of these controllers before. I need the motor to rotate in different directions when I press left and right on a keyboard. So far I have this code: // Right Motor /* Adjust these values for your servo and setup, if necessary */ int re
sistor1 = 3; int resistor2 = 5; int resistor3 = 6; int resistor4 = 10; int moveServo; void setup() { Serial. begin(9600); pinMode(resistor1, OUTPUT); // Set servo pin as an output pin pinMode(resistor2, OUTPUT); pinMode(resistor3, OUTPUT); pinMode(resistor4, OUTPUT); } void loop() { // Wait for serial input if (Serial.
available() > 0) { // Read the incoming byte: moveServo = Serial. read(); // ASCII left = 37, up = 38, right = 39, down = 40 if (moveServo = 37) { digitalWrite(resistor4, HIGH); digitalWrite(resistor1, HIGH); } } 🔗 External reference
Related Circuits
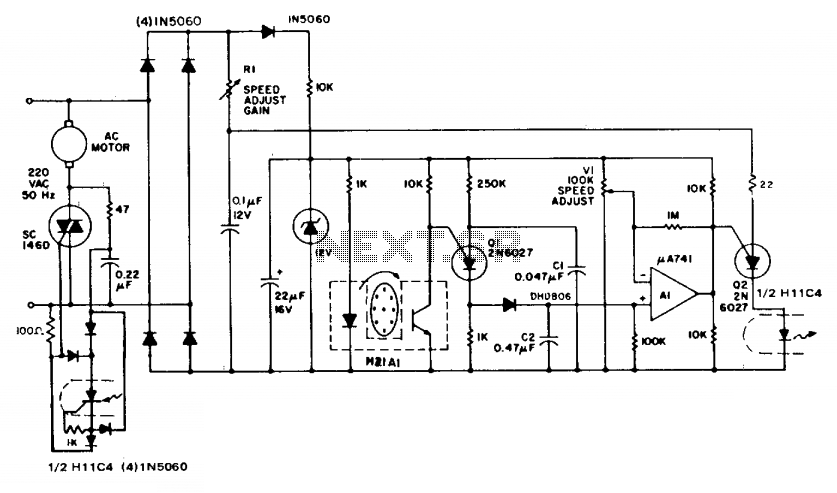
The circuit demonstrates feedback speed regulation for a standard AC induction motor, a task that is typically challenging to achieve without the use of an expensive generator-type precision tachometer. When the apertured disc connected to the motor shaft allows...
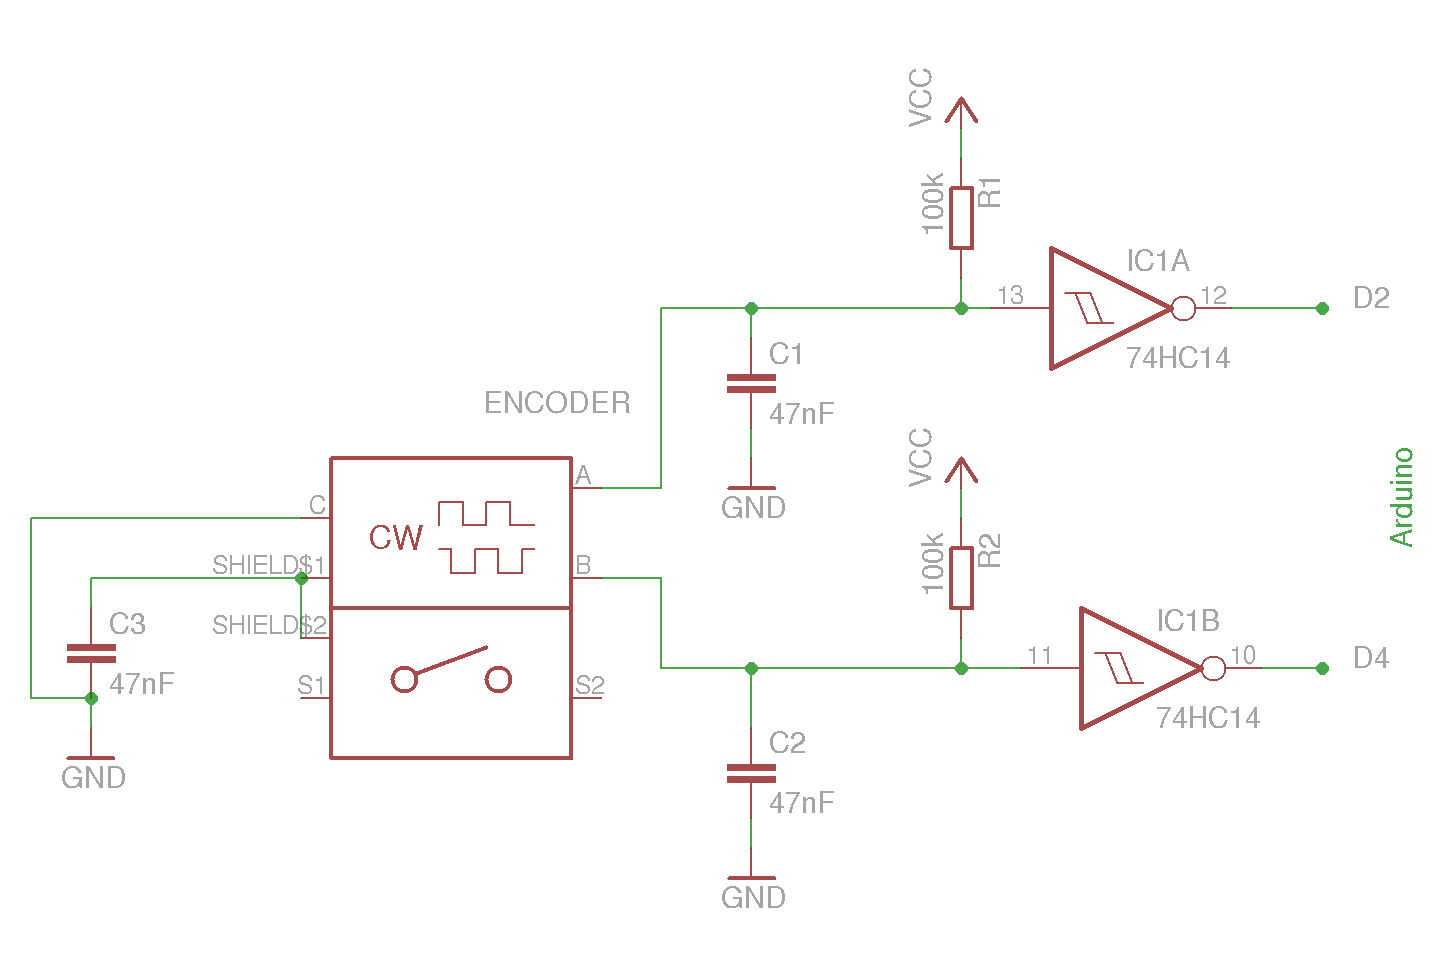
The example circuit and code should be sufficient to begin without delving into additional details. A rotary encoder is an electromechanical component with a shaft that records rotation and converts it into electrical pulses to indicate the direction of...
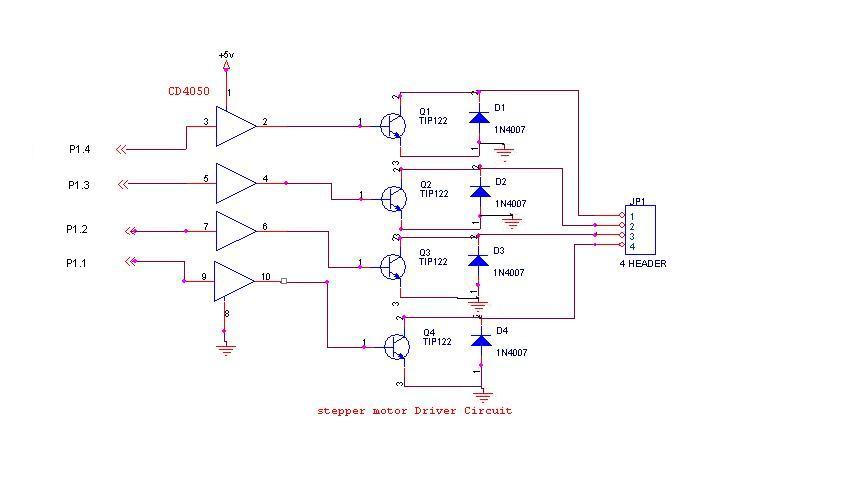
A 6V, 2A stepper motor is utilized in this circuit. The CD4050 hex buffer is employed to connect to the microcontroller. The output of the CD4050 is linked to the base of a TIP122 transistor. The emitter and collector...
A straightforward project involves using an Arduino to rotate a GH-2 camera on a fluid head by specified degrees to capture 360-degree panoramas. The motor control is uncomplicated, and there is a wealth of DIY motor projects available. Assistance...
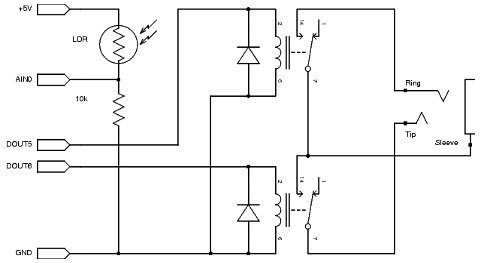
The circuit described here is for a general purpose device that can control DC devices which draw up to a few amps of current. The circuit may be used in either 12 or 24 Volt systems with only a...
A modified version of the previous program allows control of multiple servomotors, utilizing all available I/O lines on port B. The following listing demonstrates the control of two servos similarly to how a single servo was managed in the...