Remote Controlled Digital Clock with AT89C2051
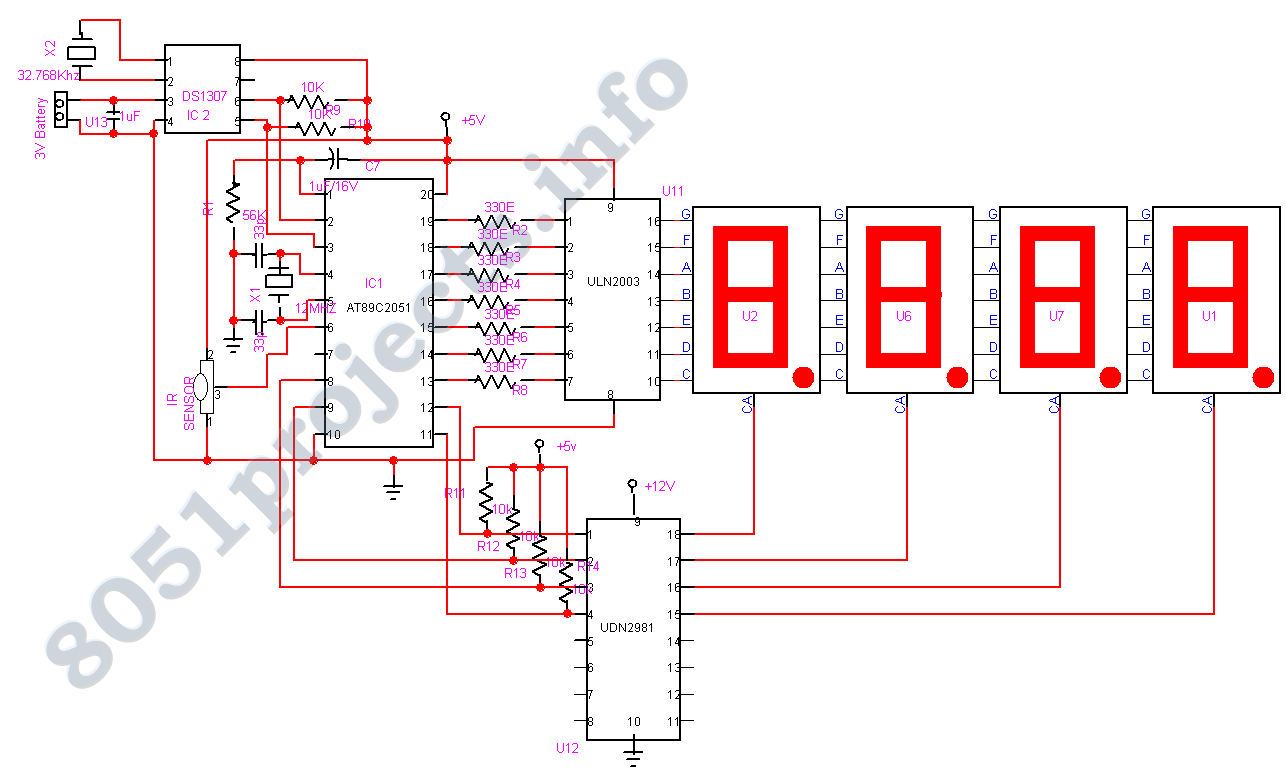
This Project is made up with AT89C2051 and the RTC DS1307. It has a large Seven segment display. The standard remote control is used to change the Time. More: Procedure to enter the Time 1. Press power button on the remote to enter new time 2. Press the Numerical buttons to enter the time 3. Press the Menu button to store the New time Ths system has an battery backup, so that the Clock will run during pow
The project utilizes an AT89C2051 microcontroller, which serves as the central processing unit for the system. This microcontroller is interfaced with a Real-Time Clock (RTC) module, specifically the DS1307, which keeps track of the current time and date. The DS1307 communicates with the microcontroller via the I2C protocol, allowing for easy data transfer and control.
A prominent feature of this design is the large seven-segment display, which visually presents the current time to the user. The display is driven by the microcontroller, which sends the appropriate signals to illuminate the segments corresponding to the digits of the time.
User interaction is facilitated through a standard remote control, allowing for a convenient method to set the time without direct physical contact with the device. The procedure for entering the time is straightforward:
1. The user presses the power button on the remote control to activate the time-setting mode.
2. Numerical buttons on the remote are used to input the desired time.
3. Finally, the user presses the Menu button to confirm and store the new time in the RTC.
To ensure continuous operation, the system is equipped with a battery backup. This feature allows the clock to maintain accurate timekeeping even during power outages. The backup battery powers the DS1307, ensuring that the time data is preserved and that the display can continue to function once power is restored.
Overall, this project combines the functionality of microcontroller programming, real-time clock management, and user-friendly interaction through remote control, making it an efficient and practical timekeeping solution.This Project is made up with AT89C2051 and the RTC DS1307. It has a large Seven segment display. The standard remote control is used to change the Time. Procedure to enter the Time 1. Press power button on the remote to enter new time 2. Press the Numerical buttons to enter the time 3. Press the Menu button to store the New time Ths system has an battery backup, so that the Clock will run during pow 🔗 External reference

