
pathlight circuit

The Solar CD Two LED circuit is an innovative project that integrates solar energy with LED lighting, providing a sustainable and efficient lighting solution. The circuit design emphasizes the importance of careful assembly and testing to ensure functionality. The use of a breadboard for initial testing allows for easy modifications and verification of connections before finalizing the circuit on a soldered board.
The circuit board's compact size is conducive to portability and ease of integration into various enclosures. The choice of components, such as the rosin core solder and the specified wattage for the soldering iron, is crucial for achieving reliable connections. The aesthetic aspect of the circuit is also addressed, as the shiny solder joints indicate good electrical contact, which is essential for performance.
The protective clear plastic container not only safeguards the components from dust and potential damage but also facilitates the organization of the circuit elements. The arrangement of the Solar CD and batteries ensures optimal functionality by maximizing exposure to sunlight while maintaining a compact footprint. The incorporation of twist-on connectors for the LEDs provides flexibility in placement, allowing users to customize their lighting setup as desired.
Overall, this project exemplifies the intersection of electronics and renewable energy, encouraging hands-on learning and creativity in circuit design and assembly. The emphasis on safety and best practices in soldering further enhances the educational aspect of this endeavor, making it accessible to both novices and seasoned enthusiasts.The finished Solar CD Two LED circuit. The components are labeled to match the schematic. The soldered circuit looks a little different than the schematic, but the connections are the same. and it is the connections that matter. Here is how to make the jump from the schematic to the finished circuit: test the layout on the breadboa rd until you are sure you have the right parts connected together, and the circuit works. Then stick the components, a couple at a time, on to a little piece of circuit board: the circuit board in the photo is less than 2 inches square. Stick the component leads (legs) through the holes, trim the leads so they are just long enough to touch where they need to connect.
Then, using a multi-armed clamping device to hold the parts in place, carefully solder the leads together. Anybody doesn`t really know how to solder: anybody just pretends! There are many sites on the Internet with decent soldering information and photos. Or, better yet, get a friend to show you how. Soldering can be fun! Anybody can learn with a little practice and some spare components. Use small diameter rosin core solder and a 10 to 20 watt soldering iron. The clumps of solder are supposed to be shiny and bright, otherwise the connections might not be good.
Be careful not to apply too much heat to the components, or they may be damaged. Anybody learned that you don`t have to use as much solder as the circuit to the left shows. It is so much fun playing with hot molten metal that it is easy to get carried away! Just be careful not to set anything on fire. unintentionally. The photo on the right shows the circuit board with the batteries and the Solar CD hooked up. The LEDs are not attached yet: they will be added later by using little twist-on electrical connectors (like the orange ones attaching the Solar CD). Everything but the LEDs fit inside the clear plastic container at the top of the photo. The Solar CD goes in first with the solar cells facing the bottom of the container, then the piece of Styrofoam goes in, then the batteries and circuit board, then the lid goes on.
The container protects the Solar CD, batteries and circuit board from dust and mayhem. The LEDs can be located anywhere on the light: just run the wires from the LEDs through a small hole in the lid of the container and attach with twist-on connectors. Be sure to test your soldered circuits at home: it is much easier to make repairs in the comfort of your own livingroom than on the playa.
Besides, you will have *better* things to do on the playa. 🔗 External reference
Related Circuits
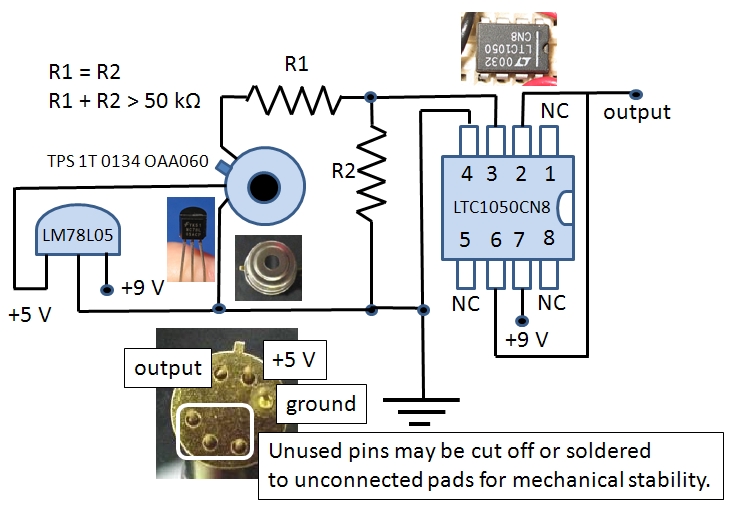
The Excelitas TPS 1T 0134 OAA060 thermopile sensor is a self-contained module that includes a built-in operational amplifier. The designation A2TPMI 334 OAA 60 is used in this document due to its previous identification under the PerkinElmer part number...
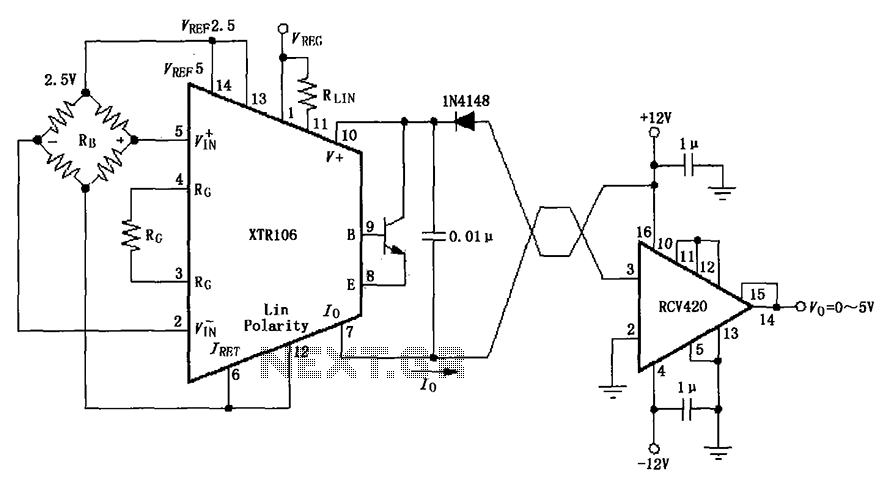
The IN4148 series diode is connected in the V+ line and configured in a loop to prevent damage from reverse voltage conditions. The diode exhibits a forward voltage drop of approximately 0.7V, which affects the supply voltage. The circuit...
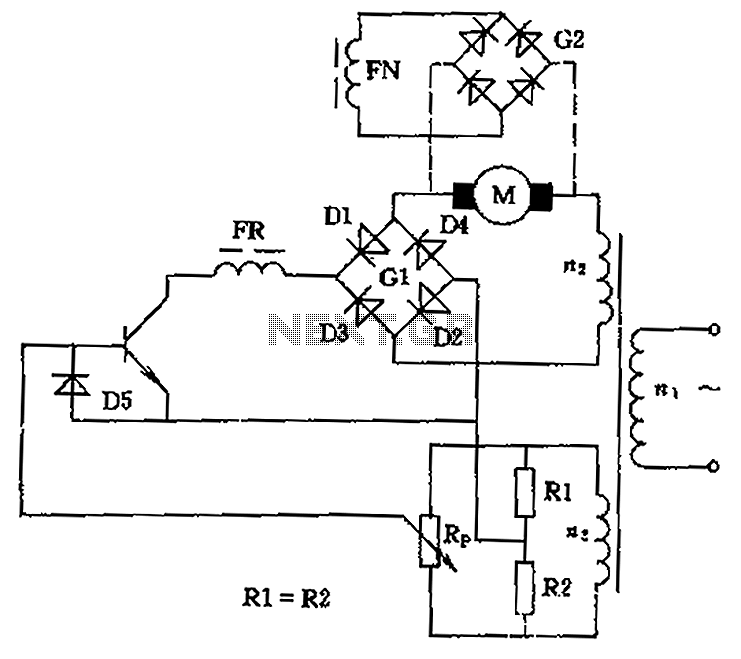
The circuit is designed to control the speed and direction of low-power DC motors, including series and shunt motors. It utilizes a rectifier bridge (G1) connected in series with the motor and linked to the secondary winding (n2) of...
An FM transmitter circuit that utilizes a low power configuration, employing an operational amplifier as an audio preamplifier and a single transistor to function as the RF amplifier. This FM transmitter circuit is designed for low power applications, making...
Due to the increased level of the transistor amplifier circuit, the control circuit's performance in Figure 16-6 is more sensitive and can accept input control signals superimposed on others (such as voltage, current, and speed feedback signals) to meet...

The circuit has been designed for telephone apparatus to indicate an incoming call as it rings using an LED for visual indication. BC550, an NPN general-purpose transistor, is utilized in the design. The circuit operates by detecting the ringing voltage...