
remote control

To implement a remote control interface for F/G CED players, the following components and steps are essential:
1. **Components Required**:
- Microcontroller (e.g., Arduino or similar)
- Infrared receiver module
- Infrared remote control (compatible with the chosen receiver)
- Resistors (as required for voltage division or pull-up/pull-down configurations)
- Breadboard and jumper wires for prototyping
- Power supply for the microcontroller
- Optional: A PCB for a more permanent solution
2. **Circuit Design**:
- Connect the infrared receiver module to the microcontroller. Typically, the receiver has three pins: VCC (power), GND (ground), and OUT (signal). The VCC pin connects to the microcontroller's power output, GND to ground, and the OUT pin connects to a digital input pin on the microcontroller.
- Ensure that the microcontroller is powered correctly and can communicate with the infrared receiver.
3. **Programming the Microcontroller**:
- Write a program that initializes the infrared receiver and listens for signals from the remote control. The program should decode the signals and map them to specific commands that control the F/G CED player functions.
- Use libraries available for the microcontroller to simplify the process of decoding infrared signals.
4. **Testing the Interface**:
- After programming, test the interface by pressing buttons on the infrared remote control. The microcontroller should recognize the signals and execute the corresponding commands on the F/G CED player.
- Debug any issues with signal reception or command execution by checking the connections and reviewing the program.
5. **Final Implementation**:
- Once testing is successful, consider designing a PCB for a more robust and compact solution. This would involve laying out the circuit traces for the microcontroller, infrared receiver, and any additional components required for stability.
- Encase the final assembly in a suitable enclosure to protect the electronics and provide a user-friendly interface for the remote control.
This comprehensive approach allows for the integration of a remote control interface with F/G CED players, enhancing user experience by enabling control through a variety of joystick options, including wireless infrared controllers.Step-by-Step instructions for adding a remote control interface to F/G CED players which can be used with a variety of Atari and Sega joysticks including wireless infrared controllers.. 🔗 External reference
Related Circuits
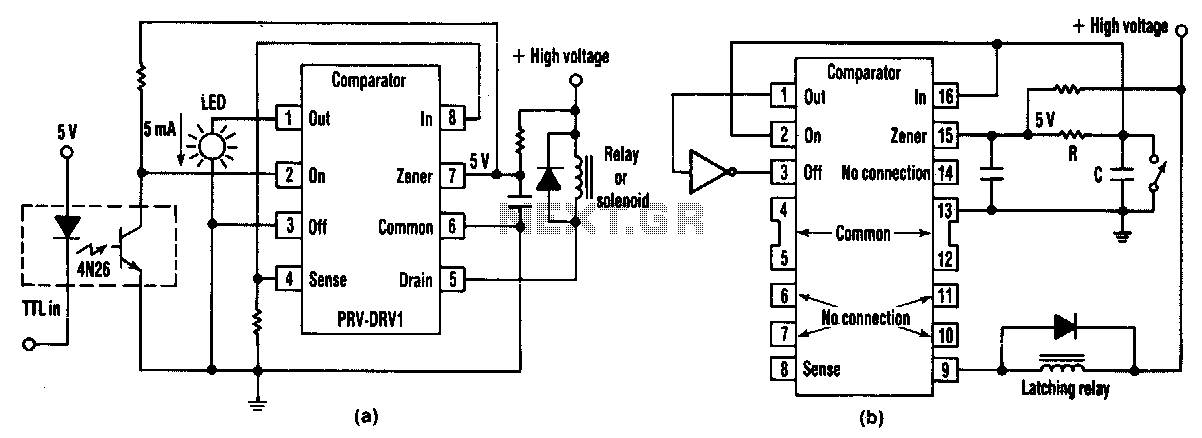
At half brightness, the lamp current is pulsed on and off by the voltage developed across the resistor and capacitor at the current-sense output. The current-sense output detects the lamp current. A basic pulse-width modulation (PWM) lamp-brightness control circuit...
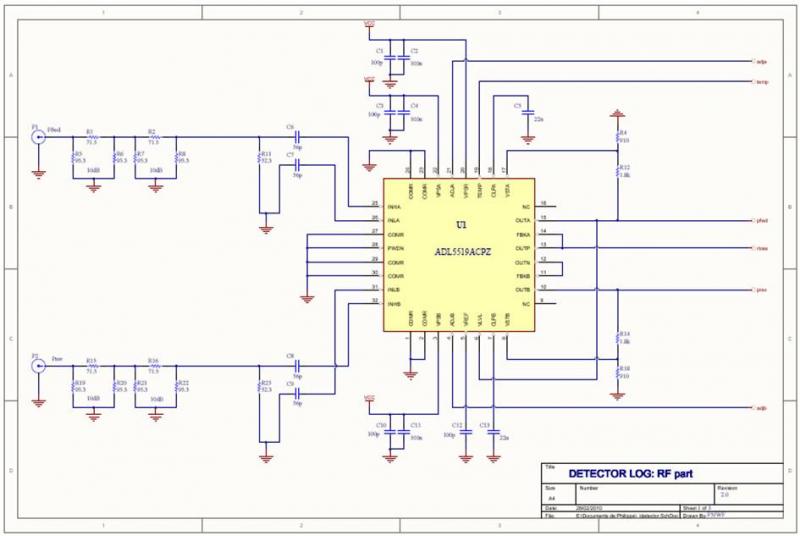
The ADL5519 is particularly focused on bandwidth, specified up to 8 GHz, though it remains usable at 10 GHz with reduced dynamic range. It features two channels, allowing for the measurement of power transmitted to the antenna and the...
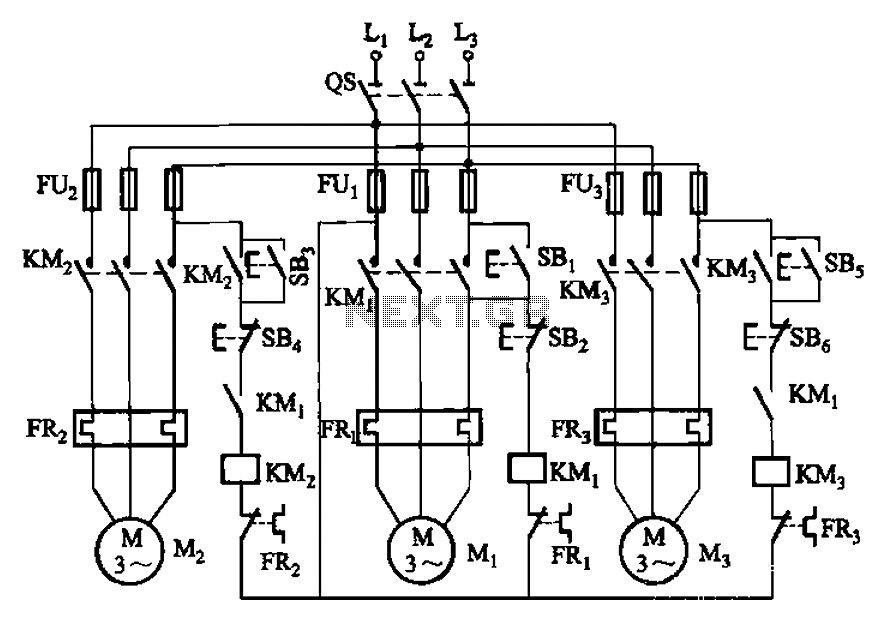
The circuit shown in Figure 3-89 illustrates a system where starting motor M1 allows motors M2 and M3 to initiate operation. Upon shutdown, motor Mz can be stopped first; however, once motor M1 is stopped (by pressing switch SB2),...
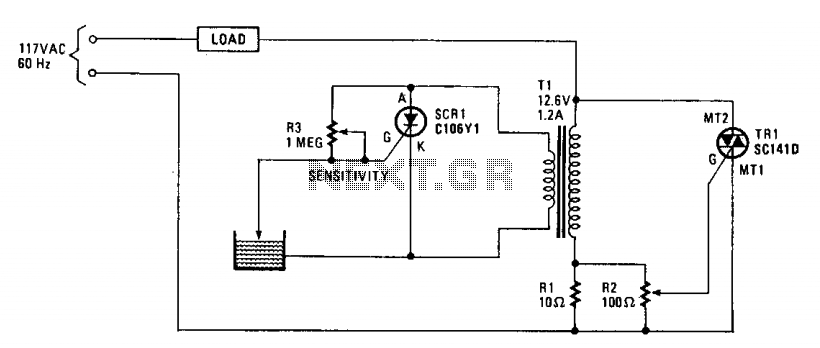
The operation of the circuit is based on the difference in the primary impedance of a transformer when its secondary is loaded compared to when it is open-circuit. The impedance of the primary of T1 and resistor R1 are...

The A/B switch circuit comprises three integrated circuits (ICs) and several resistors. Two gates from a 4011 quad 2-input NAND gate (U1A and U1B) are configured as a monostable multivibrator. When switch SI is activated, it triggers a 4017...
This article was previously published, but the intention is to spread the idea further, potentially inspiring new concepts. An improved version was being developed using an ULN2803A instead of multiple BC547B transistors and optional Zener diodes to ensure that...