
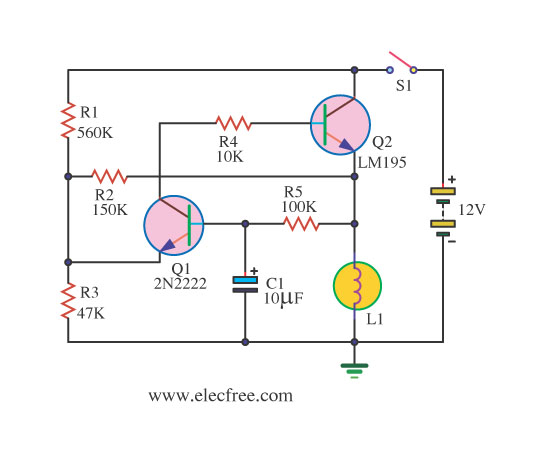
A lamp flasher circuit using transistors
The three lamp flasher circuits can be designed using different components and configurations, each offering unique characteristics suitable for various applications.
1. **Basic Transistor Flasher Circuit**: This circuit utilizes a single NPN transistor, a resistor, and a capacitor to create a simple flashing effect. When power is applied, the capacitor charges through the resistor, and once it reaches a certain voltage, the transistor is triggered into conduction. This allows current to flow through the lamp, causing it to light up. As the capacitor discharges, the transistor turns off, causing the lamp to extinguish. The cycle repeats, resulting in a flashing effect. The frequency of the flashing can be adjusted by varying the resistance and capacitance values.
2. **555 Timer Flasher Circuit**: The 555 timer IC can be configured in astable mode to produce a continuous square wave output, which can be used to drive a lamp. In this configuration, two resistors and a capacitor determine the timing intervals for the flashing. The output frequency can be finely tuned by adjusting these components, making this circuit versatile for different flashing rates. The 555 timer can handle higher currents, allowing for the use of larger lamps without additional transistors.
3. **Microcontroller-Based Flasher Circuit**: A microcontroller can be programmed to control the flashing of a lamp with precision. This circuit typically includes a microcontroller, a relay or transistor for switching the lamp, and additional components for power regulation. The microcontroller can be programmed to create complex flashing patterns, adjust brightness levels, or respond to external inputs, such as sensors or user controls. This approach offers the most flexibility and can be tailored for specific applications, such as decorative lighting or warning signals.
Each of these circuits can be implemented on a breadboard for prototyping or designed onto a printed circuit board (PCB) for more permanent applications. Proper consideration of power ratings, heat dissipation, and component specifications is essential to ensure reliable operation in the intended environment.If you want one small lamp that flashing for general to use. I have many ways, But today you see this three of the lamp flasher circuits. Which it has.. 🔗 External reference
Related Circuits
The circuit described is a simple sound level meter, also known as a VU meter, which helps monitor sound levels to prevent hearing loss caused by loud music. It is a passive type of meter, requiring no separate power...

This cat and dog repeller circuit is designed to deter animals from specific areas. The circuit utilizes ultrasonic sound, which is known to provoke a strong response in many animals, particularly cats. The design features an astable multivibrator configuration...
The circuit for the power amplifier has a power output of up to 1500W RMS and is commonly utilized in outdoor sound systems. The final image displays a series of power amplifiers that utilize 10 sets of power transistors....
The LM1036 is a DC-controlled circuit designed for tone adjustment (bass/treble), volume control, and balance. It is suitable for use in car radios, televisions, and audio systems. The circuit also incorporates loudness compensation. The LM1036 integrates several functionalities essential for...
A modulated current is supplied by the integrated rotational speed sensor KMI 15/x. This current signal needs to be converted into a ground-referenced voltage signal. The KMI 15/x sensor operates by generating a modulated current proportional to the rotational speed of...
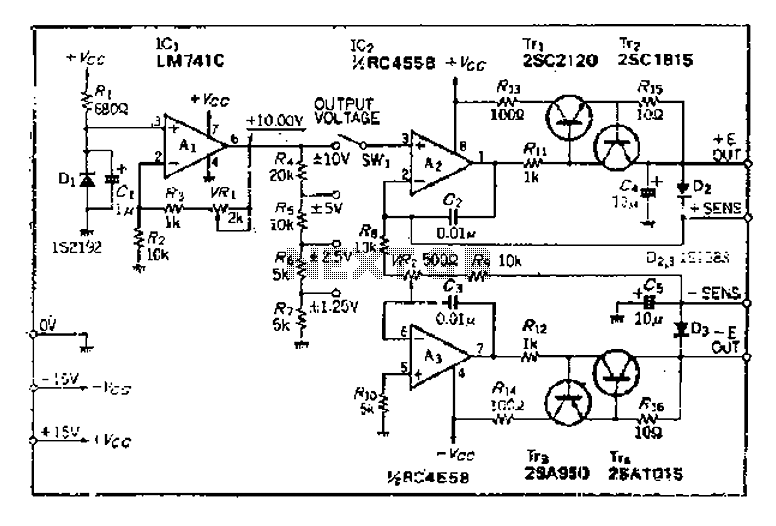
The maximum input voltage is 10V. An operational amplifier (op-amp) is used to provide a reference voltage of 10V, with its stability primarily determined by the characteristics of a temperature-compensated Zener diode (IS2192). The Zener voltage (Vz) can be...
Warning: include(partials/cookie-banner.php): Failed to open stream: Permission denied in /var/www/html/nextgr/view-circuit.php on line 713
Warning: include(): Failed opening 'partials/cookie-banner.php' for inclusion (include_path='.:/usr/share/php') in /var/www/html/nextgr/view-circuit.php on line 713