
Arduino GoPro Hero2 Control
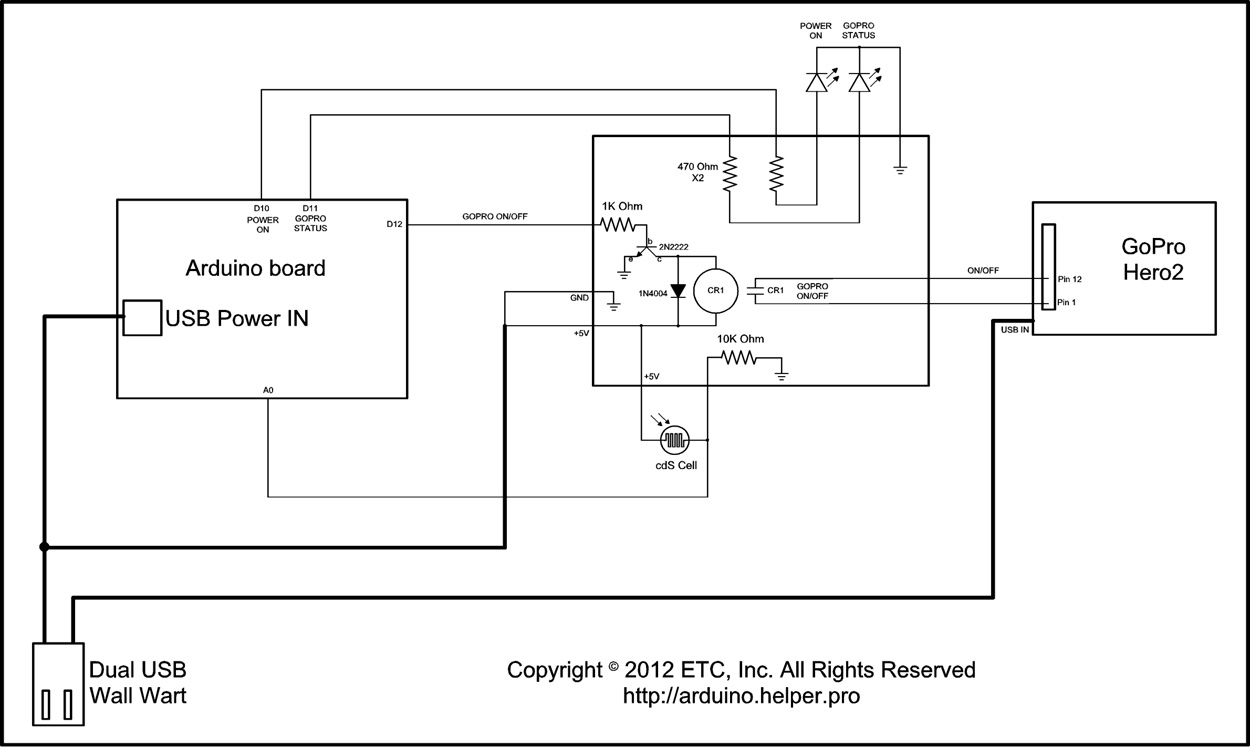
To ensure continuous operation, a dual USB wall charger is utilized to power both the Arduino and the GoPro, eliminating concerns regarding battery life. While the Arduino can operate on a battery pack for an extended period, the GoPro, especially when using an EyeFi SD card, tends to deplete its battery quickly. An alternative would be to use a standard SD card to extend battery life, as a 32 GB SD card can store a substantial number of 11 MP images.
To avoid the inconvenience of removing the SD card when it fills up, an Eye-Fi SD card is used, which wirelessly transfers images to a nearby computer. The project also aims to enable remote activation of the camera, allowing it to take a picture and then power down until the next capture. During the 20-minute intervals, the Arduino remains powered while the GoPro stays off, except when capturing images or transferring them to the PC. Since both devices are connected to USB power sources, power consumption is not a concern. The primary requirement is to establish a method for the Arduino to switch the GoPro on and off, along with a connector to access the GoPro bus located on the back of the camera.
The proposed electronic schematic for this project consists of several key components: the GoPro Hero2 camera, an Arduino microcontroller, a dual USB power supply, and an Eye-Fi SD card. The Arduino will be programmed to control the power state of the GoPro using a relay module or a transistor switch, which will be connected to the camera's power input.
The relay or transistor switch will be activated by the Arduino's digital output pin, allowing it to turn the GoPro on for a brief period to capture an image and then turn it off again. The Arduino will also manage the timing of these actions using its internal clock to ensure the camera captures images at the desired 20-minute intervals.
The Eye-Fi SD card will facilitate the wireless transfer of images to a designated computer, ensuring that the GoPro's storage does not fill up during the extended project duration. The connection for the GoPro bus will be achieved through a compatible connector, which will allow the Arduino to interface with the camera for any additional control features if necessary.
Overall, this electronic schematic will provide a robust solution for capturing time-lapse photography over an extended period while maintaining ease of use and minimizing manual intervention.I wanted to do some time lapse photography where the camera would take 1 capture every 20 minutes or so of a race car chassis fabrication project. After looking around on the web, I decided the GoPro Hero2 would work. The GoPro has a built-in time lapse feature but it can’t handle long intervals between pics.
I learned that the camera has a one button mode that allows it to snap off a capture as soon as you turn it on. My project will take place over a period of weeks, so running it all off the internal battery of the GoPro was not an option.
The GoPro has a USB port on the side for charging.
I got a dual USB wall wart to power both the Arduino and the GoPro and will leave them plugged in, so I don’t need to worry about battery capacity. The Arduino likely would run a long time on a battery pack but I have found that the GoPro with the EyeFi SD card I will use seems to go through a fully charged battery pretty quickly.
If I didn’t mind downloading the pics manually before the memory card got full, I could use a standard SD card instead of the EyeFi card and probably run the whole thing on a battery. A 32 GB SD card would hold a fair amount of 11 MP shots.
I also didn’t want to have to remove the SD card from the GoPro when it got full, so I got an Eye-Fi SD card that automatically transfers the images from the GoPro to a nearby computer that is on a wireless network.
I realized that if I could turn the camera on remotely, it would take one picture, then I could turn it off until the next time I needed a picture.
With a 20 minute interval between pictures, the Arduino would be running the whole time, but the GoPro would be totally off except for when it was taking the picture or transferring it to the PC. Since both the Arduino and the GoPro are plugged into USB power sources, power consumption was not a consideration for my application.
All I needed was a way to turn the camera on and off with the Arduino, and a connector to access the GoPro bus on the back of the camera.
Related Circuits

The oscillator is designed to tune from 1.8 GHz to 2 GHz for typical cellular telephony applications. An extended tuning range can be obtained by adjusting the ratio between the varactor capacitance and fixed capacitance in the tank. PMOSFETs...
The YN-460 is an affordable manual-only shoe mount flash produced by the Chinese company Yongnuo. It has gained popularity within the strobist community primarily due to its low price and satisfactory performance. To adjust the flash power level, users...
The project utilizes a 10 x 20 grid of RGB LEDs controlled by the myRIO. It is operated through a web interface on any device that supports WebSockets. Originally, the system was built using an Arduino, but the creator...
Controlling a door lock through a personal cell phone has become remarkably straightforward. This project outlines the construction of a simple electronic circuit that transforms a conventional door lock into a high-security lock, which can now be operated via...
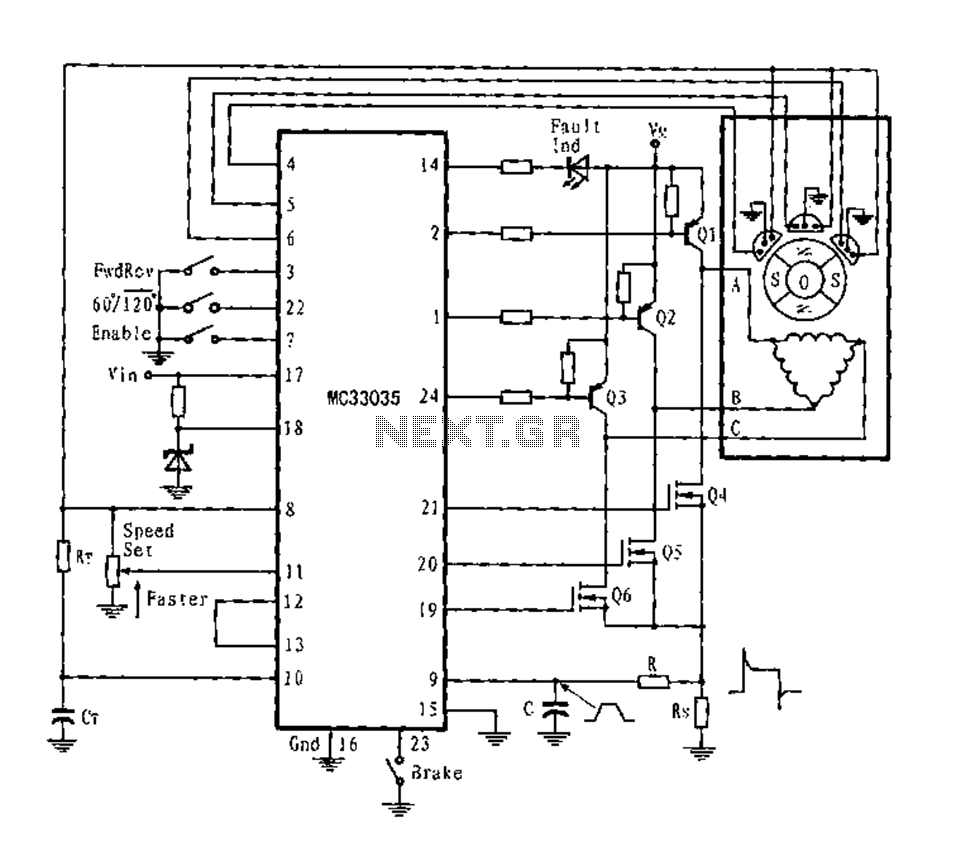
The application circuit is a three-phase full-wave six-step driving circuit for an open-loop motor controller. It features a power switching transistor of the Darlington type, specifically PNP, while the lower power switching transistors are N-channel power MOSFETs. Each device...
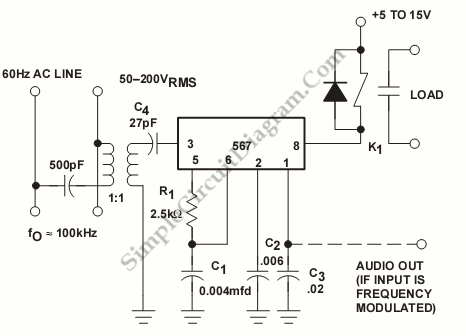
The 567 IC tone decoder/detector can be utilized to construct a remote control or intercom system. This circuit is capable of controlling a relay or transmitting an audio signal. The 567 IC is a versatile component often employed in tone...
Warning: include(partials/cookie-banner.php): Failed to open stream: Permission denied in /var/www/html/nextgr/view-circuit.php on line 713
Warning: include(): Failed opening 'partials/cookie-banner.php' for inclusion (include_path='.:/usr/share/php') in /var/www/html/nextgr/view-circuit.php on line 713